在之前这篇博客中利用Numba中最简单的@jit方法进行了加速,但其实这样其实并没有使用到GPU或者说CUDA,只是用CPU进行了加速。这篇博客主要以如何利用Numba实现GPU加速为重点,改写降采样代码。
1.代码实现
其实GPU编程入门并不是很难,核心就是“并行的思考问题”。之后如果有时间,会专门写一篇Numba CUDA加速的学习笔记。对于代码主要改动还是在线程层次的设计上。首先根据指定的降采大小新建新的影像,然后对新的影像的每个像素对应一个线程。而对于降采函数,依据行列的对应关系,指定赋值即可。
# coding=utf-8
from numba import cuda
import numpy as np
import cv2
import time
import math


@cuda.jit
def downSampleGPU(inImg, downSize, outImg):
    tx = cuda.threadIdx.x
    ty = cuda.threadIdx.y
    bx = cuda.blockIdx.x
    by = cuda.blockIdx.y
    bw = cuda.blockDim.x
    bh = cuda.blockDim.y

    x = bx * bw + tx
    y = by * bh + ty

    if x < inImg.shape[0] and y < inImg.shape[1]:
        if x / downSize < outImg.shape[0] and y / downSize < outImg.shape[1]:
            outImg[x / downSize, y / downSize] = inImg[x, y]


if __name__ == '__main__':

    img = cv2.imread("test.tif", cv2.IMREAD_GRAYSCALE)

    down_sample = 2
    height = img.shape[0]
    width = img.shape[1]

    new_height = height / down_sample
    new_width = width / down_sample

    img_new = np.zeros([new_height, new_width], img.dtype)

    THREAD_SIZE = 32

    threadsperblock = (THREAD_SIZE, THREAD_SIZE)
    blockspergrid = (int(math.ceil(img.shape[0] * 1.0 / THREAD_SIZE)),
                     int(math.ceil(img.shape[1] * 1.0 / THREAD_SIZE)))

    print 'matrix size:', img.shape
    print 'thread per block:', threadsperblock
    print 'block per grid:', blockspergrid

    for i in range(100):
        t1 = time.time()
        downSampleGPU[blockspergrid, threadsperblock](img, down_sample, img_new)
        t2 = time.time()
        print t2 - t1
    # cv2.imwrite("res.jpg", img_new)
完整代码和测试数据见Github项目。
2.测试对比
分别统计CPU和GPU加速后的耗时,共执行100次,统计结果如下。
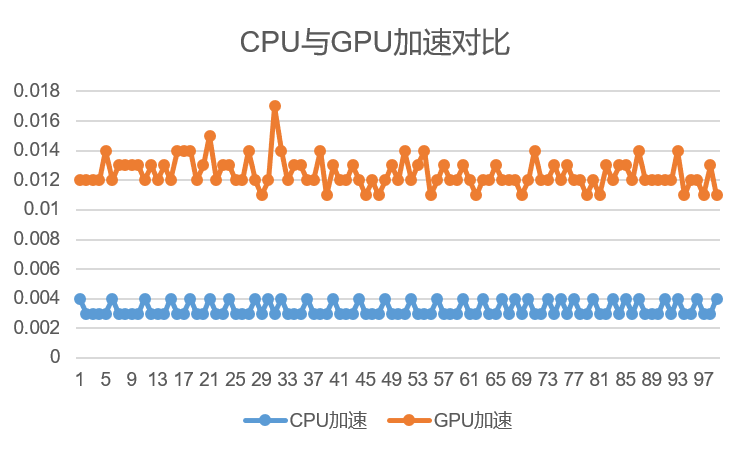 你会惊奇的发现相比于CPU加速版本,CUDA加速版本反而变慢了。这里的原因在于设计和考虑的因素较少,输入的数据量太小。GPU适合大规模并行计算,而如果数据较小,会导致GPU调度的时间多于提升减少的时间,导致变慢。此外,计算太简单也是一个因素。还有从host到device的数据拷贝时间也是需要考虑和优化的。不同的数据类型对于GPU的计算效率也会有影响。
本文作者原创,未经许可不得转载,谢谢配合