在之前的博客中,我们介绍了利用汽车和无人机进行数据采集。但说到现在,采集的都只是视觉数据(无论是单目还是双目),没有IMU、LiDAR等数据。但事实上AirSim是支持这些传感器的。所以,这篇博客就着重探索一下AirSim中的多模态数据采集。
1.默认开启的传感器
我们首先看一下官方文档中声明的支持的传感器,如下。
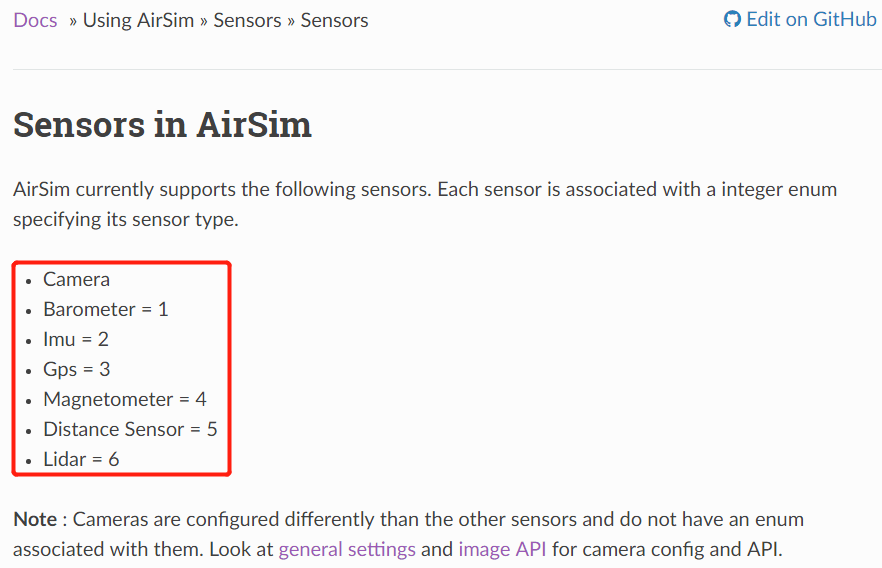 可以看到支持普通的相机、气压计、IMU、GPS、磁力计、距离传感器以及LiDAR,基本涵盖了我们能涉及到的所有方面。这里也提到,相机和其它传感器有不太相同,有自己的API。同时针对不同的平台,默认开启的传感器种类也是不同的,如下:
- Multirotor:IMU、磁力计、GPS、气压计
- Car:GPS
- ComputerVision:None
当然,这里需要注意的是,这上面列出的只是AirSim默认打开的,并不代表只支持指定的传感器。比如Car默认只开启了GPS,并不代表它不能加载相机传感器。
2.如何开启传感器
在进一步介绍之前,先回到settings.json文件中来。在前面,我们除了指定SimMode来控制不同的采集平台外,其实我们并没有对平台进行什么“定制化”。
2.1 通用模板
下面就介绍一个比较标准的模板。事实上,我们可以通过Vehicles属性来自定义一个采集平台。一个简单的示例如下。
{
  "SeeDocsAt": "https://microsoft.github.io/AirSim/settings/",
  "SettingsVersion": 1.2,

  "SimMode": "Multirotor",

   "Vehicles": {
      "Drone1": {
          "VehicleType": "simpleflight",
          "AutoCreate": true,
          "Sensors": {
              "LidarSensor1": {
                  "SensorType": 6,
                  "Enabled" : true,
                  "NumberOfChannels": 16,
                  "RotationsPerSecond": 10,
                  "PointsPerSecond": 100000,
                  "X": 0, "Y": 0, "Z": -1,
                  "Roll": 0, "Pitch": 0, "Yaw" : 0,
                  "VerticalFOVUpper": -15,
                  "VerticalFOVLower": -25,
                  "HorizontalFOVStart": -20,
                  "HorizontalFOVEnd": 20,
                  "DrawDebugPoints": true,
                  "DataFrame": "SensorLocalFrame"
              },
              "LidarSensor2": {
                 "SensorType": 6,
                  "Enabled" : true,
                  "NumberOfChannels": 4,
                  "RotationsPerSecond": 10,
                  "PointsPerSecond": 10000,
                  "X": 0, "Y": 0, "Z": -1,
                  "Roll": 0, "Pitch": 0, "Yaw" : 0,
                  "VerticalFOVUpper": -15,
                  "VerticalFOVLower": -25,
                  "DrawDebugPoints": true,
                  "DataFrame": "SensorLocalFrame"
              }
          }
      }
  }
}
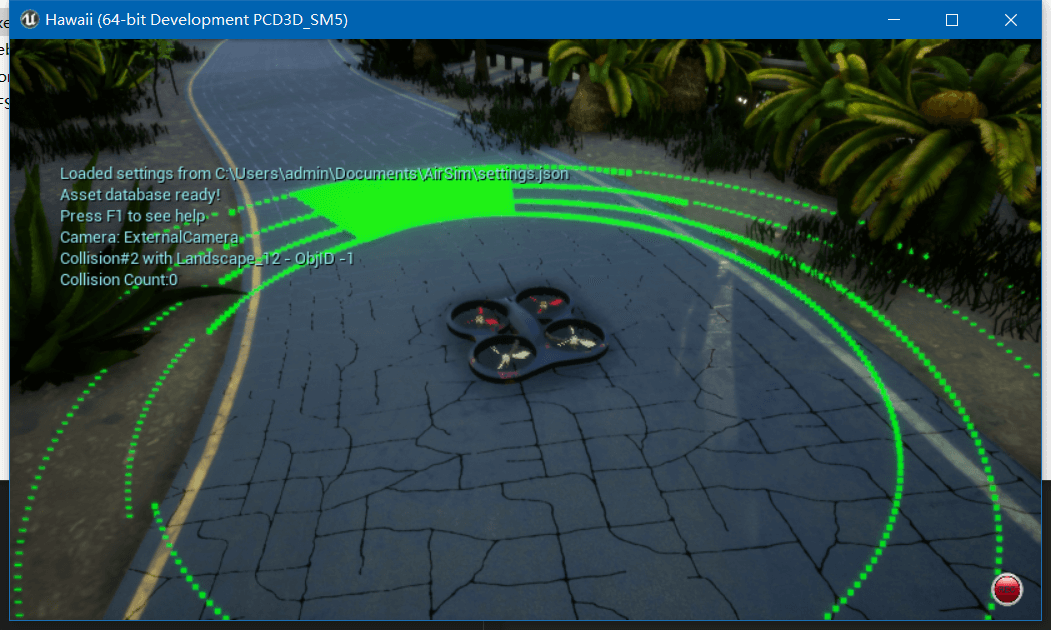
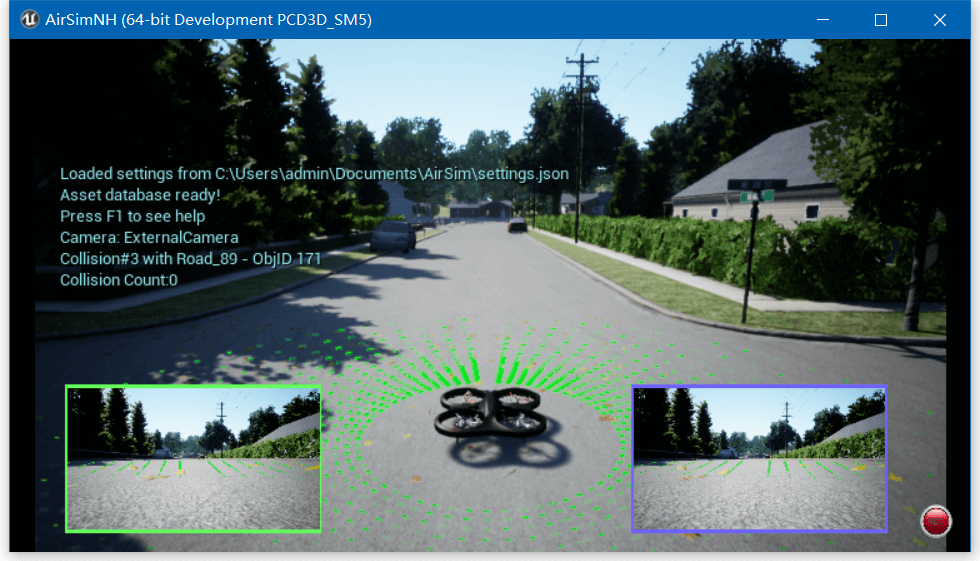
AirSim在启动时会寻找所有AutoCreate属性为true的平台并自动新建。如果配置文件里没有Vehicles属性,那么AirSim就会建一个默认的汽车(叫做PhysXCar)或者无人机(叫SimpleFlight)。对于每一个Vehicle而言,必须要有VehicleType属性,且为PhysXCar、SimpleFlight、PX4Multirotor、ComputerVision、ArduCopter、ArduRover之一。然后,对于每一个采集平台,我们可以通过Sensors属性来设置IMU、LiDAR、GPS等各种传感器。相关属性其实基本一看也就都能理解。可以看到,这里我们新建了一个叫Drone1的无人机平台,这个平台搭载了2个LiDAR传感器,运行之后,可视化效果如下所示。
 所以其实配置不同类型的传感器其实就是修改
Sensors属性。
此时还有一个问题,在配制好传感器以后,也可以仿真运行了,但是要怎么获取到观测数据呢?或者说怎么样进行录制呢?根据之前的博客,我们可以使用Recording属性来指定录制哪些影像数据。但IMU、LiDAR、GPS这种类型传感器的数据呢?通过查阅官方文档,非视觉模态的数据并不能通过Recording属性进行配置,然后按R键进行录制,而是要通过AirSim提供的API来访问和存储。关于更详细的API介绍,会在之后的笔记中说明,这里主要就针对获取数据的函数分别进行介绍。
2.2 IMU
配置IMU的settings.json文件如下。
{
  "SeeDocsAt": "https://microsoft.github.io/AirSim/settings/",
  "SettingsVersion": 1.2,

  "SimMode": "Multirotor",

   "Vehicles": {
      "Drone1": {
          "VehicleType": "simpleflight",
          "AutoCreate": true,
          "Sensors": {
                "Imu": {
                  "SensorType": 2,
                  "Enabled" : true,
                  "AngularRandomWalk": 0.3,
                  "GyroBiasStabilityTau": 500,
                  "GyroBiasStability": 4.6,
                  "VelocityRandomWalk": 0.24,
                  "AccelBiasStabilityTau": 800,
                  "AccelBiasStability": 36
              }
          }
      }
  }
}
这样就可以启动一个带IMU的无人机(当然默认就有相机)。如何获取IMU数据呢?我们可以通过AirSim提供的Python API实现,如下。
# coding=utf-8
import airsim
import time


def parseIMU(imu_data):
    angular_velocity = imu_data.angular_velocity
    linear_acceleration = imu_data.linear_acceleration
    orientation = imu_data.orientation
    time_stamp = imu_data.time_stamp

    # 参考EuRoC IMU数据格式
    data_item = [str(time_stamp),
                 str(angular_velocity.x_val),
                 str(angular_velocity.y_val),
                 str(angular_velocity.z_val),
                 str(linear_acceleration.x_val),
                 str(linear_acceleration.y_val),
                 str(linear_acceleration.z_val)]
    return data_item


if __name__ == '__main__':
    # 连接到AirSim模拟器
    client = airsim.MultirotorClient()
    client.confirmConnection()

    cur_time = time.strftime("%Y_%m_%d_%H_%M_%S", time.localtime())
    fout = open(cur_time + "_IMU.csv", "w")
    fout.write("# timestamp(ns)、"
               "gyro_x(rad/s)、gyro_y(rad/s)、gyro_z(rad/s)、"
               "accel_x(m/s^2)、accel_y(m/s^2)、accel_z(m/s^2)\n")

    print("Recording IMU data ...\nPress Ctrl + C to stop.")
    last_timestamp = 0
    # 循环读取数据
    while True:
        # 通过getImuData()函数即可获得IMU观测
        # 返回结果由角速度、线加速度、朝向(四元数表示)、时间戳(纳秒)构成
        imu_data = client.getImuData()
        cur_time_stamp = imu_data.time_stamp

        if cur_time_stamp != last_timestamp:
            data_item = parseIMU(imu_data)
            fout.write(data_item[0] + "," +
                       data_item[1] + "," +
                       data_item[2] + "," +
                       data_item[3] + "," +
                       data_item[4] + "," +
                       data_item[5] + "," +
                       data_item[6] + "\n")
            last_timestamp = cur_time_stamp

    fout.close()
代码同样放到了Github项目中,核心函数就是client.getImuData(),剩下的就是对IMU数据的解析了。
2.3 LiDAR
配置LiDAR的settings.json文件如下。
{
  "SeeDocsAt": "https://microsoft.github.io/AirSim/settings/",
  "SettingsVersion": 1.2,

  "SimMode": "Multirotor",

   "Vehicles": {
      "Drone1": {
          "VehicleType": "simpleflight",
          "AutoCreate": true,
          "Sensors": {
            "LidarSensor": {
              "SensorType": 6,
               "Enabled" : true,
               "NumberOfChannels": 4,
               "RotationsPerSecond": 10,
               "PointsPerSecond": 10000,
               "X": 0, "Y": 0, "Z": -1,
               "Roll": 0, "Pitch": 0, "Yaw" : 0,
               "VerticalFOVUpper": -15,
               "VerticalFOVLower": -25,
               "DrawDebugPoints": true,
               "DataFrame": "SensorLocalFrame"
           }
          }
      }
  }
}
事实上,LiDAR有很多的参数可以自定义,感兴趣可以参考这个文档。除了上面写出来的属性,还有Range等许多属性。
同理,类似的,我们也可以利用Python API读取LiDAR数据,官方文档中也有简单介绍,如下。
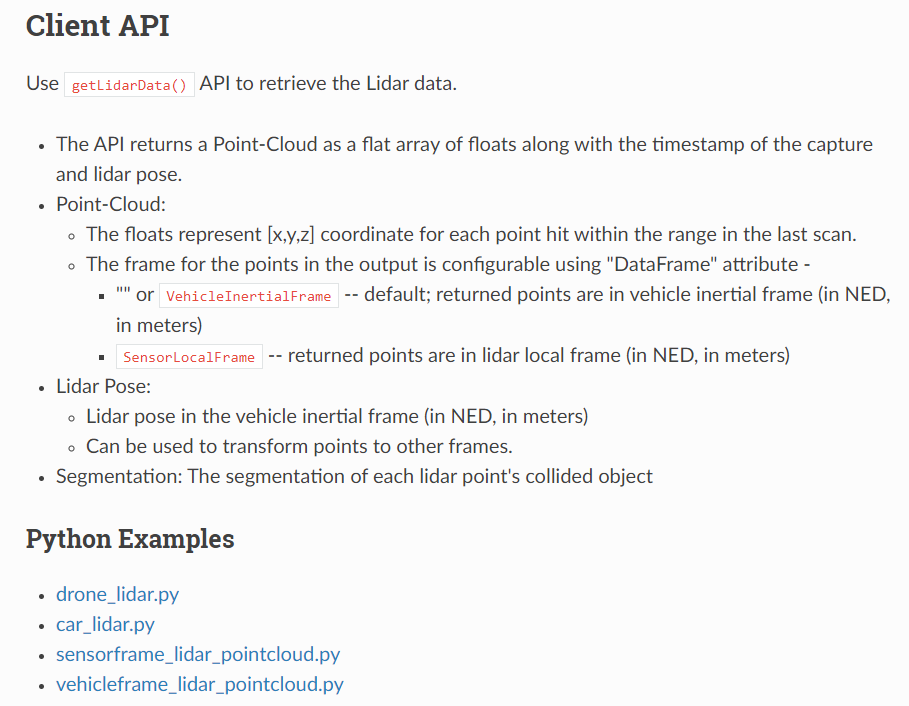 可以看到,AirSim输出的点云主要包括四个内容:点云、LiDAR位姿、点云分割结果、时间戳。点云有两种参考系,一种是相对于采集平台的,另一种是相对于LiDAR传感器本身的。我们更关注的自然是点云(包括LiDAR位姿)和时间戳,其它就可以暂时不管。所以,我们需要保存
pose、time_stamp、point_cloud。
# coding=utf-8
import airsim
import numpy as np

if __name__ == '__main__':
    # 连接到AirSim模拟器
    client = airsim.MultirotorClient()
    client.confirmConnection()

    print("Recording LiDAR data ...\nPress Ctrl + C to stop.")
    last_timestamp = 0
    # 循环读取数据
    while True:
        lidar_data = client.getLidarData()
        cur_time_stamp = lidar_data.time_stamp

        if cur_time_stamp != last_timestamp:
            np.save(str(lidar_data.time_stamp) + "_pose", lidar_data.pose)
            np.save(str(lidar_data.time_stamp) + "_pointcloud", lidar_data.point_cloud)
            last_timestamp = cur_time_stamp
保存的点云是一个一维数组,每三个数字为一组,表示一个点的x、y、z坐标。我们可以简单再写个脚本对数据进行解析并可视化,如下。
# coding=utf-8
import numpy as np
import sys
from matplotlib import pyplot as plt


def parsePointcloud(point_array):
    x_points = []
    y_points = []
    z_points = []

    for i in range(0, point_array.shape[0], 3):
        x_points.append(point_array[i])
        y_points.append(point_array[i + 1])
        z_points.append(point_array[i + 2])
    return x_points, y_points, z_points


if __name__ == '__main__':
    file_path = sys.argv[1]
    pointcloud = np.load(file_path)
    x_points, y_points, z_points = parsePointcloud(pointcloud)
    plt.figure(figsize=(8, 6))
    ax = plt.axes(projection='3d')
    ax.scatter3D(x_points, y_points, z_points)
    plt.show()
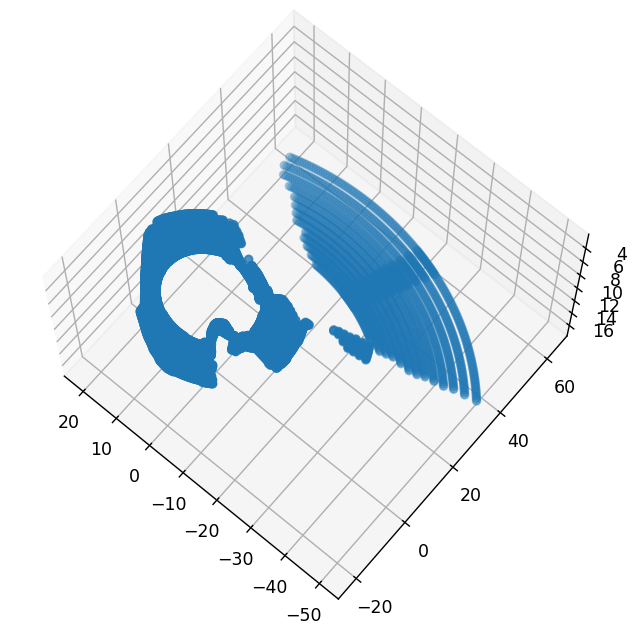
采集的某帧场景如下。
 对应的解析出来的点云数据如下。
 上述代码同样放到了Github项目中。在这个网页中也对AirSim中LiDAR的相关内容进行了介绍,感兴趣可以扩展阅读。
2.4 距离传感器
一个简单的距离传感器配置如下。
{
  "SeeDocsAt": "https://microsoft.github.io/AirSim/settings/",
  "SettingsVersion": 1.2,

  "SimMode": "Multirotor",

   "Vehicles": {
      "Drone1": {
          "VehicleType": "simpleflight",
          "AutoCreate": true,
          "Sensors": {
            "Distance": {
              "SensorType": 5,
              "Enabled" : true,
              "MinDistance": 0.2,
              "MaxDistance": 40,
              "X": 0, "Y": 0, "Z": -1,
              "Yaw": 0, "Pitch": 0, "Roll": 0,
              "DrawDebugPoints": false
          }
          }
      }
  }
}
类似的,通过Python API访问与保存距离数据,如下。
# coding=utf-8
import airsim
import time

if __name__ == '__main__':
    # 连接到AirSim模拟器
    client = airsim.MultirotorClient()
    client.confirmConnection()

    cur_time = time.strftime("%Y_%m_%d_%H_%M_%S", time.localtime())
    fout = open(cur_time + "_Depth.csv", "w")
    fout.write("# timestamp(ns)、Distance(m)\n")

    print("Recording Distance data ...\nPress Ctrl + C to stop.")
    last_timestamp = 0
    # 循环读取数据
    while True:
        dist_data = client.getDistanceSensorData()
        cur_time_stamp = dist_data.time_stamp

        if cur_time_stamp != last_timestamp:
            fout.write(str(dist_data.time_stamp) + "," +
                       str(dist_data.distance) + "\n")
            last_timestamp = cur_time_stamp

    fout.close()
2.5 GPS
配置文件如下。
{
  "SeeDocsAt": "https://microsoft.github.io/AirSim/settings/",
  "SettingsVersion": 1.2,

  "SimMode": "Multirotor",

   "Vehicles": {
      "Drone1": {
          "VehicleType": "simpleflight",
          "AutoCreate": true,
          "Sensors": {
            "Gps": {
              "SensorType": 3,
              "Enabled" : true,
              "EphTimeConstant": 0.9,
              "EpvTimeConstant": 0.9,
              "EphInitial": 25,
              "EpvInitial": 25,
              "EphFinal": 0.1,
              "EpvFinal": 0.1,
              "EphMin3d": 3,
              "EphMin2d": 4,
              "UpdateLatency": 0.2,
              "UpdateFrequency": 50,
              "StartupDelay": 1
          }
          }
      }
  }
}
GPS数据包括GNSS参数、地理坐标、UTC时间、速度以及时间戳构成。通过Python API访问GPS数据的代码如下。
# coding=utf-8
import airsim
import time

if __name__ == '__main__':
    # 连接到AirSim模拟器
    client = airsim.MultirotorClient()
    client.confirmConnection()

    cur_time = time.strftime("%Y_%m_%d_%H_%M_%S", time.localtime())
    fout = open(cur_time + "_GPS.csv", "w")
    fout.write("# timestamp(ns),"
               "Latitude(deg),Longitude(deg),Altitude(m),"
               "Vel_x(m/s),Vel_y(m/s),Vel_z(m/s),"
               "UTCTime(sec),"
               "Status,eph,epv,fix_type"
               "\n")

    print("Recording Distance data ...\nPress Ctrl + C to stop.")
    last_timestamp = 0
    # 循环读取数据
    while True:
        gps_data = client.getGpsData()
        cur_time_stamp = gps_data.time_stamp

        if cur_time_stamp != last_timestamp:
            eph = gps_data.gnss.eph
            epv = gps_data.gnss.epv
            fix_type = gps_data.gnss.fix_type
            time_utc = gps_data.gnss.time_utc
            pos_latitude = gps_data.gnss.geo_point.latitude
            pos_longitude = gps_data.gnss.geo_point.longitude
            pos_altitude = gps_data.gnss.geo_point.altitude
            vel_x = gps_data.gnss.velocity.x_val
            vel_y = gps_data.gnss.velocity.y_val
            vel_z = gps_data.gnss.velocity.z_val
            status = gps_data.is_valid

            fout.write(str(cur_time_stamp) + "," +
                       str(pos_latitude) + "," +
                       str(pos_longitude) + "," +
                       str(pos_altitude) + "," +
                       str(vel_x) + "," +
                       str(vel_y) + "," +
                       str(vel_z) + "," +
                       str(time_utc) + "," +
                       str(status) + "," +
                       str(eph) + "," +
                       str(epv) + "," +
                       str(fix_type) + "\n")
            last_timestamp = cur_time_stamp

    fout.close()
2.6 其它
其它还有气压计和磁力计,配置文件如下。
{
  "SeeDocsAt": "https://microsoft.github.io/AirSim/settings/",
  "SettingsVersion": 1.2,

  "SimMode": "Multirotor",

   "Vehicles": {
      "Drone1": {
          "VehicleType": "simpleflight",
          "AutoCreate": true,
          "Sensors": {
            "Barometer": {
              "SensorType": 1,
              "Enabled" : true,
              "PressureFactorSigma": 0.001825,
              "PressureFactorTau": 3600,
              "UncorrelatedNoiseSigma": 2.7,
              "UpdateLatency": 0,
              "UpdateFrequency": 50,
              "StartupDelay": 0
          },
          "Magnetometer": {
              "SensorType": 4,
              "Enabled" : true,
              "NoiseSigma": 0.005,
              "ScaleFactor": 1,
              "NoiseBias": 0,
              "UpdateLatency": 0,
              "UpdateFrequency": 50,
              "StartupDelay": 0
          }
          }
      }
  }
}
可以通过client.getBarometerData()和client.getMagnetometerData()进行访问。由于和上面是类似的,这里就不多介绍了。
3.多传感器、多模态数据采集
有了上面的基础,我们再讨论多传感器、多模态数据采集就容易多了。这里我们依然把视觉传感器和其它传感器分开讨论。首先,对于视觉传感器,在这篇博客中我们已经介绍过了双目数据的采集。而对于其它模态的数据其核心步骤是类似的。我们首先需要在settings.json文件中配置传感器。然后对于视觉采用AirSim默认的录制方式,对于非视觉数据,利用上面的脚本实现录制。下面我们就以SLAM中比较常见的传感器数据组合为例进行介绍。
3.1 双目+IMU
配置文件如下。
{
  "SeeDocsAt": "https://microsoft.github.io/AirSim/settings/",
  "SettingsVersion": 1.2,

  "SimMode": "Car",

   "Vehicles": {
      "OurCar": {
          "VehicleType": "PhysXCar",
          "AutoCreate": true,
          "Sensors": {
            "Imu": {
              "SensorType": 2,
              "Enabled" : true,
              "AngularRandomWalk": 0.3,
              "GyroBiasStabilityTau": 500,
              "GyroBiasStability": 4.6,
              "VelocityRandomWalk": 0.24,
              "AccelBiasStabilityTau": 800,
              "AccelBiasStability": 36
            }
          }
      }
    },
    "Recording": {
      "RecordInterval": 0.05,
      "Cameras": [
          { "CameraName": "front_left", "ImageType": 0, "PixelsAsFloat": false, "Compress": true },
          { "CameraName": "front_right", "ImageType": 0, "PixelsAsFloat": false, "Compress": true }
      ]
    },
    "CameraDefaults": {
      "CaptureSettings": [
        {
          "ImageType": 0,
          "Width": 752,
          "Height": 480,
          "FOV_Degrees": 90
        }
      ]
    }
}
然后我们启动AirSim,按R键开始视觉数据的录制,再运行Github项目中的getIMUData.py脚本实现对IMU数据的录制。录制完成后,AirSim自动生成的视觉数据时间戳和IMU数据时间戳对比如下图所示。
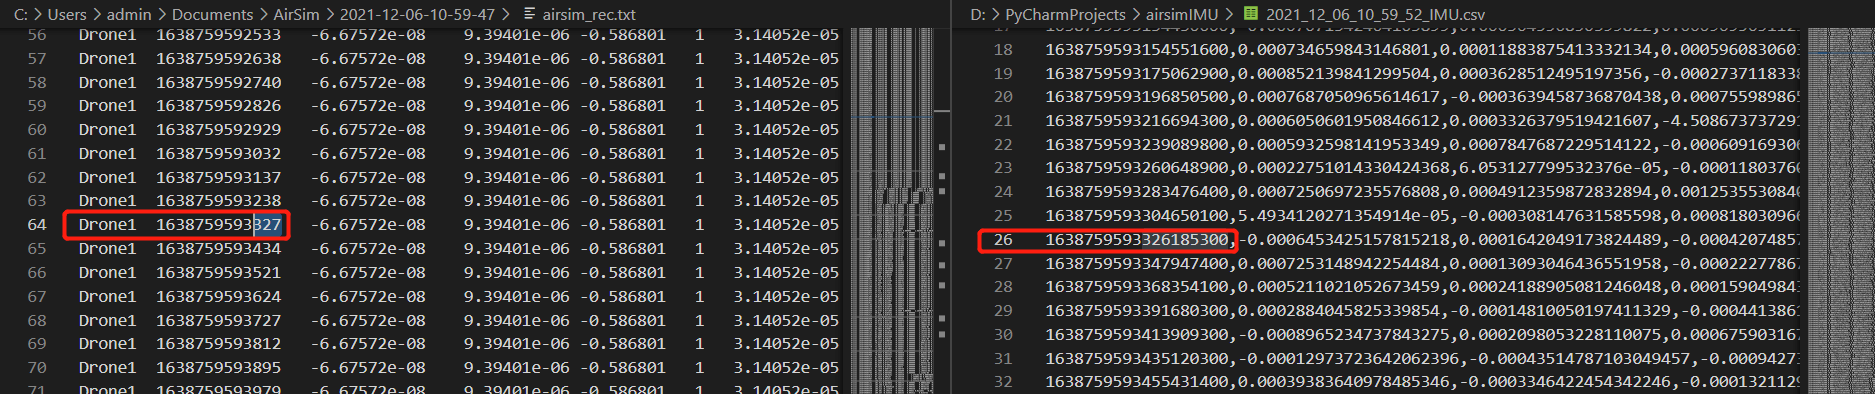 这里需要注意的是,自动生成的
airsim_rec.txt时间戳单位是毫秒,而我们保存的时间戳单位是纳秒。
3.2 IMU+LiDAR
参考前面的介绍,配置文件如下。
{
  "SeeDocsAt": "https://microsoft.github.io/AirSim/settings/",
  "SettingsVersion": 1.2,

  "SimMode": "Multirotor",

   "Vehicles": {
      "Drone1": {
          "VehicleType": "simpleflight",
          "AutoCreate": true,
          "Sensors": {
                "Imu": {
                  "SensorType": 2,
                  "Enabled" : true,
                  "AngularRandomWalk": 0.3,
                  "GyroBiasStabilityTau": 500,
                  "GyroBiasStability": 4.6,
                  "VelocityRandomWalk": 0.24,
                  "AccelBiasStabilityTau": 800,
                  "AccelBiasStability": 36
              },
              "LidarSensor": {
                "SensorType": 6,
                 "Enabled" : true,
                 "NumberOfChannels": 4,
                 "RotationsPerSecond": 10,
                 "PointsPerSecond": 10000,
                 "X": 0, "Y": 0, "Z": -1,
                 "Roll": 0, "Pitch": 0, "Yaw" : 0,
                 "VerticalFOVUpper": -15,
                 "VerticalFOVLower": -25,
                 "DrawDebugPoints": true,
                 "DataFrame": "SensorLocalFrame"
             }
          }
      }
  }
}
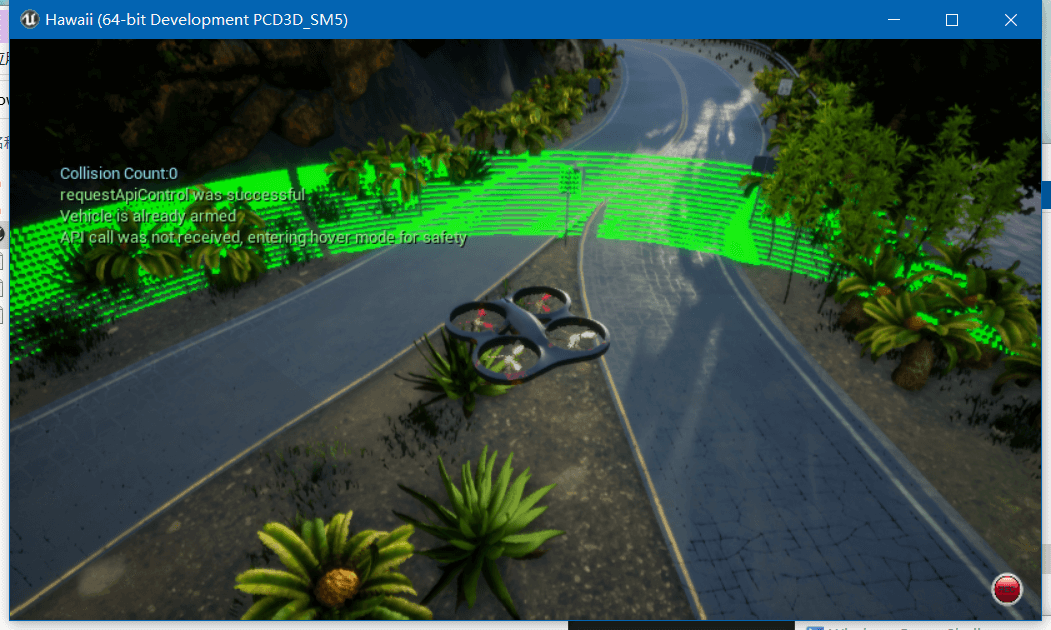
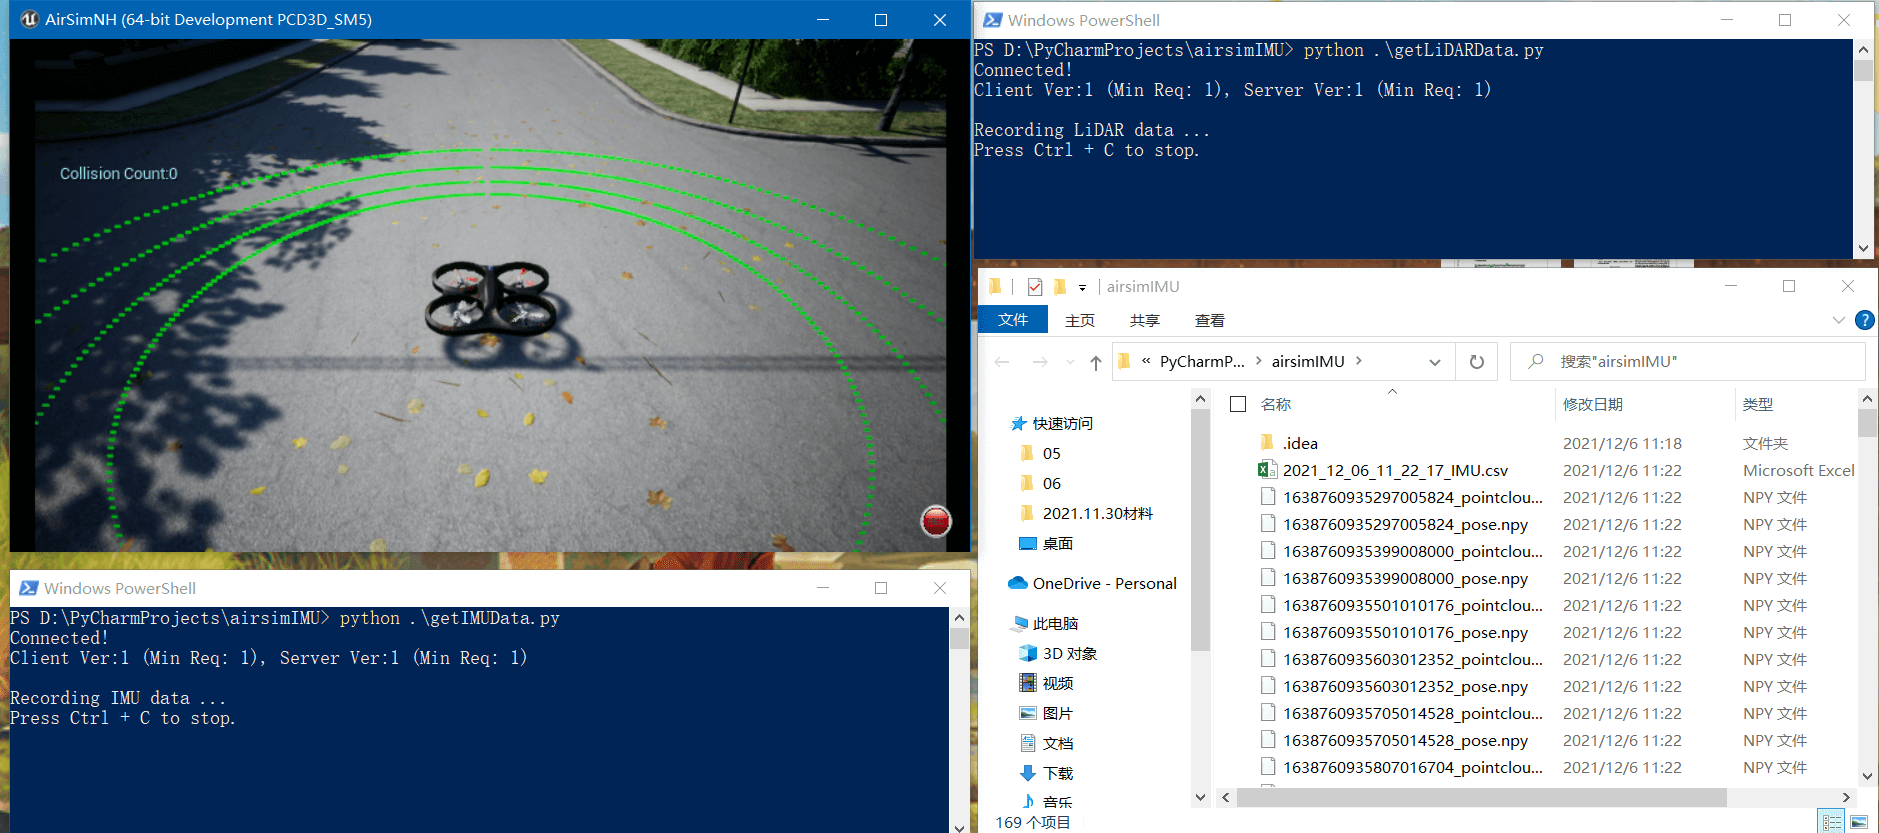
启动AirSim之后,可以分别运行getIMUData.py和getLiDARData.py进行数据录制,录制界面如下所示。
 之后如果有需要,对录制好的数据进行进一步处理,就可以跑SLAM了。
3.3 双目+IMU+LiDAR
其实类似于搭积木,配置好传感器,如下所示。
{
  "SeeDocsAt": "https://microsoft.github.io/AirSim/settings/",
  "SettingsVersion": 1.2,

  "SimMode": "Car",

   "Vehicles": {
      "OurCar": {
          "VehicleType": "PhysXCar",
          "AutoCreate": true,
          "Sensors": {
                "Imu": {
                  "SensorType": 2,
                  "Enabled" : true,
                  "AngularRandomWalk": 0.3,
                  "GyroBiasStabilityTau": 500,
                  "GyroBiasStability": 4.6,
                  "VelocityRandomWalk": 0.24,
                  "AccelBiasStabilityTau": 800,
                  "AccelBiasStability": 36
              },
              "LidarSensor": {
                "SensorType": 6,
                 "Enabled" : true,
                 "NumberOfChannels": 4,
                 "RotationsPerSecond": 10,
                 "PointsPerSecond": 10000,
                 "X": 0, "Y": 0, "Z": -1,
                 "Roll": 0, "Pitch": 0, "Yaw" : 0,
                 "VerticalFOVUpper": -15,
                 "VerticalFOVLower": -25,
                 "DrawDebugPoints": true,
                 "DataFrame": "SensorLocalFrame"
             }
          }
      }
    },
    "Recording": {
      "RecordInterval": 0.05,
      "Cameras": [
          { "CameraName": "front_left", "ImageType": 0, "PixelsAsFloat": false, "Compress": true },
          { "CameraName": "front_right", "ImageType": 0, "PixelsAsFloat": false, "Compress": true }
      ]
    },
    "CameraDefaults": {
      "CaptureSettings": [
        {
          "ImageType": 0,
          "Width": 752,
          "Height": 480,
          "FOV_Degrees": 90
        }
      ]
    }
}
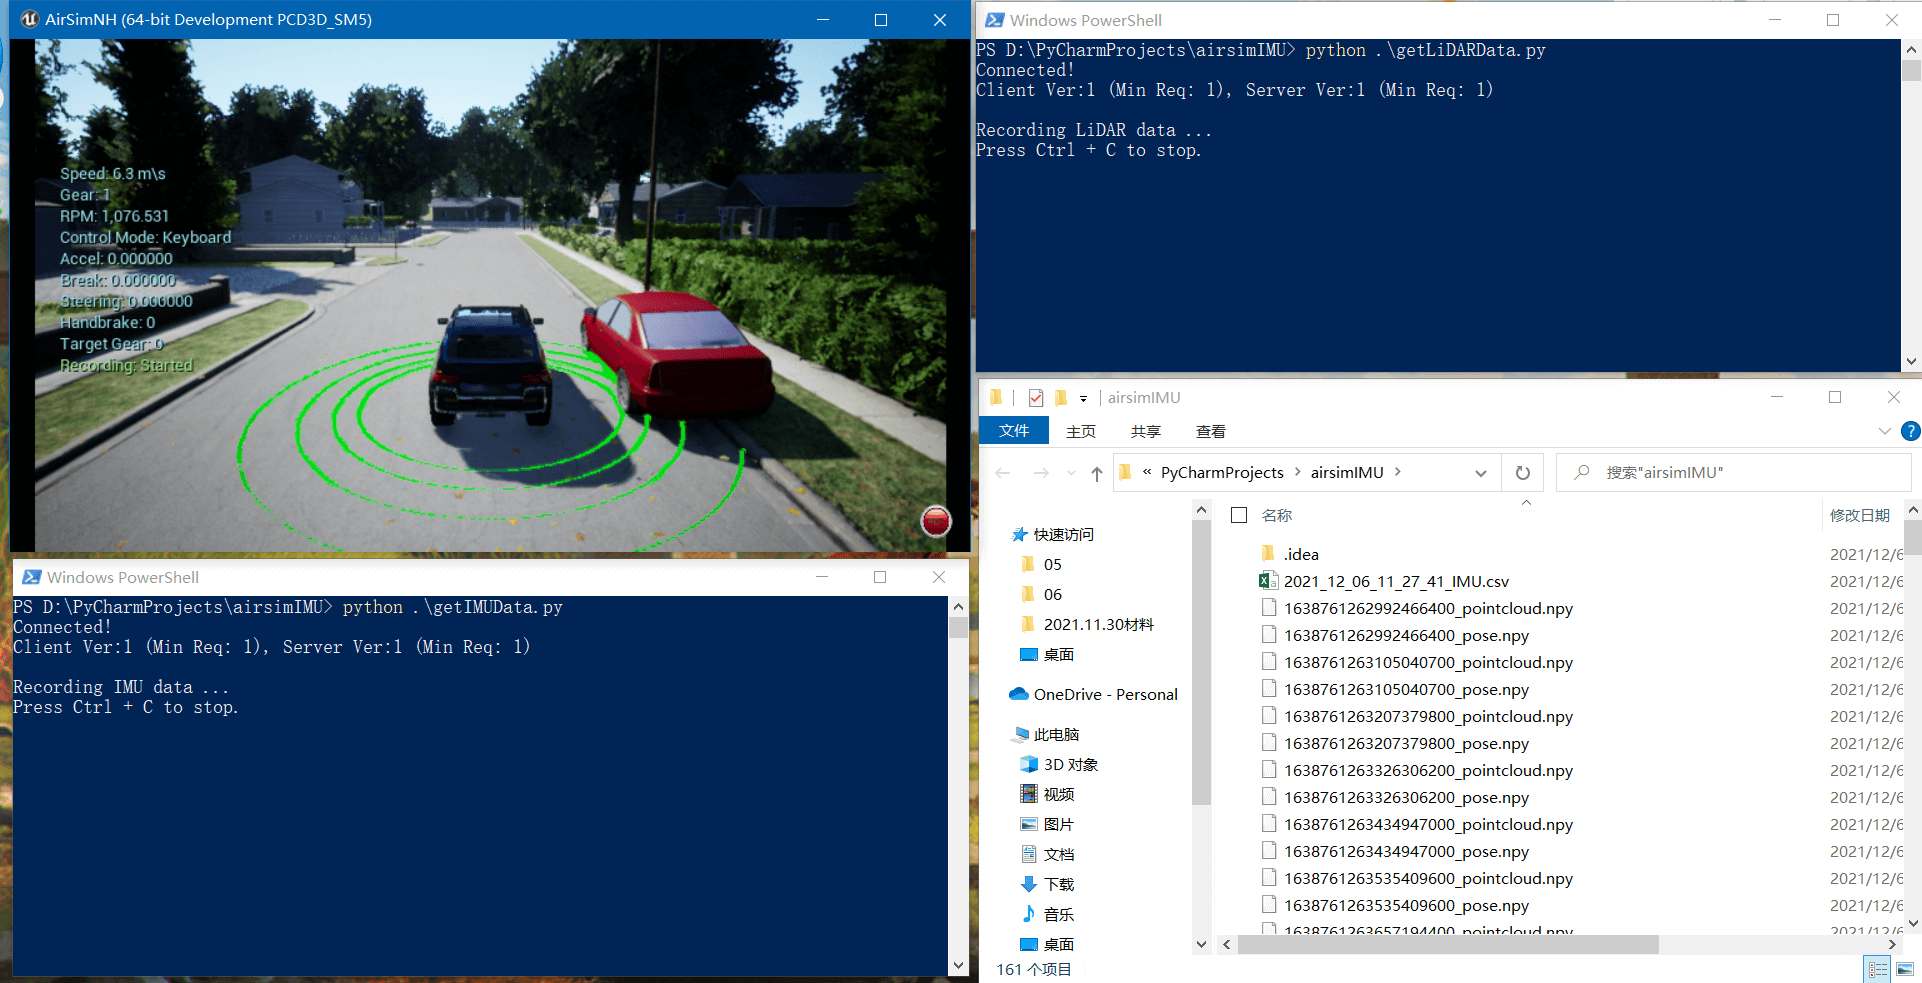
这样我们在启动AirSim以后,按R键进行视觉数据的录制,再分别启动getIMUData.py和getLiDARData.py进行IMU和LiDAR数据录制,如下。
3.4 官方示例
AirSim官方也提供了一些示例脚本,比如这个(车载LiDAR数据录制)、这个(无人机各类传感器数据读取),以及这个配置文件实现了单个无人机上的多相机配置,如下所示。
 这个配置文件配置了两个无人机,每个无人机上都搭载了相机、IMU和LiDAR,如下所示。
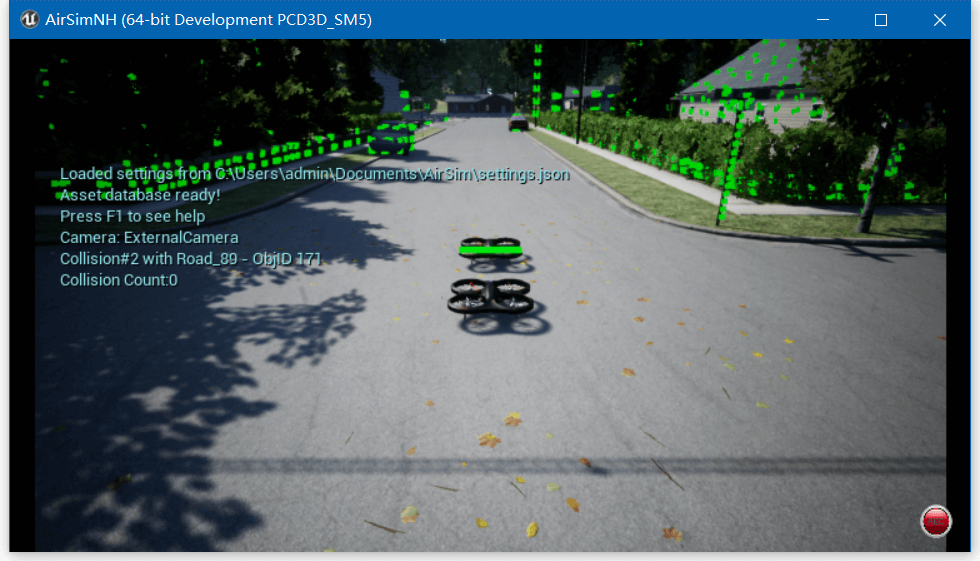
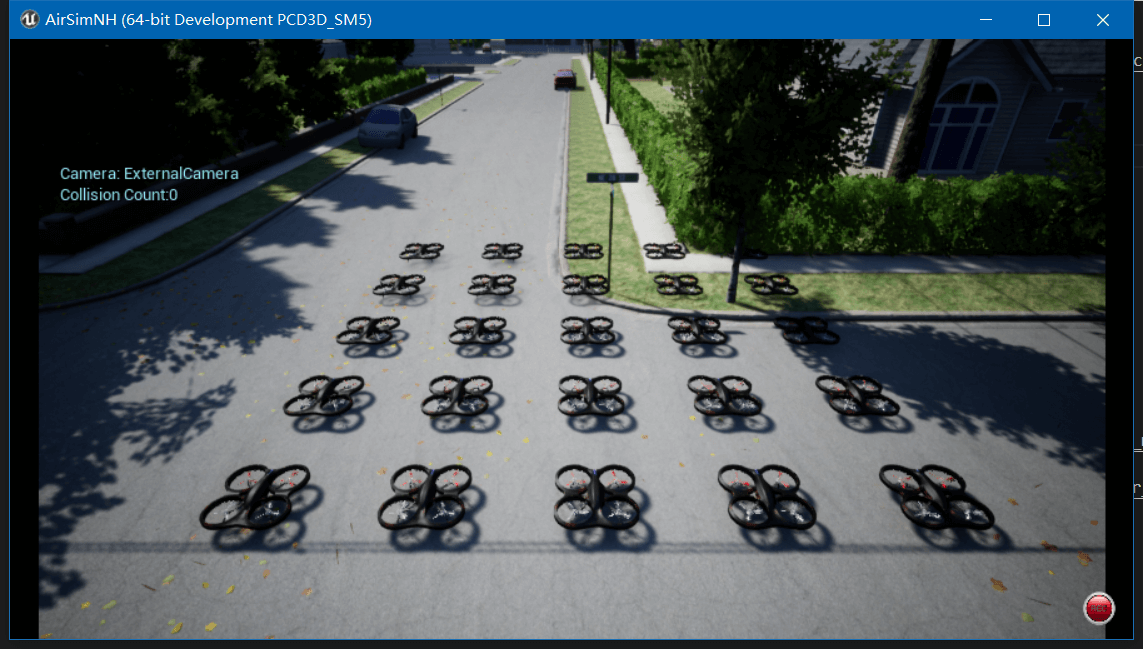
 甚至,官方还提供了个多达25架无人机编队的示例,点击查看配置文件。
 关于多无人机仿真和编队,因为不是我们的主要关注点,所以之后有时间再介绍。
至此,我们便介绍了多传感器、多模态数据的仿真与录制。其实你会发现,最核心的内容还是对于settings.json文件的修改。
4.参考资料
- [1] https://microsoft.github.io/AirSim/sensors/#sensors-in-airsim
- [2] https://microsoft.github.io/AirSim/sensors/#sensor-apis
- [3] https://microsoft.github.io/AirSim/modify_recording_data/
- [4] https://github.com/microsoft/AirSim/tree/master/PythonClient
- [5] https://microsoft.github.io/AirSim/lidar/
- [6] https://microsoft.github.io/AirSim/distance_sensor/
- [7] https://github.com/microsoft/AirSim/blob/master/PythonClient/car/car_lidar.py
- [8] https://github.com/Microsoft/AirSim/blob/master/PythonClient/multirotor/hello_drone.py
- [9] https://github.com/microsoft/AirSim/blob/master/ros/src/airsim_tutorial_pkgs/settings/front_stereo_and_center_mono.json
- [10] https://www.dazhuanlan.com/xylogen/topics/1179338
- [11] https://github.com/microsoft/AirSim/blob/master/ros/src/airsim_tutorial_pkgs/settings/two_drones_camera_lidar_imu.json
- [12] https://github.com/microsoft/AirSim/blob/master/ros/src/airsim_tutorial_pkgs/settings/twenty_five_drones.json
本文作者原创,未经许可不得转载,谢谢配合