1.Jetson平台相关API介绍
在Jetson平台中,和相机有关的主要就是Multimedia API和Argus API,Argus API可以看作是Multimedia API的一部分。如果需要开发相机相关的程序,Argus一般是会用到的。在这个网页中,列出了Jetpack SDK、Jetson Linux、Ubuntu Version、Linux Kernel、CUDA Version之间的对应关系,感兴趣可以查看。以下是官网对其描述:
- Camera application API: libargus offers a low-level frame-synchronous API for camera applications, with per frame camera parameter control, multiple (including synchronized) camera support, and EGL stream outputs. RAW output CSI cameras needing ISP can be used with either libargus or GStreamer plugin. In either case, the V4L2 media-controller sensor driver API is used.
Multimedia API的相关文件一般默认是放在/usr/src/jetson_multimedia_api下面,Argus相关则是在/usr/src/jetson_multimedia_api/argus文件夹下面。
1.1 Multimedia API
它可以理解为是许多low level API的整合,可以用于视频编码、解码、格式转换、视频缩放,相机控制等功能。从官方提供的例子(/usr/src/jetson_multimedia_api/samples文件夹)也可以看出来,它大体可以实现哪些功能,如下。

1.2 Argus Camera API
Argus则是Multimedia API里面一个更小的模块,核心任务就是和相机打交道,包括相机的控制、数据的获取、转换、处理等。官方提供了如下的示例(/usr/src/jetson_multimedia_api/argus/samples文件夹),可以简单了解它的作用。

2.利用Argus拍照实例
2.1 运行环境要求
Argus库和示例程序都放在/usr/src/jetson_multimedia_api/argus文件夹下面,根据其ReadMe文档里的描述,需要如下库。
sudo apt-get install cmake
sudo apt-get install build-essential
sudo apt-get install pkg-config
sudo apt-get install libx11-dev
sudo apt-get install libgtk-3-dev
sudo apt-get install libexpat1-dev
sudo apt-get install libjpeg-dev
sudo apt-get install libgstreamer1.0-dev
官方给的示例程序则是标准的CMake项目,直接常规步骤编译安装即可:
makedir build
cd build
cmake ..
make
sudo make install
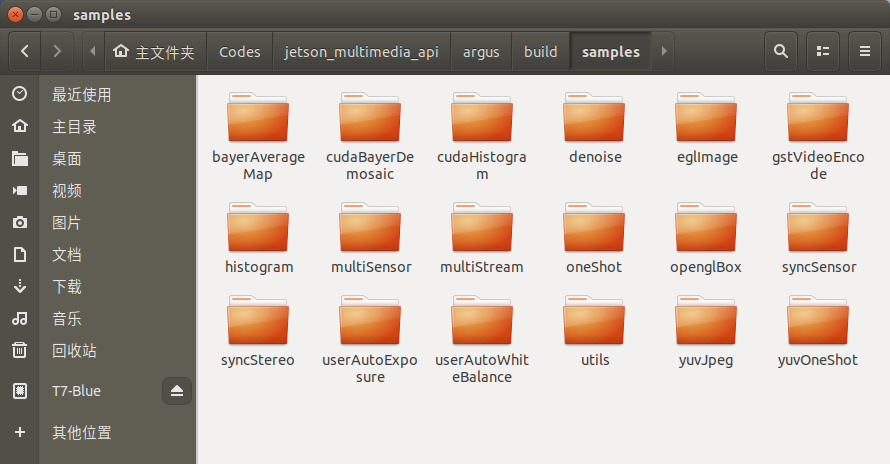
编译好以后,就可以在build/samples文件夹下看到各个示例程序了,如下。
 执行某个程序就可以试用不同的功能。
这里我们展示利用Argus进行拍照的实例,尝试自己写代码。代码参考了官方/usr/src/jetson_multimedia_api/argus/samples/oneShot的OneShot示例和这个网页。这里需要注意的是,官方的OneShot示例代码里涉及到一些他们自己写的工具函数,整个项目是相对复杂和完整的。但我们的目标则是尽可能精简,利用最少的代码、依赖实现拍摄照片。为了方便使用,我们把/usr/src/jetson_multimedia_api/argus文件夹下的include和cmake文件夹整理到了一起,放到libargus_support文件夹下,如下所示。
 在之后我们会用到这些文件。为了方便测试,也将所有的代码上传到了Github,点击查看,欢迎Star或Fork。
2.2 项目CMake文件
首先是CMakeLists.txt文件。
cmake_minimum_required (VERSION 2.6)

project(argus_oneshot_demo)

# 将Argus库相关的头文件放到了该文件夹中
set(CMAKE_SUPPORT_PATH "${CMAKE_SOURCE_DIR}/libargus_support")
message("${CMAKE_SUPPORT_PATH}")

# 将cmake相关的文件放到该文件夹中
set(CMAKE_MODULE_PATH "${CMAKE_SUPPORT_PATH}/cmake")
message("${CMAKE_MODULE_PATH}")

# 将头文件相关的文件放到该文件夹中
set(CMAKE_INCLUDE_PATH "${CMAKE_SUPPORT_PATH}/include")
message("${CMAKE_INCLUDE_PATH}")

# 查找Argus库并包含头文件目录
find_package(Argus REQUIRED)
include_directories(${ARGUS_INCLUDE_DIR})

add_executable(demo_oneshot_main_all main-all.cpp)
target_link_libraries(demo_oneshot_main_all ${ARGUS_LIBRARIES})

add_executable(demo_oneshot_main_sim main-sim.cpp)
target_link_libraries(demo_oneshot_main_sim ${ARGUS_LIBRARIES})
需要说明的是,Argus因为很底层,所以他并非能直接通过CMake找到。所以需要自己指定FindCMake文件才可以。
2.3 完整代码文件
完整代码如下。
#include <stdio.h>
#include <stdlib.h>
#include <Argus/Argus.h>
#include <EGLStream/EGLStream.h>
#include <iostream>

int main(int argc, char** argv)
{

    // step1 创建Argus环境
	Argus::UniqueObj<Argus::CameraProvider> cameraProvider(Argus::CameraProvider::create());
	Argus::ICameraProvider *iCameraProvider = Argus::interface_cast<Argus::ICameraProvider>(cameraProvider);

	// 信息输出
    std::cout<<"Step1: Create Argus Session and Get Camera Provider"<<std::endl;
    if(!iCameraProvider){
        std::cout<<"==>Cannot get core camera provider interface"<<std::endl<<std::endl;
    }else{
        std::cout<<"==>Argus Version:"<<iCameraProvider->getVersion().c_str()<<std::endl<<std::endl;
    }


    // step2 获取可用相机
	std::vector<Argus::CameraDevice*> cameraDevices;
	iCameraProvider->getCameraDevices(&cameraDevices);

	// 信息输出
    std::cout<<"Step2: Get Available Camera Devices by Camera Provider"<<std::endl;
    if(cameraDevices.size()==0){
        std::cout<<"==>No cameras available"<<std::endl<<std::endl;
    }else{
        std::cout<<"==>"<<cameraDevices.size()<<" Camera device(s) avaiable"<<std::endl<<std::endl;
    }


    // step3 获取相机属性接口
	Argus::ICameraProperties *iCameraProperties = Argus::interface_cast<Argus::ICameraProperties>(cameraDevices[0]);

    // 信息输出
    std::cout<<"Step3: Get Properties of Available Camera"<<std::endl;
    if(!iCameraProperties){
        std::cout<<"==>Failed to get iCameraProperties interface"<<std::endl<<std::endl;
    }else{
        std::cout<<"==>Succeed to get iCameraProperties interface"<<std::endl<<std::endl;
    }


    // step4 获取相机支持的拍摄模式并默认使用第一个拍摄
	std::vector<Argus::SensorMode*> sensorModes;
	iCameraProperties->getAllSensorModes(&sensorModes);
	Argus::ISensorMode *iSensorMode = Argus::interface_cast<Argus::ISensorMode>(sensorModes[0]);

	// 信息输出
    std::cout<<"Step4: Get Available Camera Modes"<<std::endl;
    if(sensorModes.size()==0){
        std::cout<<"==>Failed to get sensor modes"<<std::endl<<std::endl;
    }else{
        std::cout<<"==>Succeed to get sensor modes"<<std::endl;
        for (int i = 0; i < sensorModes.size(); ++i)
        {
            Argus::ISensorMode *tmpSensorMode = Argus::interface_cast<Argus::ISensorMode>(sensorModes[i]);
            Argus::Size2D<uint32_t> resolution = tmpSensorMode->getResolution();
            std::cout<<"\tMode "<<i<<": Width="<<resolution.width()<<" Height="<<resolution.height()<<std::endl;
        }
        std::cout<<std::endl;
    }


    // Step5 创建Capture Session并获得控制接口
	Argus::Status status;
	Argus::UniqueObj<Argus::CaptureSession> captureSession(iCameraProvider->createCaptureSession(cameraDevices[0], &status));
	Argus::ICaptureSession *iSession = Argus::interface_cast<Argus::ICaptureSession>(captureSession);

	// 信息输出
    std::cout<<"Step5: Get the Interface of Capture Session"<<std::endl;
    if(status!=Argus::STATUS_OK){
        std::cout<<"==>Failed to get the interface of capture session"<<std::endl<<std::endl;
    }else{
        std::cout<<"==>Succeed to get the interface of capture session"<<std::endl<<std::endl;
    }


    // Step6 设置输出流参数
	Argus::UniqueObj<Argus::OutputStreamSettings> streamSettings(iSession->createOutputStreamSettings(Argus::STREAM_TYPE_EGL));
	Argus::IEGLOutputStreamSettings *iEGLStreamSettings = Argus::interface_cast<Argus::IEGLOutputStreamSettings>(streamSettings);
	iEGLStreamSettings->setPixelFormat(Argus::PIXEL_FMT_YCbCr_420_888);
	iEGLStreamSettings->setResolution(iSensorMode->getResolution());
	iEGLStreamSettings->setMetadataEnable(true);

	// 信息输出
    std::cout<<"Step6: Set Parameters of Output Stream"<<std::endl;
    if(!iEGLStreamSettings){
        std::cout<<"==>Failed to set the parameters of output stream"<<std::endl<<std::endl;
    }else{
        std::cout<<"==>Succeed to set the parameters of output stream"<<std::endl<<std::endl;
    }


    // Step7 创建输出流
	Argus::UniqueObj<Argus::OutputStream> stream(iSession->createOutputStream(streamSettings.get()));

	// 信息输出
    std::cout<<"Step7: Create Output Stream Object"<<std::endl;
    if(!stream){
        std::cout<<"==>Failed to create output stream object"<<std::endl<<std::endl;
    }else{
        std::cout<<"==>Succeed to create output stream object"<<std::endl<<std::endl;
    }


    // Step8 创建Consumer对象并获取控制接口
	Argus::UniqueObj<EGLStream::FrameConsumer> consumer(EGLStream::FrameConsumer::create(stream.get()));
	EGLStream::IFrameConsumer *iFrameConsumer = Argus::interface_cast<EGLStream::IFrameConsumer>(consumer);

	// 信息输出
    std::cout<<"Step8: Create Consumer Object and Interface"<<std::endl;
    if(!iFrameConsumer){
        std::cout<<"==>Failed to create consumer object"<<std::endl<<std::endl;
    }else{
        std::cout<<"==>Succeed to create consumer object"<<std::endl<<std::endl;
    }


    // Step9 创建请求并与Stream关联
	Argus::UniqueObj<Argus::Request> request(iSession->createRequest(Argus::CAPTURE_INTENT_STILL_CAPTURE));
	Argus::IRequest *iRequest = Argus::interface_cast<Argus::IRequest>(request);
	status = iRequest->enableOutputStream(stream.get());

	// 信息输出
    std::cout<<"Step9: Create Request"<<std::endl;
    if(status!=Argus::STATUS_OK){
        std::cout<<"==>Failed to create request"<<std::endl<<std::endl;
    }else{
        std::cout<<"==>Succeed to create request"<<std::endl<<std::endl;
    }


    // Step10 设置拍摄的模式
    Argus::ISourceSettings *iSourceSettings = Argus::interface_cast<Argus::ISourceSettings>(request);
    iSourceSettings->setSensorMode(sensorModes[0]);
    uint32_t requestId = iSession->capture(request.get());

	// 信息输出
    std::cout<<"Step10: Set Sensor Mode"<<std::endl;
    if(!iSourceSettings){
        std::cout<<"==>Failed to set sensor mode"<<std::endl<<std::endl;
    }else{
        std::cout<<"==>Succeed to set sensor mode"<<std::endl<<std::endl;
    }


    // Step11 构造Frame对象并接收数据
	const uint64_t FIVE_SECONDS_IN_NANOSECONDS = 5000000000;
	Argus::UniqueObj<EGLStream::Frame> frame(iFrameConsumer->acquireFrame(FIVE_SECONDS_IN_NANOSECONDS, &status));
	EGLStream::IFrame *iFrame = Argus::interface_cast<EGLStream::IFrame>(frame);
	EGLStream::Image *image = iFrame->getImage();

	// 信息输出
    std::cout<<"Step11: Create Frame Object and Receive Data"<<std::endl;
    if(!image){
        std::cout<<"==>Failed to create frame object and receive data"<<std::endl<<std::endl;
    }else{
        std::cout<<"==>Succeed to create frame object and receive data"<<std::endl<<std::endl;
    }


    // Step12 构造JPEG对象
	EGLStream::IImageJPEG *iImageJPEG = Argus::interface_cast<EGLStream::IImageJPEG>(image);
	status = iImageJPEG->writeJPEG("argus_oneShot.jpg");

	// 信息输出
    std::cout<<"Step12: Create JPEG Object and Save Data"<<std::endl;
    if(status!=Argus::STATUS_OK){
        std::cout<<"==>Failed to create jpeg object and save data"<<std::endl<<std::endl;
    }else{
        std::cout<<"==>Succeed to create jpeg object and save data"<<std::endl<<std::endl;
    }


    // Step13 关闭Argus
	cameraProvider.reset();

	// 信息输出
    std::cout<<"Step13: Shut Down Argus"<<std::endl;

    return 0;
}
2.4 运行测试
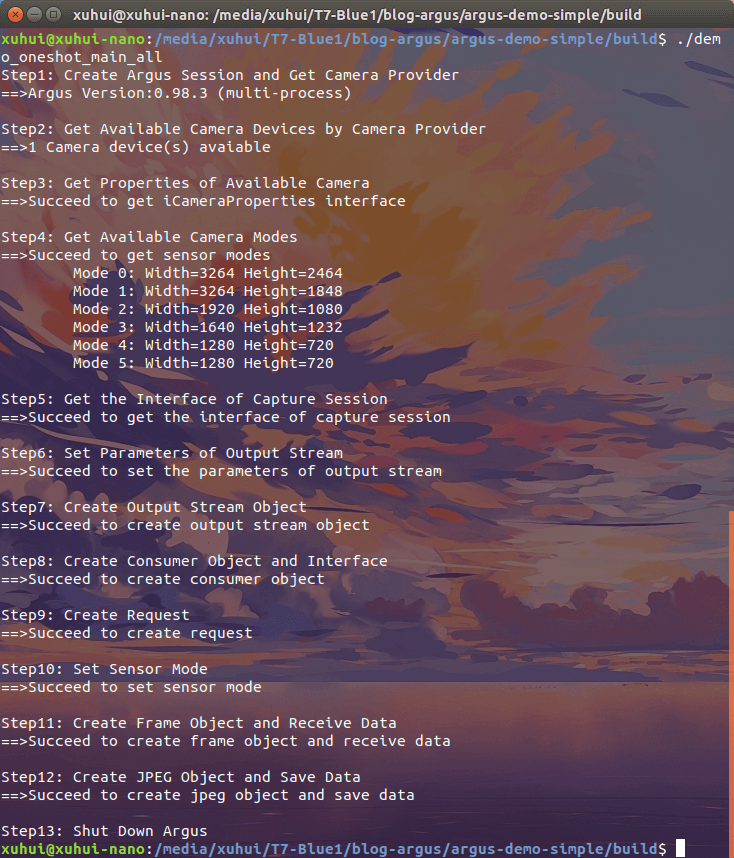
按照正常的CMake程序流程编译、执行,运行效果如下。
 终端中输出了每一个步骤的执行结果。拍摄的照片如下。

3.核心步骤分析
在上面,我们利用Argus实现了单张影像的拍摄。如果对上面的代码进行删减,去除不必要的输出,应该是下面的样子。
#include <stdio.h>
#include <stdlib.h>
#include <Argus/Argus.h>
#include <EGLStream/EGLStream.h>
#include <iostream>

int main(int argc, char** argv)
{

    // step1 创建Argus环境
	Argus::UniqueObj<Argus::CameraProvider> cameraProvider(Argus::CameraProvider::create());
	Argus::ICameraProvider *iCameraProvider = Argus::interface_cast<Argus::ICameraProvider>(cameraProvider);

    // step2 获取可用相机
	std::vector<Argus::CameraDevice*> cameraDevices;
	iCameraProvider->getCameraDevices(&cameraDevices);

    // step3 获取相机属性接口
	Argus::ICameraProperties *iCameraProperties = Argus::interface_cast<Argus::ICameraProperties>(cameraDevices[0]);

    // step4 获取相机支持的拍摄模式并默认使用第一个拍摄
	std::vector<Argus::SensorMode*> sensorModes;
	iCameraProperties->getAllSensorModes(&sensorModes);
	Argus::ISensorMode *iSensorMode = Argus::interface_cast<Argus::ISensorMode>(sensorModes[0]);

    // Step5 创建Capture Session并获得控制接口
	Argus::Status status;
	Argus::UniqueObj<Argus::CaptureSession> captureSession(iCameraProvider->createCaptureSession(cameraDevices[0], &status));
	Argus::ICaptureSession *iSession = Argus::interface_cast<Argus::ICaptureSession>(captureSession);

    // Step6 设置输出流参数
	Argus::UniqueObj<Argus::OutputStreamSettings> streamSettings(iSession->createOutputStreamSettings(Argus::STREAM_TYPE_EGL));
	Argus::IEGLOutputStreamSettings *iEGLStreamSettings = Argus::interface_cast<Argus::IEGLOutputStreamSettings>(streamSettings);
	iEGLStreamSettings->setPixelFormat(Argus::PIXEL_FMT_YCbCr_420_888);
	iEGLStreamSettings->setResolution(iSensorMode->getResolution());
	iEGLStreamSettings->setMetadataEnable(true);

    // Step7 创建输出流
	Argus::UniqueObj<Argus::OutputStream> stream(iSession->createOutputStream(streamSettings.get()));

    // Step8 创建Consumer对象并获取控制接口
	Argus::UniqueObj<EGLStream::FrameConsumer> consumer(EGLStream::FrameConsumer::create(stream.get()));
	EGLStream::IFrameConsumer *iFrameConsumer = Argus::interface_cast<EGLStream::IFrameConsumer>(consumer);

    // Step9 创建请求并与Stream关联
	Argus::UniqueObj<Argus::Request> request(iSession->createRequest(Argus::CAPTURE_INTENT_STILL_CAPTURE));
	Argus::IRequest *iRequest = Argus::interface_cast<Argus::IRequest>(request);
	status = iRequest->enableOutputStream(stream.get());

    // Step10 设置拍摄的模式
    Argus::ISourceSettings *iSourceSettings = Argus::interface_cast<Argus::ISourceSettings>(request);
    iSourceSettings->setSensorMode(sensorModes[0]);
    uint32_t requestId = iSession->capture(request.get());

    // Step11 构造Frame对象并接收数据
	const uint64_t FIVE_SECONDS_IN_NANOSECONDS = 5000000000;
	Argus::UniqueObj<EGLStream::Frame> frame(iFrameConsumer->acquireFrame(FIVE_SECONDS_IN_NANOSECONDS, &status));
	EGLStream::IFrame *iFrame = Argus::interface_cast<EGLStream::IFrame>(frame);
	EGLStream::Image *image = iFrame->getImage();

    // Step12 构造JPEG对象
	EGLStream::IImageJPEG *iImageJPEG = Argus::interface_cast<EGLStream::IImageJPEG>(image);
	status = iImageJPEG->writeJPEG("argus_oneShot.jpg");

    // Step13 关闭Argus
	cameraProvider.reset();

    return 0;
}
下面我们进一步对其进行分析。
3.1 创建Argus环境
Argus::UniqueObj<Argus::CameraProvider> cameraProvider(Argus::CameraProvider::create());
Argus::ICameraProvider *iCameraProvider = Argus::interface_cast<Argus::ICameraProvider>(cameraProvider);
这两行代码的作用是创建了和Argus的交互环境。具体来说,首先创建了一个CameraProvider类型的对象,然后调用转换函数,获取了其对应的接口对象。这里面涉及到几个Argus的类和函数,下面分别介绍。
Argus::CameraProvider: 这个类的作用是提供libargus runtime的入口,使程序可以与Argus进行交互。官方文档是这个。它包含以下一些成员函数。.getInterface(): Acquire the interface specified by interfaceId..destroy(): Destroy this object..create(): Creates and returns a new CameraProvider.
Argus::UniqueObj<T>:这个类是模仿std::unique_ptr,可以构建一个指定类型T的指针。官方文档是这个。Argus::ICameraProvider:这个类的作用是提供CameraProvider类核心函数的接口,实现各种功能。官方文档是这个。它包含以下一些成员函数。.getVersion(): Returns the version number of the libargus implementation..getVendor(): Returns the vendor string for the libargus implementation..supportsExtension(): Returns whether or not an extension is supported by this libargus implementation..getCameraDevices(): Returns the list of camera devices that are exposed by the provider..createCaptureSession(): Creates and returns a new CaptureSession using the given device..createCaptureSession()(Overload): Creates and returns a new CaptureSession using the given device(s).
Argus::interface_cast<T>():这个类的作用是将某个接口对象转换成T类型的对象,功能类似于dynamic_cast。官方文档是这个。
尽管上面这两行代码很简单,但是体现了Argus库的一些比较常见的范式,主要有以下两点:
- 在Argus中,如果有一个类叫
ClassName,那么一般会有一个对应的IClassName类。它们的差别在于,ClassName类中,除了create()、destroy()、getInterface()等,几乎没有实际功能的函数。真正的一些功能函数在Argus中被视为“Interface”。这些接口函数就都放在ClassName对应的IClassName中。 - 因此,在Argus的代码中,会经常看到新建了某个
ClassName类,然后又通过它对应的接口类IClassName进行各种处理。这种写代码的方式应该习惯,因为后面会经常遇到。
3.2 获取可用相机
std::vector<Argus::CameraDevice*> cameraDevices;
iCameraProvider->getCameraDevices(&cameraDevices);
这一步比较简单,核心就是利用上一步新建的CameraProvider类的接口对象iCameraProvider获取当前系统中可用的Argus::CameraDevice类型的相机对象,保存在标准的vector容器中。
Argus::CameraDevice是用来表示单个相机设备的类,它由CameraProvider提供,来方便的访问可用相机,官方文档是这个。
而getCameraDevices()则是iCameraProvider的成员函数,用于获得当前系统中可用的相机,其进一步介绍可以参考对应文档。
3.3 获取相机属性接口
Argus::ICameraProperties *iCameraProperties = Argus::interface_cast<Argus::ICameraProperties>(cameraDevices[0]);
核心操作是获取当前第一个可用相机的属性接口,这里有一个新的类Argus::ICameraProperties。根据文档描述,它是CameraDevice类核心属性的接口类,通过它可以访问相机的一些属性。这里根据文档描述,简单列举成员函数,结合函数名一看就懂。
.getUUID(): Returns the camera UUID..getSensorPlacement(): Returns the camera sensor placement position on the module..getMaxAeRegions(): Returns the maximum number of regions of interest supported by AE..getMinAeRegionSize(): Returns the minimum size of resultant region required by AE..getMaxAwbRegions (): Returns the maximum number of regions of interest supported by AWB..getMaxAfRegions(): Returns the maximum number of regions of interest supported by AF..getBasicSensorModes(): Returns only the basic available sensor modes that do not have an associated extension..getAllSensorModes(): Returns all the available sensor modes including the ones that have extensions..getAperturePositions(): Returns all the recommended aperture positions..getAvailableApertureFNumbers(): Returns all the available aperture f-numbers..getFocusPositionRange(): Returns the valid range of focuser positions..getAperturePositionRange(): Returns the valid range of aperture positions..getApertureMotorSpeedRange(): Returns the valid range of aperture step positions per second..getIspDigitalGainRange(): Returns the supported range of ISP digital gain..getExposureCompensationRange(): Returns the supported range of Exposure Compensation..getModelName(): Returns the model name of the device..getModuleString(): Returns the module string for the device.
3.4 获取支持的拍摄模式并使用第一个拍摄
std::vector<Argus::SensorMode*> sensorModes;
iCameraProperties->getAllSensorModes(&sensorModes);
Argus::ISensorMode *iSensorMode = Argus::interface_cast<Argus::ISensorMode>(sensorModes[0]);
核心的操作是获得当前相机支持的拍摄模式,然后使用相机支持的第一个拍摄模式。所谓拍摄模式是指相机支持的拍摄分辨率、帧率等信息,比如之前博客提到的树莓派相机支持的几种不同的模式。这里新出现的类是Argus::SensorMode,但也比较好理解,就是用来表示不同模式,文档是这个。上一步我们说到,通过Argus::ICameraProperties就可以获得相机的一些属性,所以这里我们直接用了getAllSensorModes()函数,获得当前相机所支持的所有拍摄模式。
3.5 创建Capture Session并获得控制接口
Argus::Status status;
Argus::UniqueObj<Argus::CaptureSession> captureSession(iCameraProvider->createCaptureSession(cameraDevices[0], &status));
Argus::ICaptureSession *iSession = Argus::interface_cast<Argus::ICaptureSession>(captureSession);
这一步的核心是创建一个Capture Session,用来管理相机的拍摄流程,然后新建其对应的接口类,方便后续进行实际操作。我们调用了CameraProvider类的成员函数createCaptureSession()函数创建Capture Session。这个函数的第一个参数是需要使用的相机对象,第二个则是创建的状态(是否成功),它的官方文档是这个。这里有三个新的类型,下面分别介绍。
Argus::Status: 是一个枚举类型的类,里面包含了API函数的可能返回状态,简单列举如下,基本一看就明白是什么意思,也可以查看官方文档更详细的解释。STATUS_OK: Function succeeded.STATUS_CANCELLED: The capture was aborted.STATUS_INVALID_PARAMS: The set of parameters passed was invalid.STATUS_INVALID_SETTINGS: The requested settings are invalid.STATUS_UNAVAILABLE: The requested device is unavailable.STATUS_OUT_OF_MEMORY: An operation failed because of insufficient mavailable memory.STATUS_TIMEOUT: An operation timed out.STATUS_DISCONNECTED: The stream or other resource has been disconnected.STATUS_END_OF_STREAM: End of stream, used by Stream objects.STATUS_COUNT: Number of elements in this enum.STATUS_UNIMPLEMENTED: This method has not been implemented.
Argus::CaptureSession: 根据官方文档描述,它的作用是用来控制在某个传感器上的操作、提供从那个传感器捕获数据的接口。官方文档是这个。而且根据前面的介绍,这个CaptureSession类其实也没什么实际函数,而是有个对应的ICaptureSession类负责一些实际的功能接口。Argus::ICaptureSession: 上一点已经说了,这个类主要负责一些实质性函数的接口,是获取数据比较核心的类之一,官方文档是这个。简单列举包含的函数,介绍也比较简单。.capture(): Submits a single capture request..cancelRequests(): Removes all previously submitted requests from the queue..captureBurst(): Submits a burst of requests..maxBurstRequests(): Returns the maximum number of capture requests that can be included in a burst capture..createRequest(): Creates a request object that can be later used with this CaptureSession..createOutputStreamSettings(): Creates an OutputStreamSettings object that is used to configure the creation of an OutputStream..createOutputStream(): Creates an OutputStream object using the settings configured by an OutputStreamSettings object..isRepeating(): Returns true if there is a streaming request in place..repeat(): Sets up a repeating request..repeatBurst(): Sets up a repeating burst request..stopRepeat(): Shuts down any repeating capture..waitForIdle(): Waits until all pending captures are complete.
3.6 设置输出流参数
Argus::UniqueObj<Argus::OutputStreamSettings> streamSettings(iSession->createOutputStreamSettings(Argus::STREAM_TYPE_EGL));
Argus::IEGLOutputStreamSettings *iEGLStreamSettings = Argus::interface_cast<Argus::IEGLOutputStreamSettings>(streamSettings);
iEGLStreamSettings->setPixelFormat(Argus::PIXEL_FMT_YCbCr_420_888);
iEGLStreamSettings->setResolution(iSensorMode->getResolution());
iEGLStreamSettings->setMetadataEnable(true);
这一步的操作也是比较明确的。首先调用上面创建的ICaptureSession对象的成员函数createOutputStreamSettings()创建了一个STREAM_TYPE_EGL输出流设置类,然后再获取它对应的接口类,最后通过接口类设置一系列参数。这里面有几个新东西下面分别介绍。
Argus::STREAM_TYPE_EGL: Argus的流类型。目前,根据文档描述,Argus只支持这一种类型的输出流。Argus::OutputStreamSettings: 这个类的主要作用是储存某个OutputStream所用到的配置参数,官方文档是这个。和之前类似的,它本身没有实质性函数,而是通过其对应的接口类IOutputStreamSettings实现,文档是这个。比如这里我们在新建了OutputStreamSettings对象,指定的类型是STREAM_TYPE_EGL,所以也可以通过类型转换,获得IEGLOutputStreamSettings接口类,通过这个类实现参数设置。Argus::IEGLOutputStreamSettings: 其是Argus::EGLOutputStreamSettings类对应的接口类,用于实现各种功能,文档是这个。而Argus::EGLOutputStreamSettings类则是用于EGL类型的输出流配置。在上面代码中,尽管我们新建的是Argus::OutputStreamSettings对象,但是由于其传入参数是Argus::STREAM_TYPE_EGL,所以其实和Argus::EGLOutputStreamSettings类在一定程度上是等价的。最后我们列出Argus::IEGLOutputStreamSettings中一些常用的成员函数。.setPixelFormat(): Set the format of the stream..getPixelFormat(): Get the format of the stream..setResolution(): Set the resolution of the stream..getResolution(): Get the resolution of the stream..setExposureCount(): Set the number of exposures per stream frame..getExposureCount(): Get the number of exposures per stream frame..setEGLDisplay(): Set the EGLDisplay the created stream must belong to..getEGLDisplay(): Get the EGLDisplay the created stream must belong to..setMode(): Set the mode of the OutputStream..getMode(): Get the mode of the OutputStream..setFifoLength(): Set the FIFO queue length of the stream..getFifoLength(): Get the FIFO queue length of the stream..setMetadataEnable(): Enable or disable embedding Argus CaptureMetadata within frames written to the EGLStream..getMetadataEnable(): Get the status (boolean) of Argus CaptureMetadata within frames written to the EGLStream..supportsOutputStreamFormat(): True if the output pixel format is supported by the CaptureSession for the queried sensor mode. Otherwise, returns false.
PIXEL_FMT_YCbCr_420_888: Argus支持的像素格式之一,在Argus/Types.h的267行定义。为了方便查询,也将目前Argus支持的完整的像素格式罗列出来:PIXEL_FMT_UNKNOWNPIXEL_FMT_Y8PIXEL_FMT_Y16PIXEL_FMT_YCbCr_420_888PIXEL_FMT_YCbCr_422_888PIXEL_FMT_YCbCr_444_888PIXEL_FMT_JPEG_BLOBPIXEL_FMT_RAW16PIXEL_FMT_P016
3.7 创建输出流
Argus::UniqueObj<Argus::OutputStream> stream(iSession->createOutputStream(streamSettings.get()));
这行代码也比较容易理解,基于上面设置的参数,调用ICaptureSession类的成员函数createOutputStream()创建了输出流。这里的Argus::OutputStream类表示可以从Capture Session中接收影像帧的Stream,只有正确创建了流以后才可以正常获取数据。官方文档是这个。
3.8 创建Consumer对象并获取控制接口
Argus::UniqueObj<EGLStream::FrameConsumer> consumer(EGLStream::FrameConsumer::create(stream.get()));
EGLStream::IFrameConsumer *iFrameConsumer = Argus::interface_cast<EGLStream::IFrameConsumer>(consumer);
在明白这两行代码在干什么之前。先要简单了解一下,EGLStream相关内容,可以参考这个文档。根据文档描述,EGLStream是一种可以在不同API之间进行高效影像帧序列交换的一种机制,这种API包括OpenGL、CUDA和NvMedia。在EGLStream中,“Producer”、“Consumer”、“Stream”是关键概念。Producer将影像帧放入Stream中,而Consumer则从Stream中取出影像帧。这种思路就像是《日常》动画里有一集提到的流水面一样。Producer就是那个放面的人,流水就是这里的Stream,而Consumer则是另一端吃面的人。同时在EGLStream中,有两种运行模式,一种是Mailbox模式,另一种是FIFO模式。下面简单介绍。
- 在Mailbox模式下,EGLStream会扮演一个“邮箱”的角色。当Producer产生新的影像帧时,他会清空这个mailbox(把旧的内容丢弃),同时插入这个新的帧。Consumer则从邮箱中读取这一帧数据并进行检查。当完成检查后,这一帧要么就被保留(如果当前邮箱为空)或者就被删除(邮箱不为空)。在这种模式下,计时主要由Producer控制。
- 在FIFO(First-In-First-Out)模式下,不会丢弃任何影像帧。当Producer产生新的帧时,这个影像帧就会被放到一个队列中,Consumer就会顺序地查询这个序列来获取数据。这个队列的大小由EGLStream设置。当Producer想插入新的帧但这个队列已经满的时候,插入就会被阻塞,直到队列有空间容纳这一帧。当Consumer从队列中取数据的时候,他会顺序的取到上一帧之后的影像帧(除非它之后没有数据了,这样就会取到一样的内容)。在这种模式下,计时由Consumer掌握。每一帧都有由Producer生成的时间戳。Consumer可以利用这个时间戳来决定是保留还是丢弃。
在简单介绍了EGLStream之后,再来看这两行代码就会容易一些。首先调用FrameConsumer的create()成员函数新建了一个Consumer对象。在新建的过程中,将我们上一步创建好的输出流作为参数传入,实现了和这个新建的Consumer之间的绑定。然后类似的,Consumer类本身没有什么实质性的函数,我们需要获取到它对应的接口类,通过interface_cast()进行转换完成。
3.9 创建请求并与Stream关联
Argus::UniqueObj<Argus::Request> request(iSession->createRequest(Argus::CAPTURE_INTENT_STILL_CAPTURE));
Argus::IRequest *iRequest = Argus::interface_cast<Argus::IRequest>(request);
status = iRequest->enableOutputStream(stream.get());
这三行代码的作用是创建某个意图的请求与之前创建的流相关联。我们首先调用ICaptureSession类的成员函数createRequest()启构造了一个Argus::Request类型的请求,该类型的官方文档是这个。类似的,它本身没有什么实质函数,所以我们再通过类型转换获得其对应的接口类Argus::IRequest,官方文档是这个。最后,通过它的成员函数enableOutputStream()尝试与之前创建的流关联。首先,这里有一个常量叫Argus::CAPTURE_INTENT_STILL_CAPTURE,他在Argus/Types.h的235行被定义。目前在Argus中一共有5中intent,在官方文档里也没有找到较好的介绍,所以这里把头文件中的说明摘抄过来。
CAPTURE_INTENT_MANUAL: intent disables auto white balance and auto-focus.CAPTURE_INTENT_PREVIEW: intent disables noise reduction related post-processing in order to reduce latency and resource usage.CAPTURE_INTENT_STILL_CAPTURE: intent enables Noise Reduction related post-processing in order to optimize still image quality.CAPTURE_INTENT_VIDEO_RECORD: intent enables motion sensors related post-processing to optimize the video quality.CAPTURE_INTENT_VIDEO_SNAPSHOT: 没有明确的解释(根据名称猜测应该是禁用了一些后处理步骤使运行更快)
这里我们也简单列举一下Argus::IRequest类中的一些成员函数。
.enableOutputStream(): Enables the specified output stream..disableOutputStream(): Disables the specified output stream..clearOutputStreams(): Disables all output streams..getOutputStreams(): Returns all enabled output streams..getStreamSettings(): Returns the Stream settings for a particular stream in the request..getAutoControlSettings(): Returns the capture control settings for a given AC..getSourceSettings(): Returns the source settings for the request..setClientData(): Sets the client data for the request..getClientData(): Gets the client data for the request..setEnableIspStage(): Set this to false if o/p buffer is Bayer and ISP stage needs to be skipped..getEnableIspStage(): Check if ISP stage is enabled/disabled.
3.10 设置拍摄的模式
Argus::ISourceSettings *iSourceSettings = Argus::interface_cast<Argus::ISourceSettings>(request);
iSourceSettings->setSensorMode(sensorModes[0]);
uint32_t requestId = iSession->capture(request.get());
这一步的作用是指定我们拍摄所使用的模式,从我们在第四步中获得的那几个中选择一个。这里我们又遇到新的类型Argus::ISourceSettings,文档是这个。当然了,根据之前的经验,Argus中有个Argus::SourceSettings,但没有实际作用的函数,所以暂时不管它。下面简单列举Argus::ISourceSettings的成员函数。
.setExposureTimeRange(): Sets the exposure time range of the source, in nanoseconds..getExposureTimeRange(): Returns the exposure time range of the source, in nanoseconds..setFocusPosition(): Sets the focus position, in focuser units..getFocusPosition(): Returns the focus position, in focuser units..setAperturePosition(): Sets the aperture position..getAperturePosition(): Returns the aperture position..setApertureMotorSpeed: Sets the aperture motor speed in motor steps/second..getApertureMotorSpeed(): Returns the aperture motor speed in motor steps/second..setApertureFNumber(): Sets the aperture f-number..getApertureFNumber(): Returns the aperture f-number..setFrameDurationRange(): Sets the frame duration range, in nanoseconds..getFrameDurationRange(): Returns the frame duration range, in nanoseconds..setGainRange(): Sets the gain range for the sensor..getGainRange(): Returns the gain range..setSensorMode(): Sets the sensor mode..getSensorMode(): Returns the sensor mode..setOpticalBlack(): Sets the user-specified optical black levels..getOpticalBlack(): Returns user-specified opticalBlack level per bayer phase..setOpticalBlackEnable(): Sets whether or not user-provided optical black levels are used..getOpticalBlackEnable(): Returns whether user-specified optical black levels are enabled.
最后,也是很关键的一个步骤,调用CaptureSession类的成员函数.capture()进行发送请求,进行数据获取。请求的具体内容则在上一步构造好了。该函数会返回请求的ID,当然你可以不接收这个参数,根据需要自行决定。
3.11 构造Frame对象并接收数据
const uint64_t FIVE_SECONDS_IN_NANOSECONDS = 5000000000;
Argus::UniqueObj<EGLStream::Frame> frame(iFrameConsumer->acquireFrame(FIVE_SECONDS_IN_NANOSECONDS, &status));
EGLStream::IFrame *iFrame = Argus::interface_cast<EGLStream::IFrame>(frame);
EGLStream::Image *image = iFrame->getImage();
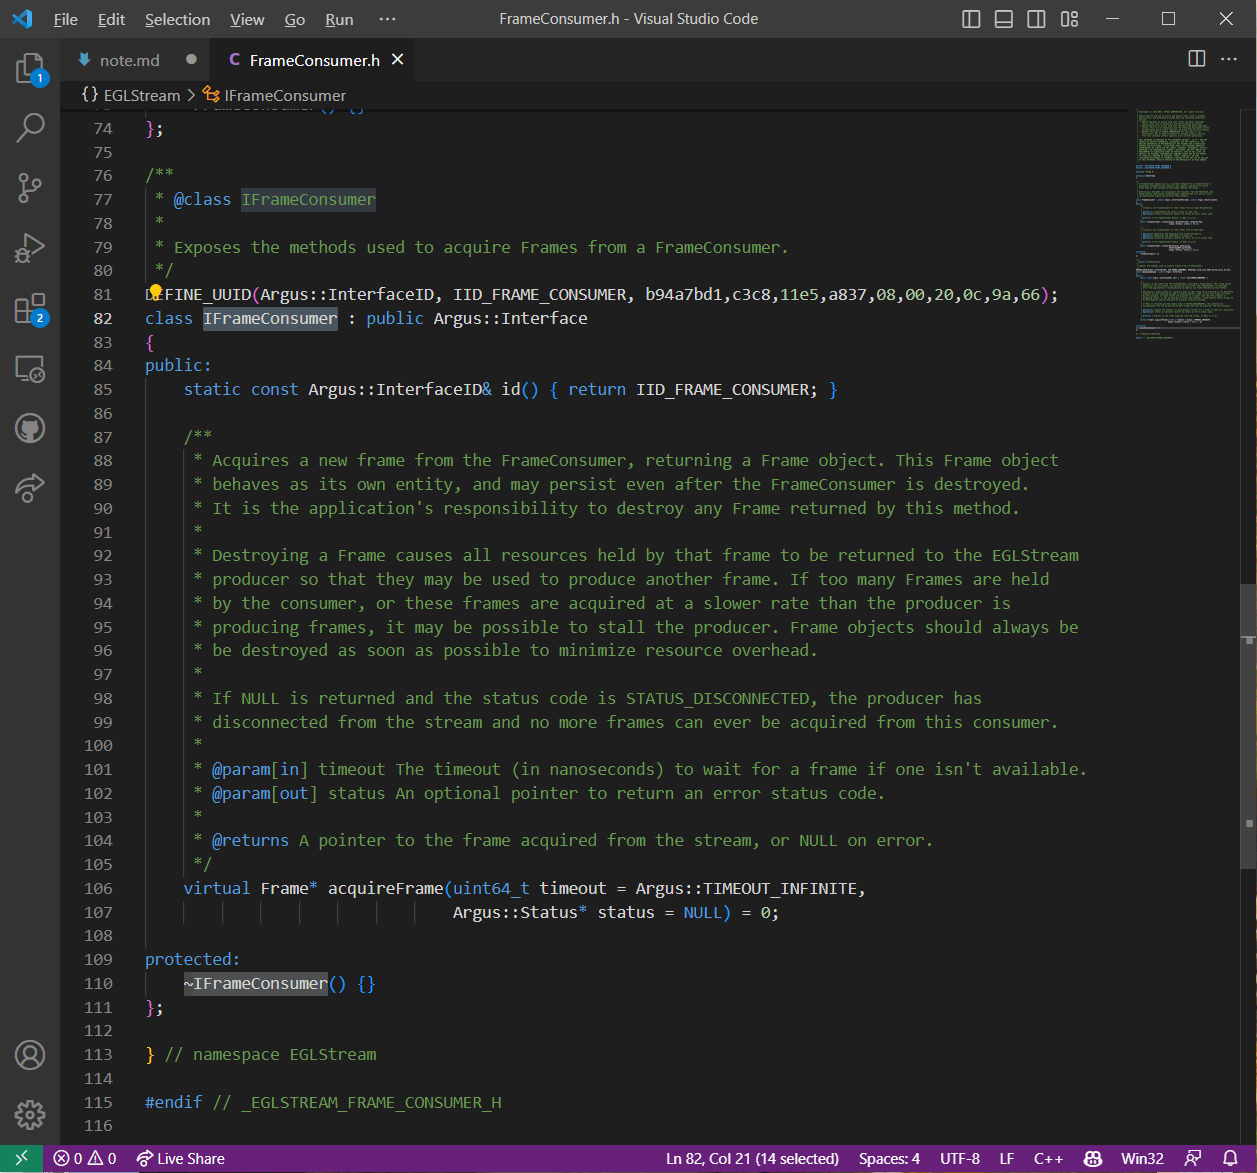
这几行代码中,我们首先利用之前构建好的IFrameConsumer类的对象,调用他的成员函数acquireFrame()构造了一个EGLStream::Frame对象。然后类似的,通过类型转换得到了这个EGLStream::Frame对象的接口类对象。最后通过这个接口类对象的成员函数,尝试获得数据并赋给EGLStream::Image类的对象。当然你可能会好奇第一行的这个常量是干什么的,下面会进行解释。首先是IFrameConsumer类的成员函数acquireFrame()。这个函数它是EGLStream里的,所以我们搜索Argus的文档找不到任何信息。但没关系,我们可以找到EGLStream/FrameConsumer.h,打开之后如下。
 可以看到,整个
IFrameConsumer类只有一个成员函数,也就是这个acquireFrame()。进一步,我们可以阅读一下对这个函数的介绍,就能明白这个函数的作用以及那个5秒常量了。简单来说,这个函数的作用就是通过FrameConsumer获取一个Frame。并且,我们可以看到,该函数的第一个参数表示超时的时间也就是说,如果某个时刻相机出现了问题导致获取不到数据,程序最多会等待多久的时间,单位是纳秒。第二个参数则是函数的执行状态,是否成功。在获得了EGLStream::Frame对象以后,类似的,我们获取其对应的接口对象EGLStream::IFrame。最后,通过它的成员函数getImage()获得影像。下面对EGLStream::Frame和EGLStream::IFrame简单进行介绍。首先是EGLStream::Frame,我们可以找到EGLStream/Frame.h,和之前类似的,他本身也没有实质性函数。EGLStream::IFrame同样是在这个头文件中,但他有成员函数,简单列举如下。
.getNumber(): Returns the frame number..getTime(): Returns the timestamp of the frame, in nanoseconds..getImage(): Returns the Image contained in the Frame. The returned Image object is owned by the Frame and is valid as long as the Frame is valid. (that is, while the Frame is acquired).
最后,还有个EGLStream::Image类。它的声明在EGLStream/Image.h中,他的作用就是储存从Frame类对象中取出的影像。它本身没有功能函数,功能函数都在EGLStream::IImage,EGLStream::IImage2D,EGLStream::IImageJPEG,IImageHeaderlessFile中(根据不同需求,可以将EGLStream::Image转换成不同类别的接口)。
3.12 获取Image对象接口并输出数据
EGLStream::IImageJPEG *iImageJPEG = Argus::interface_cast<EGLStream::IImageJPEG>(image);
status = iImageJPEG->writeJPEG("argus_oneShot.jpg");
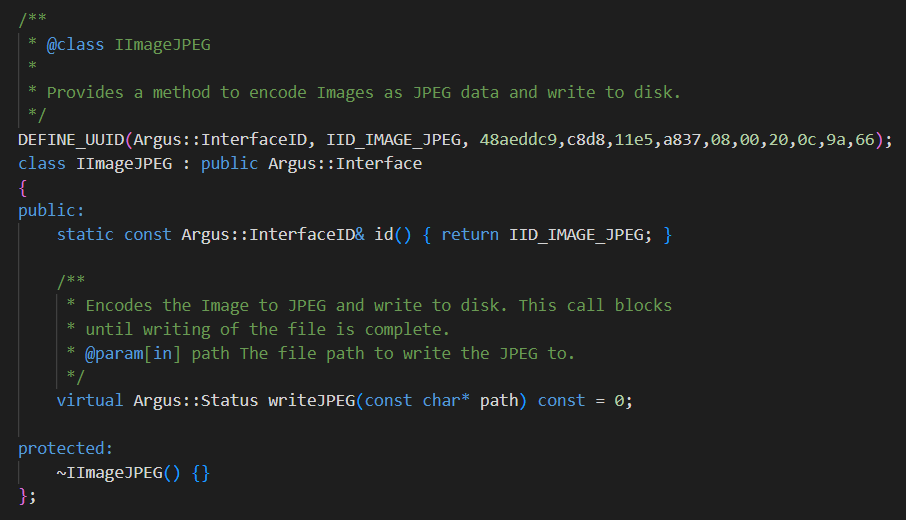
这一步的核心就是获得Image对象的接口类,通过调用接口类的成员函数writeJPEG()实现数据的保存。我们首先简单介绍EGLStream::IImageJPEG类。它是在EGLStream/Image.h中声明的,如下。
 可以看到,该类的作用是将影像编码为JPEG并保存到硬盘中。并且该类只有一个成员函数,就是
writeJPEG()。为了便于对比,我们简单列举一下所有类型的接口类(都来自于EGLStream/Image.h中对应部分的注释说明)。
对于EGLStream::IImage,它包含以下成员函数:
.id(): Returns the ID of the Image..getBufferCount(): Returns the number of buffers in the Image..getBufferSize(): Returns the size of one of the Image’s buffers..mapBuffer(): Maps a buffer for CPU access and returns the mapped pointer..mapBuffer()(Overload): Maps the first/only buffer for CPU access and returns the mapped pointer.
对于EGLStream::IImage2D,它可以用来处理一些具有多个通道的影像,包含以下成员函数:
.id(): Returns the ID of the Image..getSize(): Returns the size of the image plane, in pixels..getStride(): Returns the stride, or bytes per pixel row, of the image plane.
对于EGLStream::IImageJPEG,它用来将影像数据以JPEG的形式输出到硬盘,包含以下成员函数:
.writeJPEG(): Encodes the Image to JPEG and write to disk.
对于EGLStream::IImageHeaderlessFile,它可以将影像数据直接以没有编码和头信息的方式输出到硬盘,包含以下成员函数:
.writeHeaderlessFile(): Writes the pixels to disk.
3.13 关闭Argus
cameraProvider.reset();
最后,我们记得关闭在一开始创建的CameraProvider,结束整个程序。
4.参考资料
- [1] https://www.stereolabs.com/blog/nvidia-jetson-l4t-and-jetpack-support/
- [2] https://developer.nvidia.com/embedded/jetpack
- [3] https://on-demand.gputechconf.com/gtc/2016/webinar/getting-started-jetpack-camera-api.pdf
- [4] https://docs.nvidia.com/jetson/l4t-multimedia/index.html
- [5] https://docs.nvidia.com/jetson/l4t-multimedia/group__LibargusAPI.html
- [6] https://www.yangyouji.info/archives/703
本文作者原创,未经许可不得转载,谢谢配合
