本篇博客是2019年的第一篇,也算是一个新的开始吧。这篇博客算是“独立自主写算法”系列的第一篇博客,目的是对于一些经典算法在不依赖或者尽可能依赖较少第三方库的情况下完成算法,以加深对算法的理解与掌握。 对于很多算法由于都有很多现成的库可以使用,以至于只会用别人的东西而没有“核心技术”。为了克服这样的情况,有了本系列博客的想法。相比于单纯原理,会更加侧重于算法的实现以及相关细节,对细节抱着“一丝不苟”的态度,力争做到“求甚解”。
本篇就从计算机视觉最早的角点检测算子之一Moravec开始,追随着大神的脚步,体会大神的思想,重新走一遍大神当年走过的路,自己动手实现这个古老而又有开创性的角点算子。看看当年这些大神们是怎么“筚路蓝缕”,一步步打造出现在辉煌的计算机视觉的世界的。
这里借用WiKi上Corner Detection词条中的分类,如下。
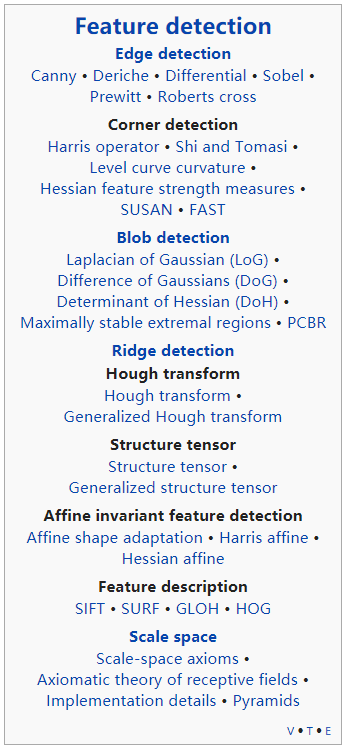 这张图片比较清晰地概括了Feature Detection门类下的各个分支和代表算法,比较全面。
1.Moravec算子介绍
Moravec角点算子的简历如下:
- 提出者:Hans Moravec
- 大学:Carnegie Mellon University(卡内基·梅隆大学)
- 提出时间:1980
- 最初用途:用于影像立体匹配,解决Stanford Cart导航问题
- 相关论文:Obstacle Avoidance and Navigation in the Real World by a Seeing Robot Rover(论文年代实在太过久远,所以文档质量不是太好,凑合看吧)
- 一句话总结: Moravec算子是一种基于灰度方差的角点检测方法,通过滑动矩形窗口寻找灰度变化的局部极值。计算像素点沿周围8个方向的灰度方差,并选取最小值作为该像素角点响应值CRF(Corner Response Function),最后通过局部非极大值抑制进行筛选。
2.Moravec算子原理
关于原理部分我这里直接把WiKi上Corner Detection词条的Moravec corner detection algorithm部分直接翻译、复制过来,觉得写的很不错。
This is one of the earliest corner detection algorithms and defines a corner to be a point with low self-similarity. The algorithm tests each pixel in the image to see if a corner is present, by considering how similar a patch centered on the pixel is to nearby, largely overlapping patches. The similarity is measured by taking the sum of squared differences (SSD) between the corresponding pixels of two patches. A lower number indicates more similarity.
Moravec是最早的角点检测算法之一,它将角点定义为自相似性较低的点。算法通过考虑以像素为中心的窗口与附近的大部分重叠窗口有多相似,来测试图像中的每个像素,以查看是否存在角点。相似度是由两个窗口的对应像素之间的平方差之和(the sum of squared differences,SSD)来测量的,数字越小表示相似度越高。
If the pixel is in a region of uniform intensity, then the nearby patches will look similar. If the pixel is on an edge, then nearby patches in a direction perpendicular to the edge will look quite different, but nearby patches in a direction parallel to the edge will result in only in a small change. If the pixel is on a feature with variation in all directions, then none of the nearby patches will look similar.
如果像素在一个灰度均匀的区域,那么附近的窗口看起来会十分相似。如果像素在边界上,垂直于边界方向的窗口内容看起来会非常不同,平行于边界方向的窗口看起看只会有很小的变化。而如果像素位于一个全方位变化的特征上,那么附近的窗口看起来都不会相似。
The corner strength is defined as the smallest SSD between the patch and its neighbours (horizontal, vertical and on the two diagonals). The reason is that if this number is high, then the variation along all shifts is either equal to it or larger than it, so capturing that all nearby patches look different.If the corner strength number is computed for all locations, that it is locally maximal for one location indicates that a feature of interest is present in it.
角点的强度通过以该像素为中心的窗口与其相邻窗口(水平、垂直以及两个对角线方向)间的SSD的最小值来定义。原因在于如果我们选择的这个最小值都很大,那么说明其它的SSD要么等于它要么大于它,也就是说其它所有窗口看起来会更加不一样。(补充翻译:而正如上面说到的,在特征点上,相邻窗口的内容看起来都会比较不同。因此可以反推回来就是,若某个像素的相邻窗口看起来都不相同(SSD较大),即认为该点是一个特征点。)如果计算了所有位置的角点强度值,那么某个位置的局部最大值表示其中存在感兴趣的特征。
As pointed out by Moravec, one of the main problems with this operator is that it is not isotropic: if an edge is present that is not in the direction of the neighbours (horizontal, vertical, or diagonal), then the smallest SSD will be large and the edge will be incorrectly chosen as an interest point.
也正如Moravec所指出的,此运算符的一个主要问题是它不是各向同性的:如果存在一个不与计算方向(水平、垂直以及两个对角线方向)相同的边,那么最小SSD将会很大,因此该边将被错误地选作角点(但很明显是条边)。
Moravec计算过程主要有以下三个步骤。
(1)滑动窗口计算角点响应值
如下图所示,对于每一个像素分别有水平、垂直以及对角线共8个方向,依次计算原始窗口与便宜窗口间对应像素的差值。
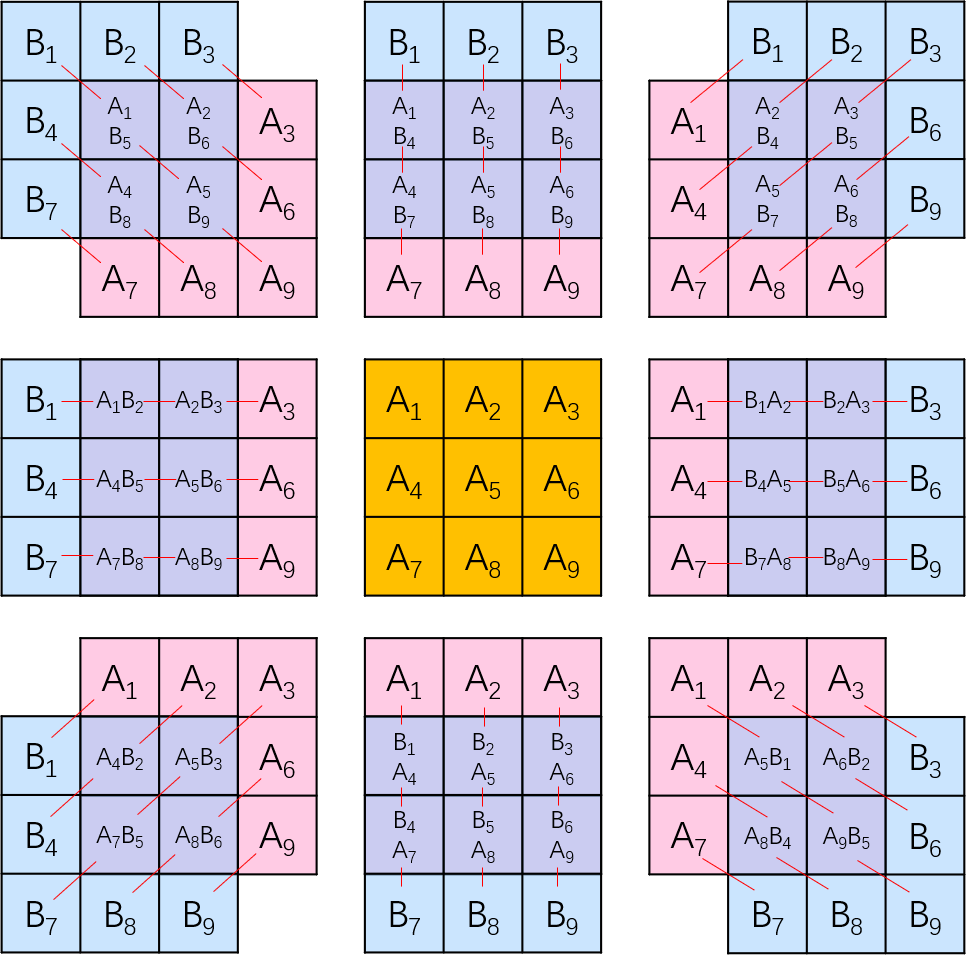 对于每一个滑动窗口,计算公式表示如下。
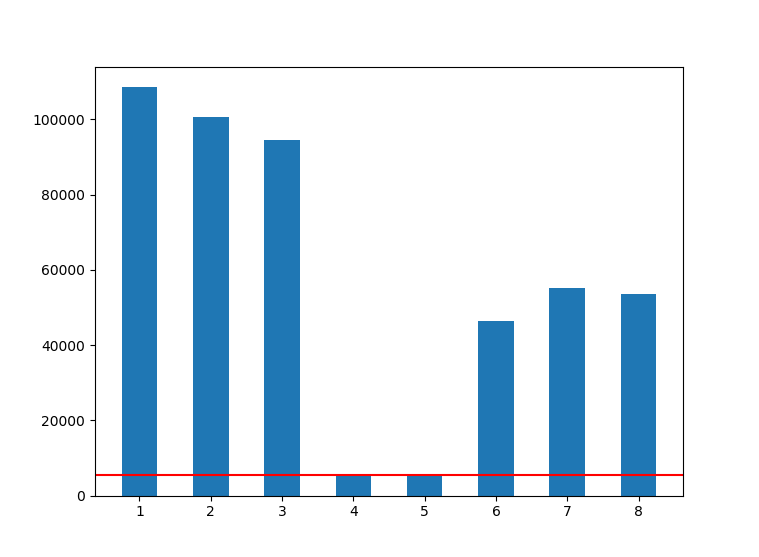
这样通过上式,就可以计算出每个像素在8个方向上的灰度变化情况。选择这8个方向中最小的V值作为像素角点响应值CRF。
\[CRF = min(V_1,V_2,...,V_8)\]如对某个像素分别计算8个方向得到的V如下图所示,最终选择最小值5462作为该像素的CRF。
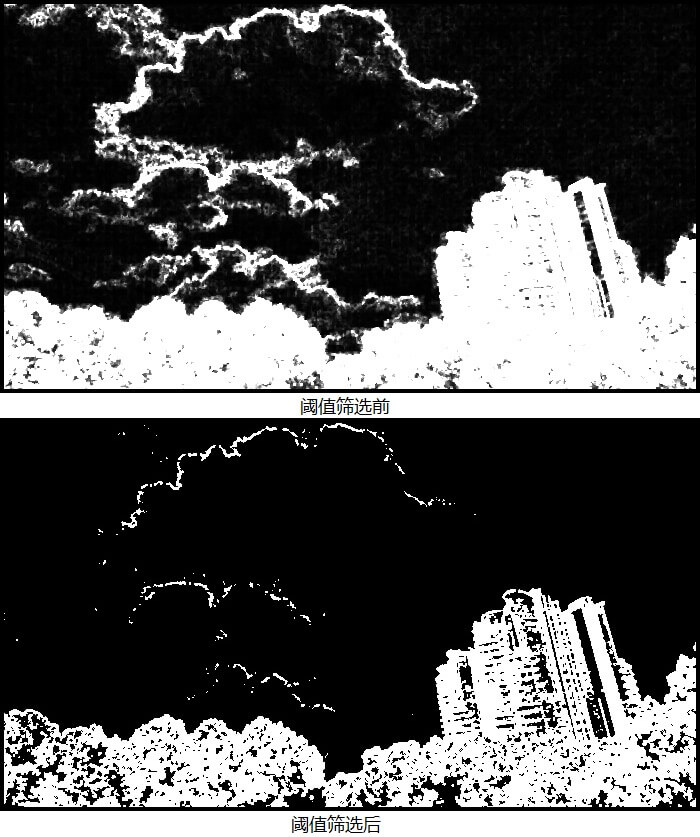
(2)CRF阈值筛选获得候选角点
经过上面的步骤,每一个像素都会有一个计算得到的CRF。但由于我们是要提取特征角点,因此必须要对像素点进行筛选,对于CRF较小的点直接舍去。如下图所示,分别是筛选前后的候选角点。
(3)局部非极大值抑制获得最终角点
在对CRF进行阈值筛选之后,依旧还是会有很多较为密集的角点。为了减少角点的密集程度,使用局部窗口的非极大值抑制(Non-Maximum Supression,NMS)。极大值即认为是角点,如下图。
 非极大值抑制听起来有点高大上,但其实说白了就是在一堆数里找最大值,并把所有不是最大值的数全部置为0。这样做的好处就是可以过滤掉相似的数据,只选择最好的。
3.Moravec算子实现
本文使用Python语言对Moravec算子进行实现。代码引用了两个第三方库,一个是Numpy用于进行矩阵运算等操作,一个是OpenCV,用于读写影像以及绘制特征角点点。其余全部自己实现。完整项目、测试数据与结果见Github,点击查看。代码如下。
# coding=utf-8
import cv2
import numpy as np
from matplotlib import pyplot as plt


def calcV(window1, window2):
    # 用于计算窗口间的差异
    win1 = np.int32(window1)
    win2 = np.int32(window2)
    diff = win1 - win2
    diff = diff * diff
    return np.sum(diff)


def getWindow(img, i, j, win_size):
    # 获得指定范围、大小的窗口内容
    if win_size % 2 == 0:
        win = None
        return win
    half_size = win_size / 2
    start_x = i - half_size
    start_y = j - half_size
    end_x = i + half_size + 1
    end_y = j + half_size + 1
    win = img[start_x:end_x, start_y:end_y]
    return win


def getWindowWithRange(img, i, j, win_size):
    # 获取指定范围、大小的窗口内容以及坐标
    if win_size % 2 == 0:
        win = None
        return win
    half_size = win_size / 2
    start_x = i - half_size
    start_y = j - half_size
    end_x = i + half_size + 1
    end_y = j + half_size + 1
    win = img[start_x:end_x, start_y:end_y]
    return win, start_x, end_x, start_y, end_y


def get8directionWindow(img, i, j, win_size, win_offset):
    # 获取8个方向的不同窗口内容
    half_size = win_size / 2
    win_tl = img[i - win_offset - half_size:i - win_offset + half_size + 1,
             j - win_offset - half_size:j - win_offset + half_size + 1]
    win_t = img[i - win_offset - half_size:i - win_offset + half_size + 1,
            j - half_size:j + half_size + 1]
    win_tr = img[i - win_offset - half_size:i - win_offset + half_size + 1,
             j + win_offset - half_size:j + win_offset + half_size + 1]
    win_l = img[i - half_size:i + half_size + 1,
            j - win_offset - half_size:j - win_offset + half_size + 1]
    win_r = img[i - half_size:i + half_size + 1,
            j + win_offset - half_size:j + win_offset + half_size + 1]
    win_bl = img[i + win_offset - half_size:i + win_offset + half_size + 1,
             j - win_offset - half_size:j - win_offset + half_size + 1]
    win_b = img[i + win_offset - half_size:i + win_offset + half_size + 1,
            j - half_size:j + half_size + 1]
    win_br = img[i + win_offset - half_size:i + win_offset + half_size + 1,
             j + win_offset - half_size:j + win_offset + half_size + 1]
    return win_tl, win_t, win_tr, win_l, win_r, win_bl, win_b, win_br


def nonMaximumSupression(mat, nonMaxValue=0):
    mask = np.zeros(mat.shape, mat.dtype) + nonMaxValue
    max_value = np.max(mat)
    loc = np.where(mat == max_value)
    row = loc[0]
    col = loc[1]
    mask[row, col] = max_value
    return mask, row, col


def getScore(item):
    return item[2]


def getKeypoints(keymap, nonMaxValue, nFeature=-1):
    # 用于获取角点的坐标以及对角点进行排序筛选
    loc = np.where(keymap != nonMaxValue)
    xs = loc[1]
    ys = loc[0]
    print xs.__len__(), 'keypoints were found.'
    kps = []
    for x, y in zip(xs, ys):
        kps.append([x, y, keymap[y, x]])

    if nFeature != -1:
        kps.sort(key=getScore)
        kps = kps[:nFeature]
        print kps.__len__(), 'keypoints were selected.'
    return kps


def drawKeypoints(img, kps):
    for kp in kps:
        pt = (kp[0], kp[1])
        cv2.circle(img, pt, 3, [0, 0, 255], 1, cv2.LINE_AA)
    return img


def getMoravecKps(img_path, win_size=3, win_offset=1, nonMax_size=5, nonMaxValue=0, nFeature=-1, thCRF=-1):
    """
    将上面的步骤整合为一个函数,方便调用

    :param img_path: 影像的路径
    :param win_size: 滑动窗口的大小
    :param win_offset: 窗口偏移的距离
    :param nonMax_size: 非极大值抑制的滑动窗口大小
    :param nonMaxValue: 非极大值抑制时,非极大值被赋的值
    :param nFeature: 打算提取的角点个数,-1表示自动
    :param thCRF: 在对CRF进行筛选时使用的阈值,-1表示自动计算平均值作为阈值
    :return:
    """
    print "step 1:read image"
    img_rgb = cv2.imread(img_path)
    img = cv2.cvtColor(img_rgb, cv2.COLOR_BGR2GRAY)
    img_h = img.shape[0]
    img_w = img.shape[1]
    print "=>image size:", img_h, '*', img_w

    keymap = np.zeros([img_h, img_w], np.int32)

    print "step 2:calculate score value using sliding window"
    safe_range = win_offset + win_size
    for i in range(safe_range, img_h - safe_range):
        for j in range(safe_range, img_w - safe_range):
            win = getWindow(img, i, j, win_size)
            win_tl, win_t, win_tr, win_l, win_r, win_bl, win_b, win_br = get8directionWindow(img, i, j, win_size,
                                                                                             win_offset)
            v1 = calcV(win, win_tl)
            v2 = calcV(win, win_t)
            v3 = calcV(win, win_tr)
            v4 = calcV(win, win_l)
            v5 = calcV(win, win_r)
            v6 = calcV(win, win_bl)
            v7 = calcV(win, win_b)
            v8 = calcV(win, win_br)
            c = min(v1, v2, v3, v4, v5, v6, v7, v8)
            keymap[i, j] = c

    if thCRF == -1:
        # CRF的平均值作为筛选阈值
        mean_c = np.mean(keymap)
        print '=>auto threshold for score value:', mean_c
    else:
        mean_c = thCRF
        print '=>threshold for score value:', mean_c

    print "step 3:filter keypoints using threshold..."
    cv2.imwrite("keymap.jpg", keymap)
    keymap = np.where(keymap < mean_c, 0, keymap)
    cv2.imwrite("keymap_th.jpg", keymap)

    print "step 4:non maximum supression..."
    for i in range(safe_range, img_h - safe_range):
        for j in range(safe_range, img_w - safe_range):
            win, stx, enx, sty, eny = getWindowWithRange(keymap, i, j, nonMax_size)
            nonMax_win, row, col = nonMaximumSupression(win)
            keymap[stx:enx, sty:eny] = nonMax_win
    cv2.imwrite("keymap_nonMax.jpg", keymap)

    print "step 5:get keypoint location and draw points."
    kps = getKeypoints(keymap, nonMaxValue=nonMaxValue, nFeature=nFeature)
    img_kps = drawKeypoints(img_rgb, kps)
    return kps, img_kps


if __name__ == '__main__':
    kps, img = getMoravecKps("img.jpg", nFeature=300)
    cv2.imwrite("moravec.jpg", img)
    cv2.imshow("img", img)
    cv2.waitKey(0)
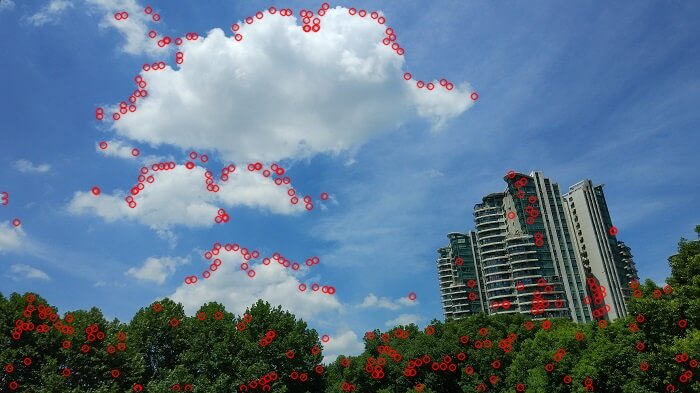
运行结果如下。
 在编程过程中有以下需要注意的地方。首先是滑动窗口的范围问题。需要保证滑动窗口在影像有效范围内遍历。这里采用的是空出边界的办法。即只在比原图小一圈的范围计算特征角点。第二是效率问题。上面的代码运行起来并不是很快,没有进行很多的加速操作。例如在计算CRF这一步,其实各像素、各滑动窗口之间的计算是独立没有关联的,因此完全可以多线程或GPU进行加速。同时这一步也是耗时最久的一步。
对于Numpy矩阵一定要注意索引的包含问题,Numpy的原则是[a,b),因此如果想把b也包含进来,应该写成[a,b+1)。此外,还需要注意的就是数值范围和越界的问题。由于读取的影像灰度数据都为uint8的,因此如果直接进行计算得到的不是想象的结果。应该转成int32类型后,再做加减乘除运算。
在编程过程中有以下需要注意的地方。首先是滑动窗口的范围问题。需要保证滑动窗口在影像有效范围内遍历。这里采用的是空出边界的办法。即只在比原图小一圈的范围计算特征角点。第二是效率问题。上面的代码运行起来并不是很快,没有进行很多的加速操作。例如在计算CRF这一步,其实各像素、各滑动窗口之间的计算是独立没有关联的,因此完全可以多线程或GPU进行加速。同时这一步也是耗时最久的一步。
对于Numpy矩阵一定要注意索引的包含问题,Numpy的原则是[a,b),因此如果想把b也包含进来,应该写成[a,b+1)。此外,还需要注意的就是数值范围和越界的问题。由于读取的影像灰度数据都为uint8的,因此如果直接进行计算得到的不是想象的结果。应该转成int32类型后,再做加减乘除运算。
4.理解与思考
通过自己编写代码,可以更加深入理解Moravec算子。提取主要流程与影响最终提取角点个数的因素如下图所示。

需要说明的主要有以下几点:
-
1.与提取的角点个数相关的参数主要有两个,一个是筛选CRF的阈值,一个是非极大值抑制时的局部窗口大小。阈值越大,提取的待选角点越少。同参数下,非极大值抑制窗口越大,提取的角点个数越少、越稀疏。
-
2.与算法效率相关的参数则是滑动窗口大小以及非极大值抑制的步长大小。滑动窗口越大,计算量也越大。对于步长,步长越小,需要计算的次数也越多。
-
3.与算法效果相关的参数则是滑动窗口偏移距离,越小越能反映灰度细节的变化。
-
4.Moravec算子只在8个方向,每45度进行了灰度计算,而没有考虑全部方向上的灰度变化。这就容易误判或漏判一些信息,不能很好地反映全部方向上的灰度变化信息。此外,在计算CRF时,对窗口内的所有像素都是一样的权重,这样就容易对噪声敏感。可以考虑通过加权求和的办法来解决这个问题。
-
5.在计算CRF时,选取的是8个方向上的灰度方差最小值作为角点响应值CRF,所以对边缘响应较为敏感,容易把边缘非角点当作角点。例如当边缘刚好与某一方向重合时,那么算出来的方差会非常小,这时候就很容易把这个值作为最小值,赋给CRF了。
-
6.以上的缺点导致Moravec算子虽然简单、快速,但不是很准确。但不管怎么说,Moravec算子作为第一个被广泛应用的角点检测算法,开启了角点检测的新概念,为后续很多角点算子奠定了基础。
5.参考资料
- [1]https://en.wikipedia.org/wiki/Corner_detection
- [2]https://blog.csdn.net/kezunhai/article/details/11176065
- [3]https://blog.csdn.net/carson2005/article/details/39642923
本文作者原创,未经许可不得转载,谢谢配合