最近经常碰到需要比划个长度手边却没有尺子的情况,比较烦人。为了解决这个问题,便有了这篇博客。本篇博客主要介绍基于Python实现生成具有真实长度的尺子的相关技术要点。
1.技术分析
要生成能和真实长度对应的尺子图片则必须要找到当前屏幕在当前分辨率下的像素与真实尺寸的对应关系。经常关注手机的同学应该对dpi这个术语不陌生,它是用来屏幕显示精细程度的指标,全称是dots per inch,按如下公式计算。
\[DPI = \frac{pixels}{inch}\]这个指标其实就联系了像素与真实长度,例如我的手机是386dpi,就表示在1英寸的长度上有386个像素。一英寸对应2.54cm。因此可以很自然地算出1cm上约有151.9685个像素。 获得的这个数值,在屏幕上显示真实长度就方便了。只需要构造一个长度为152像素(取整)的图像,并在屏幕上100%显示,其对应的就是真实长度1cm了。 以上便是实现这个需求的技术分析了,核心就是获取到当前屏幕的dpi。
相比于手机上相对固定的dpi,在电脑上想要获取到dpi稍微复杂些,因为在电脑上dpi会改变的,不同的缩放比例和分辨率都会对应不同的dpi(部分手机也可以缩放和修改分辨率),如下图。
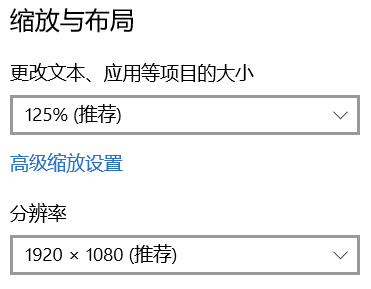 因此需要我们通过系统API,根据当前屏幕的状态自己算出当前的dpi。这部分在后面会详细介绍。
2.代码编写
(1)获取屏幕实际像素分辨率
在Windows下获取屏幕的实际像素分辨率可以通过Windows自有的API实现,比较简单,可以有以下两种方式,一种是引入win32api模块,另一种是引入win32print模块。
# coding=utf-8
import win32api, win32con
import win32gui
import win32print


def getScreenRes():
    hDC = win32gui.GetDC(0)
    width = win32print.GetDeviceCaps(hDC, win32con.HORZRES)
    height = win32print.GetDeviceCaps(hDC, win32con.VERTRES)
    return width, height


def getScreenRes2():
    width = win32api.GetSystemMetrics(win32con.SM_CXSCREEN)
    height = win32api.GetSystemMetrics(win32con.SM_CYSCREEN)
    return width, height
以上两个函数都可以实现获得当前屏幕分辨率。需要注意的是,这获取到的是屏幕实际分辨率,而不是设置的分辨率,尤其是在有缩放的情况下。例如我电脑设置的是1920×1080的分辨率,但同时又设置了125%的缩放,因此最终屏幕的真实分辨率是1536×864。
(2)获取屏幕物理尺寸
以下函数可以实现获取屏幕的物理尺寸,单位是mm。
# coding=utf-8
import win32con
import win32gui
import win32print


def getScreenSize():
    hDC = win32gui.GetDC(0)
    width_mm = win32print.GetDeviceCaps(hDC, win32con.HORZSIZE)
    height_mm = win32print.GetDeviceCaps(hDC, win32con.VERTSIZE)
    return width_mm, height_mm
在本机可以得到屏幕的宽高分别是344mm和194mm,可以求出对角线长度是394.9329mm,换算成英寸约为15.5485inch。这也和之前电脑标注的配置15寸屏幕吻合。
更多关于GetDeviceCaps()函数的信息可参考这个网页。
(3)获取屏幕当前状态下的DPI
在分别获得了屏幕的实际分辨率和物理尺寸后,就可以很容易的算出DPI了,这里为了后续使用方便算的是PPM(pixel per milimeter),即像素/毫米,代码如下。
def getScreenPPM():
    width, height = getScreenRes()
    width_mm, height_mm = getScreenSize()
    ppm_w = width * 1.0 / width_mm
    ppm_h = height * 1.0 / height_mm
    return ppm_w, ppm_h
这里需要注意的是在为了保证精度,计算PPM的时候要保留成小数形式,不能直接取整,否则这会直接导致后续计算的精度损失。 例如本机获得的水平方向的PPM为4.465,也就是每1mm上有4.465个像素。而若取整为4,那么在表达10mm的时候,由小数计算出的像素数为44.65,由整数计算结果为40,相差了4个像素。而且这种差异会随着长度增大而变大。
同时,正如之前说过的,由于不同缩放状态以及设置不同分辨率会导致实际分辨率不同,进而会导致算出来的PPM不同。例如我的电脑设置分辨率为1920×1080、125%缩放时PPM为4.46,在1920×1080、100%缩放时为5.58。 需要注意的是这里算出来的PPM并不算是屏幕的物理属性,而是会随着设置而改变的。而屏幕的物理DPI是不会变的,屏幕在生产好以后,每个像素是多少物理长度就固定了,不会随着设置而改变的,类似于相机的内参。
以上三个函数均在本机(Win10)测试通过,可以正常使用,但不保证在不同版本的系统一定可以使用。
(4)生成长度量尺
算出了必要的数据后,就可以绘制尺子了,这里采用OpenCV进行绘制,相关代码如下。
def genRuler(length_cm=20, width_pixel=120):
    """
    尺子绘制函数

    :param length_cm: 尺子长度,单位厘米,默认20cm
    :param width_pixel: 尺子宽度,单位毫米,默认120mm
    :return:
    """

    # 配色方案
    color_style = []
    color_style.append((255, 255, 255))  # 文字、刻线颜色
    color_style.append([204, 144, 94])  # 浅背景色
    color_style.append([172, 93, 0])  # 深背景色

    # 获取屏幕基础信息
    ppm, _ = getScreenPPM()
    total_length_mm = length_cm * 10
    total_length_pixel = int(ppm * total_length_mm)

    # 背景绘制
    background = np.zeros([width_pixel, total_length_pixel, 3], np.uint8)
    background[:, :, :] = color_style[1]
    background[70:, :, :] = color_style[2]

    # 图案绘制
    cv2.circle(background, (total_length_pixel * 3 / 8, width_pixel - 35), 8, (255, 255, 255), -1, cv2.LINE_AA)
    cv2.circle(background, (total_length_pixel * 5 / 8, width_pixel - 35), 8, (255, 255, 255), -1, cv2.LINE_AA)
    cv2.line(background,
             (total_length_pixel * 4 / 8 - 10, width_pixel - 12),
             (total_length_pixel * 4 / 8, width_pixel - 7), (255, 255, 255), 3, cv2.LINE_AA)
    cv2.line(background,
             (total_length_pixel * 4 / 8, width_pixel - 7),
             (total_length_pixel * 4 / 8 + 10, width_pixel - 12), (255, 255, 255), 3, cv2.LINE_AA)

    # 文字信息绘制
    cv2.putText(background, "Unit:cm", (5, width_pixel - 10), cv2.FONT_HERSHEY_SIMPLEX, 0.4,
                color_style[0], 1,
                cv2.LINE_AA)
    cv2.putText(background, "Zhao Xuhui", (total_length_pixel - 80, width_pixel - 10), cv2.FONT_HERSHEY_SIMPLEX,
                0.4,
                color_style[0], 1,
                cv2.LINE_AA)

    # 绘制刻线及标注
    for i in range(int(total_length_pixel / ppm) + 1):
        graduation = int(round(i * ppm, 0))
        if i % 10 == 0:  # 整厘米刻线最长
            background[30:70, graduation, :] = color_style[0]
            if i == 0:  # 0标注为了美观稍微移动位置
                cv2.putText(background, (i / 10).__str__(), (graduation + 1, 20), cv2.FONT_HERSHEY_SIMPLEX, 0.5,
                            color_style[0], 1,
                            cv2.LINE_AA)
            else:
                if i >= 100:  # 两位数标为了美观注稍微移动
                    cv2.putText(background, (i / 10).__str__(), (graduation - 10, 20), cv2.FONT_HERSHEY_SIMPLEX, 0.5,
                                color_style[0], 1,
                                cv2.LINE_AA)
                else:
                    cv2.putText(background, (i / 10).__str__(), (graduation - 5, 20), cv2.FONT_HERSHEY_SIMPLEX, 0.5,
                                color_style[0], 1,
                                cv2.LINE_AA)
        elif i % 5 == 0:  # .5厘米刻线长一些
            background[40:70, graduation, :] = color_style[0]
        else:  # 其它毫米刻线最短
            background[53:70, graduation, :] = color_style[0]
    return background
调用上述函数即可绘制出一个标准的尺子图片,默认生成一个长20cm、宽1.2cm的量尺。
(5)生成面积量尺
在长度量尺的基础上又编写了生成面积量尺的代码,基本大同小异,只是一个是水平的一个是竖直的。
def genAreaRuler(length_cm=5, width_cm=5):
    # 颜色样式
    color_style = []
    color_style.append((255, 255, 255))  # 刻线颜色
    color_style.append([204, 144, 94])  # 浅背景色
    color_style.append([172, 93, 0])  # 深背景色
    color_style.append((0, 255, 255))  # 文字颜色

    # 获得屏幕基本信息
    ppm_w, ppm_h = getScreenPPM()
    total_length_mm = length_cm * 10
    total_length_pixel = int(ppm_w * total_length_mm)
    total_width_mm = width_cm * 10
    total_width_pixel = int(ppm_h * total_width_mm)

    # 背景绘制
    background = np.zeros([total_width_pixel, total_length_pixel, 3], np.uint8)
    background[:, :, :] = color_style[2]

    # 虚线绘制
    step_length = 5
    line_color = (255, 255, 255)
    for i in range(int(total_length_pixel / ppm_w) + 1):
        graduation = int(round(i * ppm_w, 0))
        if i % 10 == 0 and i >= 10:
            for i in range(int(total_width_pixel / step_length)):
                if i % 2 == 0:
                    cv2.line(background, (graduation, i * step_length), (graduation, (i + 1) * step_length), line_color)
    for i in range(int(total_width_pixel / ppm_h) + 1):
        graduation = int(round(i * ppm_h, 0))
        if i % 10 == 0 and i >= 10:
            for i in range(int(total_length_pixel / step_length)):
                if i % 2 == 0:
                    cv2.line(background, (i * step_length, graduation), ((i + 1) * step_length, graduation), line_color)

    # 刻线绘制
    for i in range(int(total_length_pixel / ppm_w) + 1):
        graduation = int(round(i * ppm_w, 0))
        if i % 10 == 0:
            background[:40, graduation, :] = color_style[0]
            if i == 0:
                pass
            else:
                if i >= 100:
                    cv2.putText(background, (i / 10).__str__(), (graduation - 10, 55), cv2.FONT_HERSHEY_SIMPLEX, 0.5,
                                color_style[3], 1,
                                cv2.LINE_AA)
                else:
                    cv2.putText(background, (i / 10).__str__(), (graduation - 5, 55), cv2.FONT_HERSHEY_SIMPLEX, 0.5,
                                color_style[3], 1,
                                cv2.LINE_AA)
        elif i % 5 == 0:
            background[:30, graduation, :] = color_style[0]
        else:
            background[:17, graduation, :] = color_style[0]
    for i in range(int(total_width_pixel / ppm_h) + 1):
        graduation = int(round(i * ppm_h, 0))
        if i % 10 == 0:
            background[graduation, :40, :] = color_style[0]
            if i == 0 or i == 10:
                pass
            else:
                cv2.putText(background, (i / 10).__str__(), (45, graduation + 5), cv2.FONT_HERSHEY_SIMPLEX, 0.5,
                            color_style[3], 1,
                            cv2.LINE_AA)
        elif i % 5 == 0:
            background[graduation, :30, :] = color_style[0]
        else:
            background[graduation, :17, :] = color_style[0]

    # 文字信息绘制
    cv2.putText(background, "Unit:cm", (total_length_pixel - 80, total_width_pixel - 30), cv2.FONT_HERSHEY_SIMPLEX, 0.4,
                color_style[0], 1,
                cv2.LINE_AA)
    cv2.putText(background, "Zhao Xuhui", (total_length_pixel - 80, total_width_pixel - 10), cv2.FONT_HERSHEY_SIMPLEX,
                0.4,
                color_style[0], 1,
                cv2.LINE_AA)
    return background
函数默认生成一把5cm×5cm的面积量尺。
上述所有代码均放在了Github上,点击查看,欢迎Start或Fork。
3.代码测试
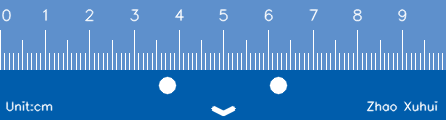
如下,在我的电脑(1920×1080,125%缩放)生成了一把10cm的长度量尺。
 以及一个10cm×6cm的面积量尺。
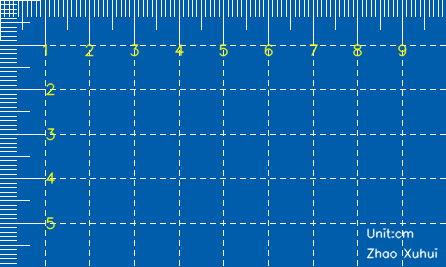 将生成的量尺和真实卷尺比较如下所示。
 可以看到和真实卷尺相比是完全一致的(8、9cm那里不对应是因为没拉直),圆满完成了我们的目标。
本文作者原创,未经许可不得转载,谢谢配合