本篇博客是慕课《ROS机器人操作系统入门》的第五篇笔记,慕课网址是这里。本篇笔记主要记录Action和在C++和Python下的两种实现方式、需要注意的问题。
1.Action基本知识
相比于之前提到的Topic和Service通信方式,Action是一种带有反馈状态的通信方式,与Service相比,它一般用于长时间、可抢占的任务中,而且可以在执行过程中停止。基本知识在第一篇ROS笔记中有提到,点击查看。
在ROS中Action通过actionlib提供API,更多关于它的介绍可参考官方文档,点击查看。
2.需求与描述
这里我们构建这样一个场景:客户端将一张需要处理的图像发送给服务端,服务端进行处理(如将RGB彩色图像变成灰度图像)并实时返回处理进度,当处理完成后返回处理后的图像。
我们创建一个包名称叫image_process,其中包含两个节点(Node):img_server和img_client。img_client负责发送一个图片的路径字符串,img_server负责根据这个字符串打开图片,并进行处理,最后返回给img_client。整个过程通过ProcImg这个Action进行交互。
3.Action的C++实现
(1)创建Package
打开RoboWare,在”资源管理器”中找到src文件夹,右键单击选择”新建ROS包”,输入image_process即可创建Package。创建完成后右键Package选择”编辑依赖的ROS包列表”,输入roscpp、message_generation、genmsg、actionlib_msgs、actionlib(空格隔开)即可添加依赖。
(2)定义Action文件
Action文件需要三个部分:goal、result以及feedback,彼此之间用三个短横线隔开。客户端向服务端发送一个goal,服务端在接收到后开始执行,并实时返回执行进度feedback,在执行完成后返回最终结果result。
在RoboWare的”资源管理器”中找到image_process文件夹,右键单击选择”新建Action文件夹”,在新建的Action文件夹上右键选择”新建ACTION文件”,输入ProcImg.action即可创建。
文件创建好后在文件中写入如下内容并保存。根据需求与描述部分的要求,可以定义goal-result-feedback这种三段式的Action文件如下:
# 定义goal
# 定义goal,传入的是待处理的图像路径
string img_path
---
# 定义result,传出的是处理后的图像数据以及宽高
uint8[] processed_img
uint32 img_width
uint32 img_height
---
# 定义feedback,完成百分比
float32 complete_percent
(3)编译Action文件
在Catkin的工作空间根目录下调用catkin_make就可以进行编译了。之后我们可以在/root/catkin_ws/devel/include/image_process下找到生成的Action头文件了,如下,后续调用它即可。
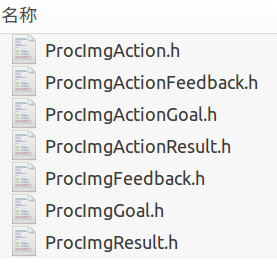 在
在/root/catkin_ws/devel/share/image_process/msg下则可以找到根据我们定义的Action文件自动生成的Message文件。
(2)创建img_client节点
在RoboWare的资源管理器中找到image_process,右键选择”新建Src文件夹”,在src文件夹上右键,然后选择”新建CPP源文件”,输入名称为img_client.cpp并回车,然后在弹出的对话框中选择”加入到新的可执行文件中”即可。
需要注意的是由于涉及到图片相关,因此还需要用到OpenCV库。所以我们还需要打开CMakeLists.txt文件手动添加OpenCV依赖,修改好的内容如下。
# 新增寻找OpenCV
find_package(OpenCV 3.4.6 REQUIRED)
# 新增添加include目录
include_directories(${OpenCV_DIRS})

add_executable(img_server
  src/img_server.cpp
)
add_dependencies(img_server ${${PROJECT_NAME}_EXPORTED_TARGETS} ${catkin_EXPORTED_TARGETS})
target_link_libraries(img_server
  ${catkin_LIBRARIES}
  # 新增link opencv的库
  ${OpenCV_LIBS}
)
这里需要十分注意的是在安装ROS的时候自动也装了一个OpenCV,但这个OpenCV并不一定好用。所以你需要用你之前自己装的OpenCV。要想使用自己的OpenCV就要在CMakeLists.txt中精确指定OpenCV版本(ROS装的OpenCV和自己的OpenCV版本号不一样的情况下),可以进行区分了。可以在终端中使用如下命令查看OpenCV版本:
pkg-config opencv --modversion
我电脑上自己装的是3.4.6版本,所以这里就填它了。
(3)编写img_client节点代码
对于一个Action的客户端来说,其对外发布tf消息与之前的Topic类似。主要包含:初始化ROS节点(ros::init())、编写回调函数、创建客户端、发送goal(client.sendGoal())、循环执行(ros::spin())。具体代码如下:
#include<ros/ros.h>
#include<actionlib/client/simple_action_client.h>   // 客户端需要包含的头文件
#include<image_process/ProcImgAction.h> // 自定义Action所要包含的头文件
#include<opencv2/opencv.hpp>    // OpenCV基础包要包含的头文件

// 利用typedef提前定义好类型
typedef actionlib::SimpleActionClient <image_process::ProcImgAction> Client;

// 自定义函数,用于将Message传输的vector<uint8_t>类型数据转换成OpenCV的Mat类型
cv::Mat cvtArray2Img(std::vector<uint8_t> array, int img_height, int img_width) {
    cv::Mat restore_img(img_height, img_width, CV_8UC3);
    for (int i = 0; i < img_height; i++) {
        for (int j = 0; j < img_width; j++) {
            int index = i * img_width + j;
            uint8_t b = array[index];
            uint8_t g = array[index + img_height * img_width];
            uint8_t r = array[index + img_height * img_width * 2];
            restore_img.at<cv::Vec3b>(i, j) = cv::Vec3b(b, g, r);
        }
    }
    return restore_img;
}


// 当Action完成后的回调函数
void doneCb(const actionlib::SimpleClientGoalState &state,
            const image_process::ProcImgResultConstPtr &result) {
    // 新建一个Mat并将传输的数据转换成OpenCV能识别的Mat类型
    cv::Mat processed_img;
    processed_img = cvtArray2Img(result->processed_img, result->img_height, result->img_width);

    // 如果原图太大,将它缩小,这样利于展示
    if (result->img_width > 1200) {
        float ratio = 1200.0 / result->img_width;
        cv::resize(processed_img, processed_img, cv::Size(0, 0), ratio, ratio);
    }

    ROS_INFO("Finished processing image with %d x %d pixels...", result->img_height, result->img_width);

    // 展示图片
    cv::imshow("processed_img", processed_img);
    cv::waitKey(0);

    // 关闭ROS
    ros::shutdown();
}

// 当Action启动后的回调函数
void activeCb() {
    ROS_INFO("Contected to server,start processing image...");
}

// 当收到Feedback后的回调函数
void feedbackCb(const image_process::ProcImgFeedbackConstPtr &feedback) {
    ROS_INFO("percent complete:%.2f%%", feedback->complete_percent);
}

int main(int argc, char *argv[]) {
    // 用户输入图片路径
    std::string img_path;
    std::cout << "Input image path:\n";
    std::cin >> img_path;

    // 初始化并指定节点名称
    ros::init(argc, argv, "img_client");
    // 创建客户端并指定要连接到的服务端名称
    Client client("img_process", true);

    // 等待服务端
    ROS_INFO("Waiting for action server to start.");
    client.waitForServer();
    ROS_INFO("Action server started, sending goal.");

    // 创建Action的goal,传入的是图片路径字符串
    image_process::ProcImgGoal img_goal;
    img_goal.img_path = img_path;

    // 将goal发送给服务端,并设置回调函数
    client.sendGoal(img_goal, &doneCb, &activeCb, &feedbackCb);

    // 循环执行
    ros::spin();
    return 0;
}
(4)创建img_server节点
在RoboWare的资源管理器中找到src文件夹,点击右键,然后选择”新建CPP源文件”,输入名称为img_server.cpp并回车,然后在弹出的对话框中选择”加入到新的可执行文件中”即可。
同理,由于包含了对OpenCV的引用,在CMakeLists.txt的img_server里的target_link_libraries中要添加OpenCV库(${OpenCV_LIBS})。
(5)编写img_server节点代码
对于一个Action的服务端来说,主要包含:初始化ROS节点(ros::init())、新建NodeHandle(ros::NodeHandle)、编写回调函数、创建Server、开始服务(server.start())、循环执行(ros::spin())。具体代码如下:
#include<ros/ros.h>
#include<actionlib/server/simple_action_server.h>   // 服务端需要包含的头文件
#include<image_process/ProcImgAction.h> // 自定义Action所要包含的头文件
#include<opencv2/opencv.hpp>    // OpenCV基础包要包含的头文件

// 利用typedef提前定义好类型
typedef actionlib::SimpleActionServer <image_process::ProcImgAction> Server;

// 自定义的用于将OpenCV的Mat类型转成Message传输的vector<uint8_t>类型的函数
std::vector<uint8_t> cvtImg2Array(cv::Mat img) {
    // array的数据格式是B、G、R波段像素依次存储
    std::vector<uint8_t> array;
    for (int c = 0; c < img.channels(); c++) {
        for (int i = 0; i < img.size().height; i++) {
            for (int j = 0; j < img.size().width; j++) {
                array.push_back(img.at<cv::Vec3b>(i, j)[c]);
            }
        }
    }
    return array;
}

// 服务端在收到客户端发来的Action后调用的回调函数
void executeCb(const image_process::ProcImgGoalConstPtr &goal, Server *as) {
    image_process::ProcImgFeedback feedback;

    // 根据客户端发来的图片路径读取并转换图片数据
    ROS_INFO("Reading image...");
    cv::Mat img = cv::imread(goal->img_path);
    std::vector<uint8_t> array = cvtImg2Array(img);
    int img_height = img.size().height;
    int img_width = img.size().width;

    ROS_INFO("Server is processing image with %d x %d pixels...", img_height, img_width);

    // 新建一个result_array用于存放处理后的结果
    std::vector<uint8_t> result_array(img_height * img_width * 3);

    // 这里依次遍历像素,实现将彩色图像转换为灰度图像的功能
    // 为了便于功能扩展,最后的灰度图也设置成了三个通道,各通道灰度值相同
    for (int i = 0; i < img_height * img_width; i++) {
        int b = array[i];
        int g = array[i + img_height * img_width];
        int r = array[i + img_height * img_width * 2];
        uint8_t gray = uint8_t((r * 30 + g * 59 + b * 11 + 50) / 100);
        result_array[i] = gray;
        result_array[i + img_height * img_width] = gray;
        result_array[i + img_height * img_width * 2] = gray;

        // 每执行10次向客户端发布一次进度Feedback
        if (i % 10 == 0) {
            feedback.complete_percent = (i * 100.0) / (img_height * img_width);
            as->publishFeedback(feedback);
        }
    }

    // 当Action完成后,向客户端返回结果
    ROS_INFO("Server finished processing image.");
    image_process::ProcImgResult result;
    // 虽然在Message里定义的processed_img是数组,但是可以直接将vector赋值给它的
    // 因为在自动生成的头文件中uint8[]就是通过std::vector<uint8_t>实现的
    result.processed_img = result_array;
    result.img_height = img_height;
    result.img_width = img_width;
    // 最后在setSucceeded函数里设置返回值,将结果返回给客户端
    as->setSucceeded(result);
}

// 中断回调函数
void preemptCb(Server *as) {
    if (as->isActive()) {
        // 强制中断
        as->setPreempted();
    }
}


int main(int argc, char *argv[]) {
    // 初始化并指定节点名称
    ros::init(argc, argv, "img_server");
    // 创建句柄
    ros::NodeHandle nh;

    // 创建服务端
    // 第一个参数是节点句柄
    // 第二个参数是新建的Server的名称
    // 第三个参数是处理的回调函数,这里使用了boost库的bind函数,使得函数传入的参数类型可以不确定
    // _1是占位符,格式为:boost::bind(函数名, 参数1,参数2,...)
    // 更多可参考这篇博客https://blog.csdn.net/jack_20/article/details/78862402
    // 第四个参数是表示服务是否自动开始,详细可参考SimpleActionServer的构造函数文档
    Server server(nh, "img_process", boost::bind(&executeCb, _1, &server), false);
    //注册抢占回调函数
    server.registerPreemptCallback(boost::bind(&preemptCb, &server));
    // 开始服务
    server.start();
    ROS_INFO("Service is ready to work.");
    // 循环执行
    ros::spin();
    return 0;
}
(6)编译运行测试
最后在Catkin工作空间根目录下打开终端,使用catkin_make进行编译。然后先输入roscore打开Master,然后在新终端中输入rosrun image_process img_server启动img_server节点,新终端中输入rosrun image_process img_client启动img_client节点。如下:
 可以看到成功运行了刚刚写的两个节点,并且实现了Action消息的收发。最后简单说一下,生成的两个节点的可执行文件放在了
/root/catkin_ws/devel/lib/image_process里,直接在终端中运行这个可执行文件也是可以的(Master已经运行的情况下)。
4.Action的Python实现
(1)创建Package
打开RoboWare,在”资源管理器”中找到src文件夹,右键单击选择”新建ROS包”,输入image_process即可创建Package。创建完成后右键Package选择”编辑依赖的ROS包列表”,输入rospy、message_generation、genmsg、actionlib_msgs、actionlib(空格隔开)即可添加依赖。
(2)创建Action消息文件
与前面创建Action消息文件内容一模一样。
(3)编译Action消息文件
与前面编译Action消息文件内容一模一样。Message在ROS下是通用的,与编程语言无关。
(4)创建img_client节点文件
根据之前的习惯,src文件夹里一般放C/C++文件,Python代码一般放在scripts文件夹里。在包名上右键点击,选择”新建文件夹”,输入名称为scripts,在scripts文件夹上右键选择”新建文件”,输入img_client.py即可。
(5)编写img_client代码
Python代码如下:
# coding=utf-8
import rospy
import roslib
roslib.load_manifest('image_process')
import actionlib
import cv2
import numpy as np

from image_process.msg import ProcImgAction, ProcImgGoal


# 自定义函数,用于将字符串形式的数据转换成uint8数字表示的NDArray
# 在Python中Message的uint8数组以字符串形式传输的,这点需要注意
def cvtArray2Img(array, img_height, img_width):
    restore_img = np.zeros([img_height, img_width, 3], np.uint8)
    print "receiving and converting image data..."
    for i in range(img_height):
        for j in range(img_width):
            index = i*img_width+j
            # 利用ord()函数将单个字母转换成对应的字符编码
            b = ord(array[index])
            g = ord(array[index+img_height*img_width])
            r = ord(array[index+img_height*img_width*2])
            restore_img[i, j, :] = [b, g, r]
    return restore_img

# 当Action完成后的回调函数
def doneCb(state, result):
    # 新建一个Mat并将传输的字符串数据转换成OpenCV能识别的Mat类型
    processed_img = cvtArray2Img(
        result.processed_img, result.img_height, result.img_width)

    # 如果原图太大,将它缩小,这样利于展示
    if processed_img.shape[0] > 1200:
        ratio = 1200.0/result.img_width
        processed_img = cv2.resize(processed_img, None, None, ratio, ratio)

    rospy.loginfo("Finished processing image with %d x %d pixels...",
                  result.img_height, result.img_width)

    # 展示图片
    cv2.imshow("processed_img", processed_img)
    cv2.waitKey(0)

# 当Action启动后的回调函数
def activeCb():
    rospy.loginfo("Contected to server,start processing image...")

# 当收到Feedback后的回调函数
def feedbackCb(feedback):
    rospy.loginfo("percent complete:%.2f%%", feedback.complete_percent)


if __name__ == "__main__":
    # 用户输入图片路径
    img_path = raw_input("Input image path:\n")

    # 初始化并指定节点名称
    rospy.init_node("img_client")
    # 创建客户端并指定要连接到的服务端名称
    client = actionlib.SimpleActionClient("img_process", ProcImgAction)

    # 等待服务端
    rospy.loginfo("Waiting for action server to start.")
    client.wait_for_server()
    rospy.loginfo("Action server started, sending goal.")

    # 创建Action的goal,传入的是图片路径字符串
    img_goal = ProcImgGoal()
    img_goal.img_path = img_path

    # 将goal发送给服务端,并设置回调函数
    client.send_goal(img_goal, doneCb, activeCb, feedbackCb)

    # 循环执行
    rospy.spin()
(6)创建img_server节点文件
在scripts文件夹上右键选择”新建文件”,输入img_server.py即可。
(7)编写img_server代码
代码如下:
# coding=utf-8
import rospy
import roslib
roslib.load_manifest("image_process")
import actionlib
import cv2

from image_process.msg import ProcImgAction,ProcImgFeedback,ProcImgResult


# 自定义函数,用于将OpenCV的NDArray类型的数据转换成一维的list
def cvtImg2Array(img):
    # array的数据格式是B、G、R波段像素依次存储
    array = []
    img_height = img.shape[0]
    img_width = img.shape[1]
    img_channels = img.shape[2]

    for c in range(img_channels):
        for i in range(img_height):
            for j in range(img_width):
                array.append(img[i,j,c])
    return array

class ImgProcessServer:
    def __init__(self):
        self.server = actionlib.SimpleActionServer("img_process",ProcImgAction,self.exectueCb,False)
        self.server.register_preempt_callback(self.preemptCb)
        self.server.start()
        rospy.loginfo("Service is ready to work.")

    # 服务端在收到客户端发来的Action后调用的回调函数
    def exectueCb(self,goal):
        feedback = ProcImgFeedback()

        # 根据客户端发来的图片路径读取并转换图片数据
        img = cv2.imread(goal.img_path)
        array = cvtImg2Array(img)
        img_height = img.shape[0]
        img_width = img.shape[1]

        rospy.loginfo("Server is processing image with %d x %d pixels...", img_height, img_width)

        # 新建一个result_array用于存放处理后的结果
        result_array = [0]*(img_height * img_width * 3)

        # 这里依次遍历像素,实现将彩色图像转换为灰度图像的功能
        # 为了便于功能扩展,最后的灰度图也设置成了三个通道,各通道灰度值相同
        for i in range(img_height*img_width):
            b = array[i]
            g = array[i + img_height * img_width]
            r = array[i + img_height * img_width * 2]
            gray = int((r * 30 + g * 59 + b * 11 + 50) / 100)
            result_array[i]=gray
            result_array[i + img_height * img_width] = gray
            result_array[i + img_height * img_width * 2] = gray

            # 每执行10次向客户端发布一次进度Feedback
            if i%10==0:
                feedback.complete_percent = (i * 100.0) / (img_height * img_width)
                self.server.publish_feedback(feedback)

        # 当Action完成后,向客户端返回结果
        rospy.loginfo("Server finished processing image.")
        result = ProcImgResult()
        result.processed_img = result_array
        result.img_height = img_height
        result.img_width = img_width
        # 最后在set_succeeded函数里设置返回值,将结果返回给客户端
        self.server.set_succeeded(result)

    # 中断回调函数
    def preemptCb(self):
        if self.server.is_active():
            # 强制中断
            self.server.set_preempted()

if __name__ == "__main__":
    # 初始化并指定节点名称
    rospy.init_node("img_server")
    # 调用服务类启动服务
    server = ImgProcessServer()
    # 循环执行
    rospy.spin()
(8)运行测试
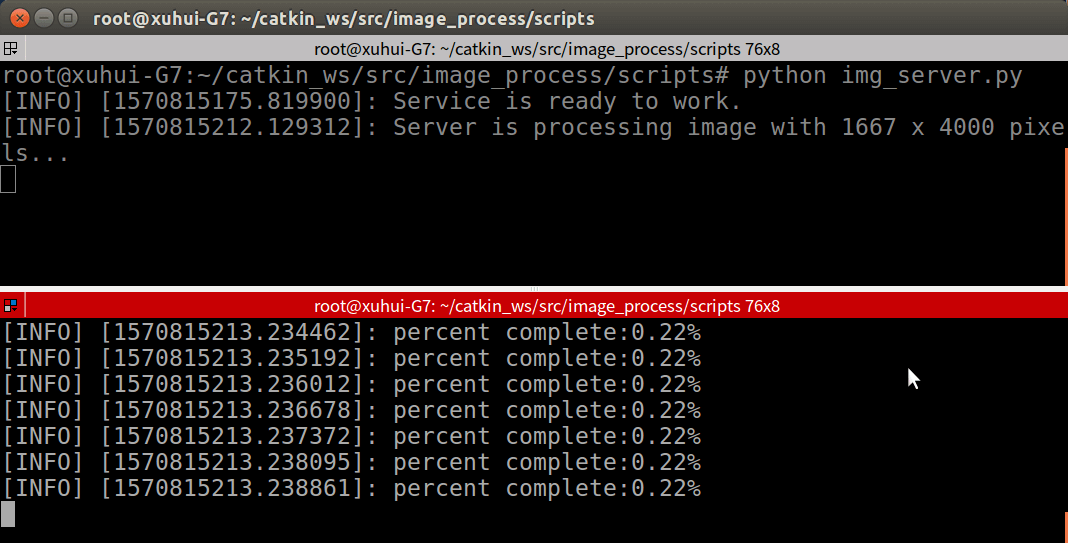
最后在终端中输入roscore启动Master,在scripts目录下打开新终端然后分别输入python img_server.py启动服务节点,python img_client.py启动客户节点。运行界面如下:
最后所有代码上传到了Github,点击查看。
本文作者原创,未经许可不得转载,谢谢配合