本篇博客是Nvidia CUDA Python系列在线课程6月9日第一次直播的实例练习。涉及CUDA编程相关基础与图像像素级操作。本次直播视频可以在这里观看,课程ppt在这里下载。相关代码见Github项目,点击查看。
1.实例代码
老师上课演示的代码是Github项目中的20200609-python-cuda-cv.py文件。下面的代码是自己实现的影像二值化、线性灰度拉伸相关功能。
# coding=utf-8
import cv2
import numpy as np
from numba import cuda
import math


@cuda.jit
def binary_img(img, threshold):
    # 这里需要计算每个线程所对应的位置,根据它的位置和每个像素对应,进而进行像素级操作
    # blockIdx是当前线程所在block的x索引(从0开始),blockDim是每个block的x方向包含的线程个数(宽度),threadIdx是该线程在当前block中的x索引
    # 另外需要注意的还是索引顺序问题,CUDA里的x指的是竖直方向,y指的是水平方向
    tx = cuda.blockIdx.x * cuda.blockDim.x + cuda.threadIdx.x
    ty = cuda.blockIdx.y * cuda.blockDim.y + cuda.threadIdx.y
    # 所以在根据索引获得像素时,是先ty再tx,不然就反了
    if img[ty, tx] > threshold:
        img[ty, tx] = 255
    else:
        img[ty, tx] = 0


@cuda.jit
def linear_stretch(img, old_min, scale_ratio):
    tx = cuda.blockDim.x * cuda.blockIdx.x + cuda.threadIdx.x
    ty = cuda.blockDim.y * cuda.blockIdx.y + cuda.threadIdx.y
    img[ty, tx] = (img[ty, tx] - old_min) * scale_ratio


def calculate_size(img, threadDim=16):
    # 获取影像宽高
    height = img.shape[0]
    width = img.shape[1]
    # 在本机上,每个block中最大支持1024个线程,这里默认为16×16个线程
    threadsperblock = (threadDim, threadDim)
    # 按照每个线程对应一个像素的原则,计算出应该有多少block(向上取整)
    blockspergrid_x = int(math.ceil(width / threadsperblock[0]))
    blockspergrid_y = int(math.ceil(height / threadsperblock[1]))
    blockspergrid = (blockspergrid_x, blockspergrid_y)
    print 'threads per block', threadsperblock
    print 'blocks per grid', blockspergrid
    return threadsperblock, blockspergrid


if __name__ == '__main__':
    # 影像二值化
    threshold = 128  # 二值化阈值
    # 读取影像,计算适合于该影像的grid、block、thread配置
    img = cv2.imread("IMG_8289.JPG", cv2.IMREAD_GRAYSCALE)
    # 需要注意的是这两个参数是二维的(x,y),用来表示行列上各有多少个元素
    threadsperblock, blockspergrid = calculate_size(img)
    # 将内存中的数据拷贝到显存中
    d_img = cuda.to_device(img)
    # 调用CUDA函数处理数据,注意函数调用的格式
    # 方括号中的第一个参数是grid中的block数量,第二个是block中的thread数量
    binary_img[blockspergrid, threadsperblock](d_img, threshold)
    # 最后,将处理好的数据从显存中拷贝回来
    # 需要注意的是copy_to_host()而不是to_host()
    result_img = d_img.copy_to_host()
    # 保存影像
    cv2.imwrite("binary.jpg", result_img)

    # 线性拉伸
    new_min = 0
    new_max = 255
    # 读取影像
    img = cv2.imread("IMG_8289.JPG", cv2.IMREAD_GRAYSCALE)
    # 相关参数计算
    threadsperblock, blockspergrid = calculate_size(img)
    old_min = np.min(img)
    old_max = np.max(img)
    print 'old min', old_min, 'old max', old_max
    print 'new min', new_min, 'new max', new_max
    scale_ratio = 1.0 * (new_max - new_min) / (old_max - old_min)
    # 拷贝到显存中
    d_img = cuda.to_device(img)
    # 执行CUDA函数
    linear_stretch[blockspergrid, threadsperblock](d_img, old_min, scale_ratio)
    # 拷贝回内存
    result_img = d_img.copy_to_host()
    # 保存影像
    cv2.imwrite("stretch_result.png", result_img)
    cv2.imwrite("stretch_original.png", img)
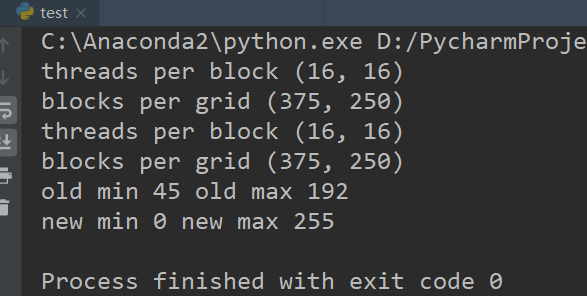
运行输出如下。
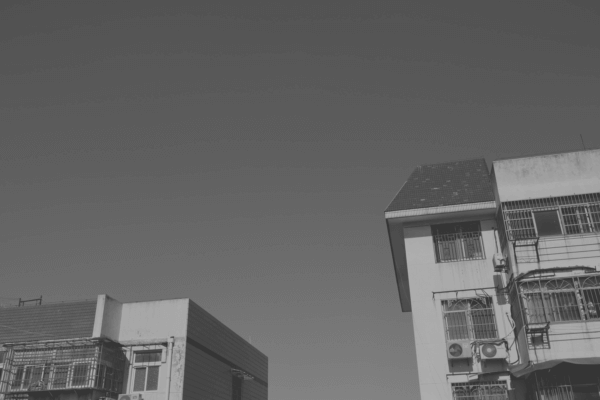
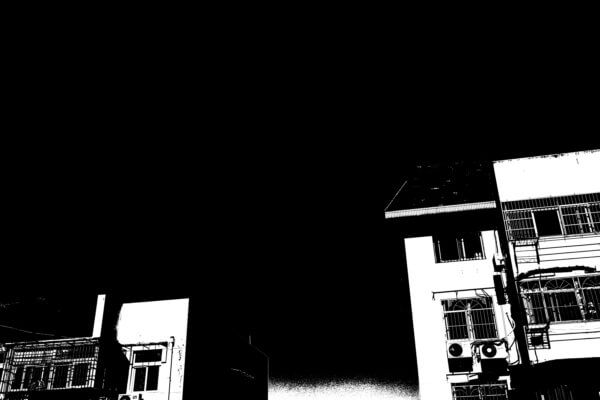
 原图(转为灰度以后)、二值影像以及拉伸后影像如下所示。

上面的代码就简单利用CUDA实现了图像的像素级操作。其实相比于算法的实现,对于CUDA编程而言,更重要的是算法的设计,如何让算法更适合于并行运行更为重要。
本文作者原创,未经许可不得转载,谢谢配合