本篇博客对应Nvidia CUDA Python系列在线课程6月23日第二次直播的实例练习。本次课程主要涉及CUDA编程的矩阵运算、卷积操作、Shared Memory使用等等,算是比较硬核的内容,也介绍了当线程数量小于需要处理的数据时,使用grid-stride loop策略等一些技巧(我之前的疑问)。直播视频可以在这里观看,课程ppt在这里下载。相关代码见Github项目,点击查看。老师上课演示的代码是Github项目中的20200623.py文件。
1.矩阵乘法
根据课程内容编写GPU加速版本的矩阵乘法,代码文件是matrix_mul.py,如下。需要注意的地方都写在注释里了。
# coding=utf-8
import numpy as np
from numba import cuda, float32
import numba
import time
import math


# 最原始的矩阵相乘算法
def matmul_cpu(A, B, C):
    # 根据矩阵乘法原理,可以先根据A、B的尺寸算出结果矩阵C的大小
    # 矩阵乘法结果C的大小是A的行数(shape[0])、B的列数(shape[1])
    # 然后循环遍历C中的每个元素,分别获得A、B中对应行列的元素,相乘并累加即可
    for i in range(A.shape[0]):
        for j in range(B.shape[1]):
            tmp = 0.0
            # 根据矩阵乘法法则,A的列数(shape[1])应该和B的行数(shape[0])相等
            # 所以这里A.shape[1]和B.shape[0]是等价的
            for k in range(A.shape[1]):
                # A、B中行列的对应元素相乘
                tmp += A[i, k] * B[k, j]
            # 最后将累加的结果放到对应位置中,完成一个元素的计算
            C[i, j] = tmp


# 调用Numba开启CPU并行加速
# 其实和原始算法比,代码内容没有做任何改动,只是在函数名称前加了Numba的修饰符即可实现CPU加速
@numba.jit(nopython=True)
def matmul_cpu_numba(A, B, C):
    for i in range(A.shape[0]):
        for j in range(B.shape[1]):
            tmp = 0.0
            for k in range(A.shape[1]):
                tmp += A[i, k] * B[k, j]
            C[i, j] = tmp


# 通过Numba调用CUDA开启GPU加速
# 在编写CUDA核函数的时候,应该时刻有“并行”的思想
# 每一个线程都会同时执行核函数,因此可以节省一些for循环
@cuda.jit
def matmul_gpu_global_mem(A, B, C):
    # 利用CUDA Python的API获得当前线程在整个grid中的x、y索引
    x, y = cuda.grid(2)
    # 如果索引在有效范围内,没越界的话执行下面代码
    # 实际经过测试发现,就算不写也不会报错,但从代码的完备性上来说还是写一下
    if x < C.shape[0] and y < C.shape[1]:
        tmp = 0.0
        # 和前面类似,得到当前线程位置后,获取A、B中对应行列的元素相乘并累加
        # A.shape[1]和B.shape[0]是等价的
        for i in range(A.shape[1]):
            tmp += A[x, i] * B[i, y]
        C[x, y] = tmp


# 利用shared memory加速读写操作,提高速度
# 同一个block中的线程可以共享一小段shared memory,特点是读写非常快,但是内存较小
# 我们可以将矩阵拆分成多个block,每个小块各自先进行乘法,最后再将所有结果累加,这样可以提升速度
@cuda.jit
def matmul_gpu_shared_mem(A, B, C):
    TPB = 16
    # 新建两个小的矩阵块对应block中的线程(所以大小和block一样),数据类型为CDUA的float32
    tA = cuda.shared.array(shape=(TPB, TPB), dtype=float32)
    tB = cuda.shared.array(shape=(TPB, TPB), dtype=float32)

    # 先获取到当前线程在整个grid中的坐标
    x, y = cuda.grid(2)

    # 再获取到当前线程在当前block中的坐标
    tx = cuda.threadIdx.x
    ty = cuda.threadIdx.y

    # 简单进行越界判断
    # 根据矩阵乘法,C的大小是A的行数(shape[0])、B的列数(shape[1])
    if x > A.shape[0] or y > B.shape[1]:
        return

    # 计算一下按照当前tA、tB的大小需要计算多少次
    exec_num = int(math.ceil(1.0 * A.shape[1] / TPB))
    tmp = 0.0
    # 每个线程都执行下面的循环
    for i in range(exec_num):
        # 首先根据当前线程位置,获取到A、B中的对应元素并赋给tA、tB对应位置
        tA[tx, ty] = A[x, ty + i * TPB]
        tB[tx, ty] = B[x + i * TPB, y]
        # 因为核函数是所有线程并行执行的,所以这里我们需要等待一下
        # 等待所有线程都执行完上面的操作后再继续进行
        cuda.syncthreads()

        # 到这里以后,tA、tB中所有的元素都被赋值了
        # 所以我们就按照常规矩阵乘法,每个线程都执行行列对应相乘
        for j in range(TPB):
            tmp += tA[tx, j] * tB[j, ty]
        # 和上面一样,要等待所有线程都执行完以后再继续
        cuda.syncthreads()
        # 执行完一次循环以后,一个拆分的小格子就被计算完了,再移动到下个block计算
        # 上面所有计算的结果都累加到了tmp中

    # 最后将tmp赋给C中的对应位置,结束
    C[x, y] = tmp


if __name__ == '__main__':
    # 待计算的矩阵
    # 需要注意的还是shape的顺序问题,shape[0]表示行方向,shape[1]表示列方向
    A = np.full([700, 500], 3, np.float32)
    B = np.full([500, 700], 5, np.float32)
    # 将矩阵拷贝到GPU中方便处理
    A_device = cuda.to_device(A)
    B_device = cuda.to_device(B)
    # 每个Block中的线程个数(一维)
    TPB = 16

    # 需要注意的是,CUDA加速只有在计算数据很大时才会有明显的效果
    # 如果数据量很小,可能比CPU还慢(因为和CPU相比多了大量线程调度等操作)

    # 方法1,最原始的算法
    # --------------------------------------------------------------------------------
    C_cpu_result = np.zeros([A.shape[0], B.shape[1]], np.float32)
    start_time = time.time()
    matmul_cpu(A, B, C_cpu_result)
    end_time = time.time()
    print 'cpu time', end_time - start_time
    # --------------------------------------------------------------------------------

    # 方法2,利用Numba进行CPU加速
    # --------------------------------------------------------------------------------
    C_cpu_result_numba = np.zeros([A.shape[0], B.shape[1]], np.float32)
    start_time = time.time()
    matmul_cpu_numba(A, B, C_cpu_result_numba)
    end_time = time.time()
    print 'cpu time(Numba)', end_time - start_time
    # --------------------------------------------------------------------------------

    # 方法3,利用CUDA进行GPU加速
    # --------------------------------------------------------------------------------
    # 新建一个device上的矩阵用于存放结果
    C_gpu_result_global = cuda.device_array((A.shape[0], B.shape[1]))

    # 进行thread-block-grid配置
    threadsperblock = (TPB, TPB)
    # 注意这里两个shape都是int,所以得到的结果还是int,且有可能出现0
    # 解决办法是将运算变成float类型,结果就是小数,再向上取整即可
    blockspergrid_x = int(math.ceil(1.0 * A.shape[0] / threadsperblock[0]))
    blockspergrid_y = int(math.ceil(1.0 * B.shape[1] / threadsperblock[1]))
    blockspergrid = (blockspergrid_x, blockspergrid_y)

    start_time = time.time()
    # 手动指定设置的thread-block-grid
    matmul_gpu_global_mem[blockspergrid, threadsperblock](A_device, B_device, C_gpu_result_global)
    # 可以同步等待一下,所有任务做完以后才会继续执行
    cuda.synchronize()
    end_time = time.time()
    # 最后别忘了把device上的结果拷贝回来
    C_cpu_result_global = C_gpu_result_global.copy_to_host()
    print 'gpu time(global memory)', end_time - start_time
    # --------------------------------------------------------------------------------

    # 方法4,利用CUDA和Shared Memory进一步提速
    # 这里需要注意的是在数据量很小时,shared memory的优势可能体现不出来
    # 因为根据设计的算法,是一个个小的block依次计算然后累加
    # 和一个线程对应一个元素相比可能还会变慢
    # --------------------------------------------------------------------------------
    C_gpu_result_shared = cuda.device_array((A.shape[0], B.shape[1]))

    threadsperblock = (TPB, TPB)
    blockspergrid_x = int(math.ceil(1.0 * A.shape[0] / threadsperblock[0]))
    blockspergrid_y = int(math.ceil(1.0 * B.shape[1] / threadsperblock[1]))
    blockspergrid = (blockspergrid_x, blockspergrid_y)

    start_time = time.time()
    matmul_gpu_shared_mem[blockspergrid, threadsperblock](A_device, B_device, C_gpu_result_shared)
    cuda.synchronize()
    end_time = time.time()
    C_cpu_result_shared = C_gpu_result_shared.copy_to_host()
    print 'gpu time(shared memory)', end_time - start_time
    # --------------------------------------------------------------------------------
运行输出结果如下。
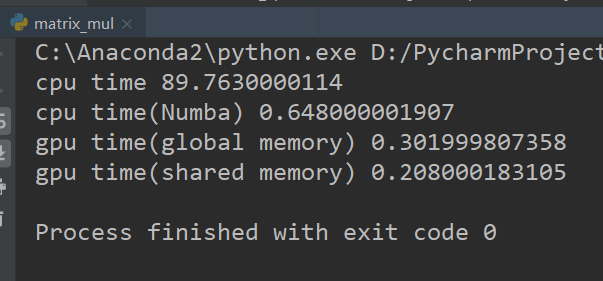
 我们对比了CPU、Numba加速的CPU、GPU以及利用Shared Memory的GPU加速。可以看到计算一个700×500与500×700的矩阵乘法,CPU基准耗时约90秒,而使用Numba进行CPU加速后可以达到0.64秒,提升非常明显。而进一步利用GPU加速后可以达到0.3秒,又提升了约50%。最后使用Shared Memory加速了读写速度,提升到了0.2秒。
2.图像卷积
根据课程内容编写GPU加速版本的图像卷积,代码文件是filter.py,如下。需要注意的地方都写在注释里了。
# coding=utf-8
import numpy as np
import cv2
import time
import math
import numba
from numba import cuda


# 用于对影像进行扩边,返回扩边后的影像,更方便卷积处理
# 核心是调用了numpy的矩阵拼接函数实现扩边,边界灰度为0
def preprocessing(img, filter):
    filter_h = filter.shape[0]
    filter_w = filter.shape[1]
    img_h = img.shape[0]
    img_w = img.shape[1]
    half_filter_h = filter_h / 2
    half_filter_w = filter_w / 2

    margin_w = np.zeros([img_h, half_filter_w])
    margin_h = np.zeros([half_filter_h, img_w + 2 * half_filter_w])
    tmp_img = np.hstack((margin_w, img, margin_w))
    extend_img = np.vstack((margin_h, tmp_img, margin_h))
    return extend_img


# 最原始的卷积算法,遍历所有像素
def filterImg(extend_img, filter):
    filter_h = filter.shape[0]
    filter_w = filter.shape[1]
    half_filter_h = filter_h / 2
    half_filter_w = filter_w / 2
    img_h = extend_img.shape[0]
    img_w = extend_img.shape[1]

    filtered_img = np.zeros_like(img)

    # 在遍历时尤其需要注意像素索引的问题,因为这个很容易错,而且一错就会导致各种问题
    for i in range(half_filter_w + 1, img_w - half_filter_w):
        for j in range(half_filter_h + 1, img_h - half_filter_h):
            patch = extend_img[j - half_filter_h:j + half_filter_h + 1, i - half_filter_w:i + half_filter_w + 1]
            filter_value = int(np.sum(patch * filter))
            filtered_img[j - half_filter_h, i - half_filter_w] = filter_value
    return filtered_img


# 利用Numba CPU加速的卷积
# 和上面的代码是一样的,只是函数前加了Numba的前缀
@numba.jit(nopython=True)
def filterImgNumba(extend_img, filter):
    filter_h = filter.shape[0]
    filter_w = filter.shape[1]
    half_filter_h = filter_h / 2
    half_filter_w = filter_w / 2
    img_h = extend_img.shape[0]
    img_w = extend_img.shape[1]

    filtered_img = np.zeros_like(img)

    for i in range(half_filter_w + 1, img_w - half_filter_w):
        for j in range(half_filter_h + 1, img_h - half_filter_h):
            patch = extend_img[j - half_filter_h:j + half_filter_h + 1, i - half_filter_w:i + half_filter_w + 1]
            filter_value = int(np.sum(patch * filter))
            filtered_img[j - half_filter_h, i - half_filter_w] = filter_value
    return filtered_img


# 利用CUDA进行GPU加速
# 经过初步测试CUDA对于读取一些越界的索引,返回0,不会报错,但是如果对越界的索引赋值可能会引发报错
@cuda.jit
def filterImgGPU(input_img, filter, filtered_img):
    filter_h = filter.shape[0]
    filter_w = filter.shape[1]
    half_filter_h = filter_h / 2
    half_filter_w = filter_w / 2

    x, y = cuda.grid(2)  # 获取当前线程在整个grid中的位置
    # 在安全索引范围内遍历
    if x < filtered_img.shape[0] and y < filtered_img.shape[1]:
        if half_filter_h < x < filtered_img.shape[0] - half_filter_h and \
                half_filter_w < y < filtered_img.shape[1] - half_filter_w:
            # 获取patch
            patch = input_img[x - half_filter_h:x + half_filter_h + 1, y - half_filter_w:y + half_filter_w + 1]
            tmp = 0.0
            # 各元素相乘累加
            for i in range(filter.shape[0]):
                for j in range(filter.shape[1]):
                    tmp += patch[j, i] * filter[j, i]
            filtered_img[x, y] = tmp
        else:
            # 目前的策略是,对于边界不进行处理,原值返回
            filtered_img[x, y] = input_img[x, y]


# 相比于上一个函数,这个函数接受的是经过扩边的影像
# 这个函数中尤其要注意的就是扩边后的影像与原始影像的坐标之间的换算关系
@cuda.jit
def filterImgGPU2(extend_img, filter, filtered_img):
    filter_h = filter.shape[0]
    filter_w = filter.shape[1]
    half_filter_h = filter_h / 2
    half_filter_w = filter_w / 2

    # 主要流程和上面是一样的
    x, y = cuda.grid(2)
    if half_filter_h < x < extend_img.shape[0] - half_filter_h and \
            half_filter_w < y < extend_img.shape[1] - half_filter_w:
        patch = extend_img[x - half_filter_h:x + half_filter_h + 1, y - half_filter_w:y + half_filter_w + 1]
        tmp = 0.0
        for i in range(filter.shape[0]):
            for j in range(filter.shape[1]):
                tmp += patch[j, i] * filter[j, i]
        # 这个地方就涉及到了扩边后的影像与原始影像的坐标之间的换算关系,注意理解
        filtered_img[x - half_filter_h, y - half_filter_w] = tmp


if __name__ == '__main__':
    # 卷积相关设置与影像读取
    kernel_size = 21  # 卷积核大小
    # 构造一个21×21的卷积核用于影像模糊
    kernel = np.ones((kernel_size, kernel_size), np.float32) / (kernel_size * kernel_size)

    img = cv2.imread("test.jpg")  # 读取影像
    img_b, img_g, img_r = cv2.split(img)  # 拆分RGB通道
    img_gray = cv2.cvtColor(img, cv2.COLOR_BGR2GRAY)  # 转换为对应灰度图
    # 对影像进行扩边,方便后续卷积操作
    img_b_ext = preprocessing(img_b, kernel)
    img_g_ext = preprocessing(img_g, kernel)
    img_r_ext = preprocessing(img_r, kernel)
    img_gray_ext = preprocessing(img_gray, kernel)

    # 每个Block中的线程个数(一维)
    TPB = 16

    # 将卷积核复制到device上
    kernel_device = cuda.to_device(kernel)

    # 原图的device变量以及结果
    img_b_device = cuda.to_device(img_b)
    img_g_device = cuda.to_device(img_g)
    img_r_device = cuda.to_device(img_r)
    result_b_device = cuda.device_array((img.shape[0], img.shape[1]))
    result_g_device = cuda.device_array((img.shape[0], img.shape[1]))
    result_r_device = cuda.device_array((img.shape[0], img.shape[1]))

    # 扩边后的device变量以及结果
    img_b_device_ext = cuda.to_device(img_b_ext)
    img_g_device_ext = cuda.to_device(img_g_ext)
    img_r_device_ext = cuda.to_device(img_r_ext)
    result_b_device_ext = cuda.device_array((img.shape[0], img.shape[1]))
    result_g_device_ext = cuda.device_array((img.shape[0], img.shape[1]))
    result_r_device_ext = cuda.device_array((img.shape[0], img.shape[1]))

    # 方法1,最原始的卷积遍历
    # --------------------------------------------------------------------------------
    start_time = time.time()
    filtered_cpu = filterImg(img_gray_ext, kernel)
    end_time = time.time()
    print 'cpu time', end_time - start_time
    # --------------------------------------------------------------------------------

    # 方法2,Numba CPU加速的卷积遍历
    # --------------------------------------------------------------------------------
    start_time = time.time()
    filtered_numba = filterImgNumba(img_gray_ext, kernel)
    end_time = time.time()
    print 'cpu time(Numba)', end_time - start_time
    # --------------------------------------------------------------------------------

    # 方法3,CUDA GPU加速的卷积遍历
    # --------------------------------------------------------------------------------
    threadsperblock = (TPB, TPB)
    # 注意这里两个shape都是int,所以得到的结果还是int,且有可能出现0
    # 这样的结果就是构造的线程数小于图像大小,某些地方会出现空白
    # 解决办法是将运算变成float类型,结果就是小数,再向上取整即可
    blockspergrid_x = int(math.ceil(1.0 * img_b.shape[0] / threadsperblock[0]))
    blockspergrid_y = int(math.ceil(1.0 * img_b.shape[1] / threadsperblock[1]))
    blockspergrid = (blockspergrid_x, blockspergrid_y)

    start_time = time.time()
    filterImgGPU[blockspergrid, threadsperblock](img_b_device, kernel_device, result_b_device)
    filterImgGPU[blockspergrid, threadsperblock](img_g_device, kernel_device, result_g_device)
    filterImgGPU[blockspergrid, threadsperblock](img_r_device, kernel_device, result_r_device)
    end_time = time.time()

    print 'gpu time*3', end_time - start_time

    result_b_host = result_b_device.copy_to_host()
    result_g_host = result_g_device.copy_to_host()
    result_r_host = result_r_device.copy_to_host()
    filtered_gpu1 = cv2.merge((result_b_host, result_g_host, result_r_host))
    # --------------------------------------------------------------------------------

    # 方法4,扩边以后的CUDA GPU加速的卷积遍历
    # --------------------------------------------------------------------------------
    threadsperblock = (TPB, TPB)
    blockspergrid_x = int(math.ceil(1.0 * img_b_ext.shape[0] / threadsperblock[0]))
    blockspergrid_y = int(math.ceil(1.0 * img_b_ext.shape[1] / threadsperblock[1]))
    blockspergrid = (blockspergrid_x, blockspergrid_y)

    start_time = time.time()
    filterImgGPU2[blockspergrid, threadsperblock](img_b_device_ext, kernel_device, result_b_device_ext)
    filterImgGPU2[blockspergrid, threadsperblock](img_g_device_ext, kernel_device, result_g_device_ext)
    filterImgGPU2[blockspergrid, threadsperblock](img_r_device_ext, kernel_device, result_r_device_ext)
    end_time = time.time()

    print 'gpu time(extend)*3', end_time - start_time

    result_b_host_ext = result_b_device_ext.copy_to_host()
    result_g_host_ext = result_g_device_ext.copy_to_host()
    result_r_host_ext = result_r_device_ext.copy_to_host()
    filtered_gpu2 = cv2.merge((result_b_host_ext, result_g_host_ext, result_r_host_ext))
    # --------------------------------------------------------------------------------

    # 方法5,OpenCV对照测试
    # --------------------------------------------------------------------------------
    start_time = time.time()
    filtered_cv = cv2.filter2D(img, -1, kernel)
    end_time = time.time()
    print 'opencv time', end_time - start_time
    # --------------------------------------------------------------------------------

    # 保存所有的输出结果
    cv2.imwrite("filtered_cpu.jpg", filtered_cpu)
    cv2.imwrite("filtered_numba.jpg", filtered_numba)
    cv2.imwrite("filtered_gpu.jpg", filtered_gpu1)
    cv2.imwrite("filtered_gpu_ext.jpg", filtered_gpu2)
    cv2.imwrite("filtered_cv.jpg", filtered_cv)
运行结果如下。
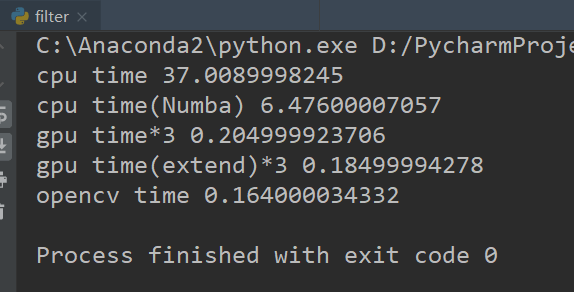
 对一张2167×2495的影像进行卷积核为21×21的模糊操作。可以看到单纯CPU遍历耗时约为37秒,而利用Numba CPU加速后耗时约为6秒,提升约80%。进一步使用GPU加速后,提升到了约0.2秒,效果非常明显。而且需要注意的是这里统计的是GPU处理三个波段的总耗时,而前面CPU都是一个波段的耗时。如果GPU也算单个波段的话,那就是约为0.06秒。相比于Numba CPU提升了约100倍。而且可以看到GPU加速的耗时和OpenCV对比属于同一水平,终于也可以说自己写的代码的运行效果和OpenCV一样了(笑。据此可以推测OpenCV的卷积可能也使用了GPU加速,不然单纯靠CPU无法达到这个速度。卷积后的部分影像对比如下图所示。
 左边为原图,右边为GPU加速滤波后的结果。完整的图片和结果对比可以去Github项目中查看。
3.轮廓提取
在实现了上面GPU加速的卷积后,我们可以实现一些更为有意思的应用,比如利用边缘检测算子实现边缘检测。具体而言我们可以使用不同方向的卷积核分别检测,然后再将检测结果合到一起。代码文件是contour.py,如下。
# coding=utf-8
import numpy as np
import cv2
from numba import cuda
import math
import time


@cuda.jit
def filterImgGPU(input_img, filter, filtered_img):
    filter_h = filter.shape[0]
    filter_w = filter.shape[1]
    half_filter_h = filter_h / 2
    half_filter_w = filter_w / 2

    x, y = cuda.grid(2)
    if x < filtered_img.shape[0] and y < filtered_img.shape[1]:
        if half_filter_h < x < filtered_img.shape[0] - half_filter_h and \
                half_filter_w < y < filtered_img.shape[1] - half_filter_w:
            patch = input_img[x - half_filter_h:x + half_filter_h + 1, y - half_filter_w:y + half_filter_w + 1]
            tmp = 0.0
            for i in range(filter.shape[0]):
                for j in range(filter.shape[1]):
                    tmp += patch[j, i] * filter[j, i]
            filtered_img[x, y] = tmp
        else:
            filtered_img[x, y] = input_img[x, y]


if __name__ == '__main__':
    # 读取影像并拷贝到device
    img = cv2.imread("test.jpg", cv2.IMREAD_GRAYSCALE)
    img_device = cuda.to_device(img)

    # 构造4个方向的卷积核并拷贝到device
    kernel1 = np.array([[-1, 0, 1], [-1, 0, 1], [-1, 0, 1]])
    kernel2 = np.array([[1, 0, -1], [1, 0, -1], [1, 0, -1]])
    kernel3 = np.array([[-1, -1, -1], [0, 0, 0], [1, 1, 1]])
    kernel4 = np.array([[1, 1, 1], [0, 0, 0], [-1, -1, -1]])
    kernel1_device = cuda.to_device(kernel1)
    kernel2_device = cuda.to_device(kernel2)
    kernel3_device = cuda.to_device(kernel3)
    kernel4_device = cuda.to_device(kernel4)

    # 新建4个device变量用于存放结果
    result1_device = cuda.device_array((img.shape[0], img.shape[1]))
    result2_device = cuda.device_array((img.shape[0], img.shape[1]))
    result3_device = cuda.device_array((img.shape[0], img.shape[1]))
    result4_device = cuda.device_array((img.shape[0], img.shape[1]))

    # 构造运算架构
    TPB = 16
    threadsperblock = (TPB, TPB)
    blockspergrid_x = int(math.ceil(1.0 * img.shape[0] / threadsperblock[0]))
    blockspergrid_y = int(math.ceil(1.0 * img.shape[1] / threadsperblock[1]))
    blockspergrid = (blockspergrid_x, blockspergrid_y)

    start_time = time.time()

    # 执行卷积
    filterImgGPU[blockspergrid, threadsperblock](img_device, kernel1_device, result1_device)
    filterImgGPU[blockspergrid, threadsperblock](img_device, kernel2_device, result2_device)
    filterImgGPU[blockspergrid, threadsperblock](img_device, kernel3_device, result3_device)
    filterImgGPU[blockspergrid, threadsperblock](img_device, kernel4_device, result4_device)

    end_time = time.time()

    print 'cost time', end_time - start_time

    # 再将运算结果拷贝回Host
    result_1_host = result1_device.copy_to_host()
    result_2_host = result2_device.copy_to_host()
    result_3_host = result3_device.copy_to_host()
    result_4_host = result4_device.copy_to_host()

    # 直接得到的结果是float类型,而且也不是0到255,所以先将数据转换到合适范围,再转成uint8
    result1_res = np.where(result_1_host < 0, 0, result_1_host)
    result1 = np.uint8(np.where(result1_res > 255, 255, result1_res))
    result2_res = np.where(result_2_host < 0, 0, result_2_host)
    result2 = np.uint8(np.where(result2_res > 255, 255, result2_res))
    result3_res = np.where(result_3_host < 0, 0, result_3_host)
    result3 = np.uint8(np.where(result3_res > 255, 255, result3_res))
    result4_res = np.where(result_4_host < 0, 0, result_4_host)
    result4 = np.uint8(np.where(result4_res > 255, 255, result4_res))

    # 保存各方向的轮廓
    cv2.imwrite("contour1.jpg", result1)
    cv2.imwrite("contour2.jpg", result2)
    cv2.imwrite("contour3.jpg", result3)
    cv2.imwrite("contour4.jpg", result4)

    # 将各方向轮廓合并
    tmp1 = cv2.bitwise_or(result1, result2)
    tmp2 = cv2.bitwise_or(tmp1, result3)
    tmp3 = cv2.bitwise_or(tmp2, result4)
    cv2.imwrite("contour.jpg", tmp3)
运行上述代码在本机的耗时约为0.3秒左右,当然还有继续优化的空间。比如直接写一个核函数,每个核函数里都算四次,这样就不用分别调用四次了,也可以减少一定的耗时。下面是原图及四个方向和总的轮廓图。
 完整对比同样可以见Github项目。
本文作者原创,未经许可不得转载,谢谢配合