1.Viz模块
Viz模块是OpenCV自带的用于3D显示的模块,使用起来比较方便。 下面分别介绍用法。
先贴出来项目的Cmakelist。
cmake_minimum_required(VERSION 3.10)
project(useViz)

set(CMAKE_CXX_STANDARD 11)

# OpenCV
find_package(OpenCV REQUIRED)
include_directories(${OpenCV_DIRS})

add_executable(useViz main.cpp filestorage.cpp)

# OpenCV链接
target_link_libraries(useViz ${OpenCV_LIBS})
(1)创建与显示窗口
#include <opencv2/viz/vizcore.hpp>
#include <iostream>
using namespace cv;
using namespace std;
int main()
{
//创建可视化窗口
viz::Viz3d window1("Viz Demo");
//构造一个坐标系,并显示到窗口中
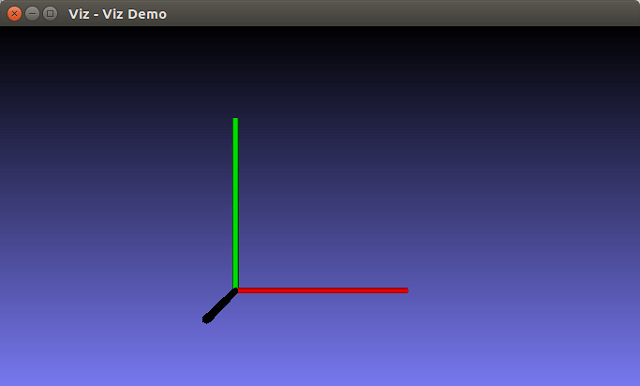
window1.showWidget("Coordinate", viz::WCoordinateSystem());
//开启永久循环暂留
window1.spin();
return 0;
}
Viz窗口的创建是十分简单的,直接新建一个Viz3D对象,然后再调用它的spin()或spinOnce()函数即可。运行效果如下图。
 这两个函数十分类似于和
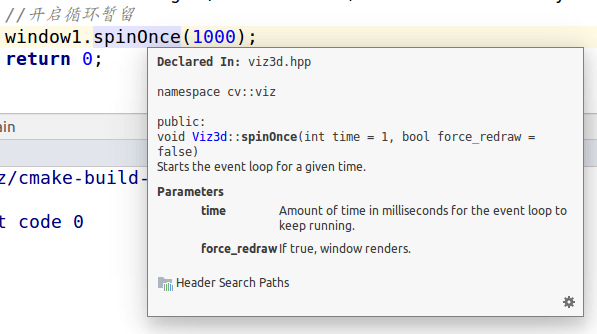
imshow()搭配的waitKey()函数,都起到了控制显示时长的作用。区别在于spin()不用传入任何参数,用于开启一个event loop永远循环,即让画面停在那里,相当于waitKey(0)。而spinOnce()函数,便可以传入停留的时间,单位为毫秒。下面是它的文档说明。
当然,这样构造出来的窗口里面什么都没有,所以又在窗口里显示一个世界坐标系的标志。Viz模块中,窗口内显示的一切东西为Widget,调用showWidget()函数即可将部件显示在窗口中。
(2)显示控件Widget
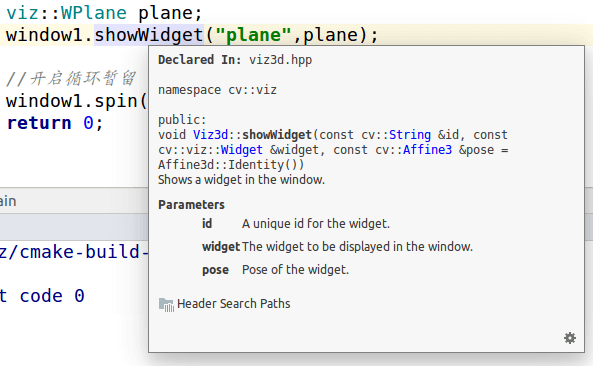
在上面的代码中其实已经用到了控件,就是显示坐标系。当然,使用showWidget()不仅仅只是显示个坐标系。它的文档如下。
 示例代码如下。
#include <opencv2/viz/vizcore.hpp>
#include <iostream>

using namespace cv;
using namespace std;

int main()
{
    //创建可视化窗口
    viz::Viz3d window1("Viz Demo");

    //构造一个坐标系,并显示到窗口中
    window1.showWidget("Coordinate", viz::WCoordinateSystem());

    //创建一个平面,参数采用默认值
    viz::WPlane plane;
    window1.showWidget("plane",plane);


    //开启循环暂留
    window1.spin();
    return 0;
}
效果如下。
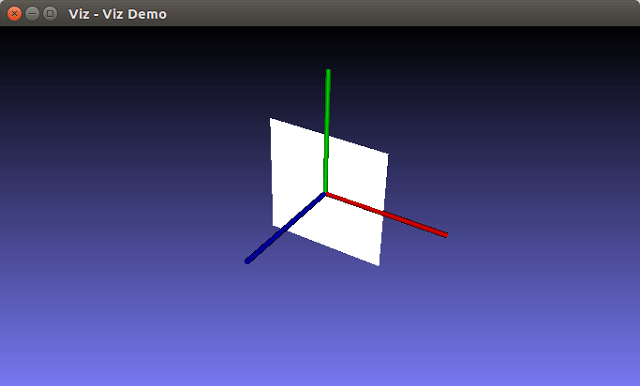 WPlane为平面类,继承自Widget3D类。除此之外还有很多的控件可以使用,如箭头、多边形等等。
(3)控件Widget位姿
上面的演示中新建了一个平面,但是参数都采用了默认值。下面的代码演示了更为复杂点的例子。
#include <opencv2/viz/vizcore.hpp>
#include <opencv2/calib3d/calib3d.hpp>
#include <iostream>

using namespace cv;
using namespace std;

/**
 * @function main
 */
int main()
{
    /// Create a window
    viz::Viz3d myWindow("Coordinate Frame");

    /// Add coordinate axes
    myWindow.showWidget("Coordinate Widget", viz::WCoordinateSystem());

    /// Add line to represent (1,1,1) axis
    viz::WLine axis(Point3f(-1.0f,-1.0f,-1.0f), Point3f(1.0f,1.0f,1.0f));
    axis.setRenderingProperty(viz::LINE_WIDTH, 4.0);
    myWindow.showWidget("Line Widget", axis);

    /// Construct a cube widget
    viz::WCube cube_widget(Point3f(0.5,0.5,0.0), Point3f(0.0,0.0,-0.5), true, viz::Color::blue());
    cube_widget.setRenderingProperty(viz::LINE_WIDTH, 4.0);

    /// Display widget (update if already displayed)
    myWindow.showWidget("Cube Widget", cube_widget);

    /// Rodrigues vector
    Mat rot_vec = Mat::zeros(1,3,CV_32F);
    float translation_phase = 0.0, translation = 0.0;
    while(!myWindow.wasStopped())
    {
        /* Rotation using rodrigues */
        /// Rotate around (1,1,1)
        rot_vec.at<float>(0,0) += CV_PI * 0.01f;
        rot_vec.at<float>(0,1) += CV_PI * 0.01f;
        rot_vec.at<float>(0,2) += CV_PI * 0.01f;

        /// Shift on (1,1,1)
        translation_phase += CV_PI * 0.01f;
        translation = sin(translation_phase);

        Mat rot_mat;
        Rodrigues(rot_vec, rot_mat);

        /// Construct pose
        Affine3f pose(rot_mat, Vec3f(translation, translation, translation));

        myWindow.setWidgetPose("Cube Widget", pose);

        myWindow.spinOnce(1, true);
    }

    return 0;
}
运行结果如下。
 所谓动画其实就是通过设置一帧帧的内容然后连续播放实现的。每一帧通过位姿矩阵改变位置。
下面是另一个动画演示,写得比较简单易懂,代码来自于这篇博客,稍作修改。
#include <opencv2/viz/vizcore.hpp>
#include <opencv2/calib3d/calib3d.hpp>
#include <iostream>

using namespace cv;
using namespace std;

/**
 * @function main
 */
int main() {
    viz::Viz3d window("window");
    window.showWidget("Coordinate", viz::WCoordinateSystem());
    //创建平面
    viz::WPlane plane;
    //添加平面,并设置一个ID为plane
    window.showWidget("plane", plane);

    //创建一个1*3的rotation vector
    Mat rvec = Mat::zeros(1, 3, CV_32F);
    //动画的本质:调整部件位姿并循环显示,控制条件是窗口没被停止,也就是主动按下了q或者e键
    while (!window.wasStopped()) {
        rvec.at<float>(0, 0) = 0.f;
        rvec.at<float>(0, 1) += CV_PI * 0.01f;
        rvec.at<float>(0, 2) = 0.f;
        Mat rmat;
        //罗德里格斯公式,将罗德里格斯向量转换成旋转矩阵
        Rodrigues(rvec, rmat);
        //构造仿射变换类型的pose,这个类型暂且看做OpenCV中的位姿类型,两个参数,一个旋转,一个平移
        Affine3f pose(rmat, Vec3f(0, 0, 0));
        //这一句就是整个可视化窗口能够动起来的核心语句了,
        //说白了就是利用循环来不断调整上面plane部件的位姿,达到动画的效果
        //另外这里就利用到了平面的ID,来表征调整的是平面的位姿
        window.setWidgetPose("plane", pose);
        //控制单帧暂留时间,调整time参数的效果就是平面转的快慢,本质上就是每一个位姿的停留显示时间。
        window.spinOnce(1, false);
    }

    return 0;
}
运行效果如下。
 首先定义一个旋转向量
rvec,然后调用Rodrigues()函数将其转换成旋转矩阵rmat,再用rmat构造pose,最后用setWidgetPose()函数和构造的pose,来达到调整部件位姿的效果,循环执行后的结果就是看起来平面转起来了。这里的Affine3f是一个三维仿射变换类。构造函数有很多样式,下面是其构造函数部分源码。
Affine3();

//! Augmented affine matrix
Affine3(const Mat4& affine);

//! Rotation matrix
Affine3(const Mat3& R, const Vec3& t = Vec3::all(0));

//! Rodrigues vector
Affine3(const Vec3& rvec, const Vec3& t = Vec3::all(0));

//! Combines all contructors above. Supports 4x4, 4x3, 3x3, 1x3, 3x1 sizes of data matrix
explicit Affine3(const Mat& data, const Vec3& t = Vec3::all(0));

//! From 16th element array
explicit Affine3(const float_type* vals);
更多相关内容可以参考OpenCV中Viz的官方文档,内容会更加详细。
2.FileStorage模块
(1)YAML(YML)、XML文件简介
首先介绍XML,套用网上百度的定义如下。
可扩展标记语言(Extensible Markup Language, XML),用于标记电子文件使其具有结构性的标记语言,可以用来标记数据、定义数据类型,是一种允许用户对自己的标记语言进行定义的源语言。XML是标准通用标记语言(SGML)的子集,非常适合Web传输。XML提供统一的方法来描述和交换独立于应用程序或供应商的结构化数据。XML格式的文件拓展名为.xml。
和GNU一样,YAML是一个递归着说“不”的名字。不同的是,GNU对UNIX说不,YAML说不的对象是XML。相比于XML而言,YAML的可读性好、和脚本语言的交互性好、使用实现语言的数据类型、有一个一致的信息模型、易于实现。同时,YAML也有XML的下列优点:YAML可以基于流来处理;YAML表达能力强,扩展性好。YAML试图用一种比XML更敏捷的方式,来完成XML所完成的任务。
YAML格式的文件拓展名包括.yml和.yaml,两个都表示YAML文件。YML和YAML是同一个东西,只是扩展名稍有差别,内容格式、规范都是相同的。这点类似于Tiff和Tif的差别,都是TIF影像。
(2)FileStorage使用
在OpenCV中,使用FileStorage模块实现信息的储存和读取。
a.数据写入
OpenCV官方文档中的介绍简单易懂,这里就直接贴过来了。
Use the following procedure to write something to XML or YAML:
- 1.Create new
FileStorageand open it for writing. It can be done with a single call toFileStorage::FileStorage()constructor that takes a filename, or you can use the default constructor and then callFileStorage::open(). Format of the file (XML or YAML) is determined from the filename extension (”.xml” and ”.yml”/”.yaml”, respectively) - 2.Write all the data you want using the streaming operator
<<, just like in the case of STL streams. - 3.Close the file using
FileStorage::release(). FileStorage destructor also closes the file.
#include "opencv2/opencv.hpp"
#include <time.h>

using namespace cv;

int main(int, char **argv) {
    FileStorage fs("test.yml", FileStorage::WRITE);

    fs << "frameCount" << 5;
    time_t rawtime;
    time(&rawtime);
    fs << "calibrationDate" << asctime(localtime(&rawtime));
    Mat cameraMatrix = (Mat_<double>(3, 3) << 1000, 0, 320, 0, 1000, 240, 0, 0, 1);
    Mat distCoeffs = (Mat_<double>(5, 1) << 0.1, 0.01, -0.001, 0, 0);
    fs << "cameraMatrix" << cameraMatrix << "distCoeffs" << distCoeffs;
    fs << "features" << "[";
    for (int i = 0; i < 3; i++) {
        int x = rand() % 640;
        int y = rand() % 480;
        uchar lbp = rand() % 256;

        fs << "{:" << "x" << x << "y" << y << "lbp" << "[:";
        for (int j = 0; j < 8; j++)
            fs << ((lbp >> j) & 1);
        fs << "]" << "}";
    }
    fs << "]";
    fs.release();
    return 0;
}
这样便将数据写入test.yml中了,打开文件查看如下。
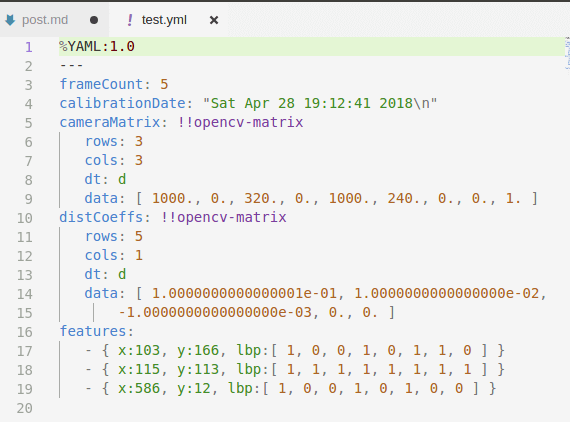 OpenCV支持XML和YAML两种规范的文件,需要更改不同保存类型的话直接修改后缀名就行了,程序会自动识别,并用相应规范去写。这一点类似于
imwrite(),在文件名中指定保存类型就可以了,不用单独指定。
b.数据读取
To read the previously written XML or YAML file, do the following:
- Open the file storage using
FileStorage::FileStorage()constructor orFileStorage::open()method. In the current implementation the whole file is parsed and the whole representation of file storage is built in memory as a hierarchy of file nodes (see FileNode) - Read the data you are interested in. Use
FileStorage::operator[](),FileNode::operator[]()and/orFileNodeIterator. - Close the storage using
FileStorage::release().
#include "opencv2/opencv.hpp"
#include <time.h>


using namespace cv;
using namespace std;

int main(int, char **argv) {
    FileStorage fs2("test.yml", FileStorage::READ);

// first method: use (type) operator on FileNode.
    int frameCount = (int) fs2["frameCount"];

    std::string date;
// second method: use FileNode::operator >>
    fs2["calibrationDate"] >> date;

    Mat cameraMatrix2, distCoeffs2;
    fs2["cameraMatrix"] >> cameraMatrix2;
    fs2["distCoeffs"] >> distCoeffs2;

    cout << "frameCount: " << frameCount << endl
         << "calibration date: " << date << endl
         << "camera matrix: " << cameraMatrix2 << endl
         << "distortion coeffs: " << distCoeffs2 << endl;

    FileNode features = fs2["features"];
    FileNodeIterator it = features.begin(), it_end = features.end();
    int idx = 0;
    std::vector<uchar> lbpval;

// iterate through a sequence using FileNodeIterator
    for (; it != it_end; ++it, idx++) {
        cout << "feature #" << idx << ": ";
        cout << "x=" << (int) (*it)["x"] << ", y=" << (int) (*it)["y"] << ", lbp: (";
        // you can also easily read numerical arrays using FileNode >> std::vector operator.
        (*it)["lbp"] >> lbpval;
        for (int i = 0; i < (int) lbpval.size(); i++)
            cout << " " << (int) lbpval[i];
        cout << ")" << endl;
    }
    fs2.release();

    return 0;
}
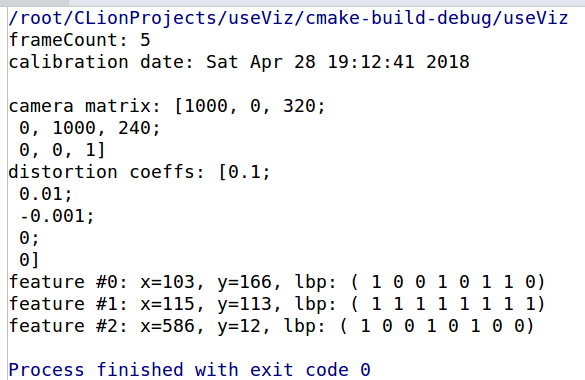
运行效果如下。
3.参考资料
- https://docs.opencv.org/2.4/doc/tutorials/viz/table_of_content_viz/table_of_content_viz.html#table-of-content-viz
- https://docs.opencv.org/2.4/modules/core/doc/xml_yaml_persistence.html?highlight=filestorage
- https://blog.csdn.net/robinhjwy/article/details/78570166
- https://blog.csdn.net/iracer/article/details/51339377
- https://blog.csdn.net/yhl_leo/article/details/47660943
- https://www.cnblogs.com/songchaoke/p/3376323.html
- https://www.ibm.com/developerworks/cn/xml/x-cn-yamlintro/https://www.yaml.org
本文作者原创,未经许可不得转载,谢谢配合