作为一个经常肝崩崩崩的舰长,在很久之前就有个想法,对于一些重复的操作,要是能自动点击实现就好了。
其实最开始有这个想法是肝阴阳师的时候,刷觉醒材料真是刷到吐,感觉自己就像机器人一样。
 最开始研究了一下,发现想法很简单,但在手机上实现起来没那么容易。
最近忽然又想到可以利用Python实现,在Windows下开个Android模拟器就可以了。
所以便着手写代码试了下,效果还不错。
最开始研究了一下,发现想法很简单,但在手机上实现起来没那么容易。
最近忽然又想到可以利用Python实现,在Windows下开个Android模拟器就可以了。
所以便着手写代码试了下,效果还不错。
自动操作脚本的思想很简单,由于重复操作每次点击的位置和内容都非常固定,因此只需要在代码中指定好每次该往哪里点即可。 在Python中,可以通过Windows自带的API实现获取鼠标位置、移动鼠标、点击鼠标等操作。
关于如何获取点击要点击的位置,也有两种思路,一种是手动设置。自己先走一遍流程,记录下每次点击的位置,放到代码里。 优点是简单粗暴,效率高,缺点是灵活性较差,点击位置稍有变化就有可能导致失败。 另一种相对”高端”的办法是自动寻找。 因为我是做CV的,所以很自然就想到了用图像识别的办法寻找点击位置。先将需要点击的位置保存成小图片,在程序运行时,让程序根据小图片自动寻找待点击位置。 这样的有点是灵活性高,应变能力强,缺点是计算量相对较大。 而关于如何寻找,这里又有两种办法,一种是基于模板匹配,另一种是基于特征点匹配。 经过实践,发现基于特征点匹配会更加稳定些,不容易误匹配。
1.自动操作基础代码
首先是一些跟自动操作有关的基础代码,如设置鼠标位置、点击等。
# coding=utf-8
import win32api, win32gui, win32con
from ctypes import *
import time

def getCurPos():
    return win32gui.GetCursorPos()


def getPos():
    while True:
        res = getCurPos()
        print res
        time.sleep(1)


def clickLeft():
    win32api.mouse_event(win32con.MOUSEEVENTF_LEFTDOWN | win32con.MOUSEEVENTF_LEFTUP, 0, 0)


def movePos(x, y):
    windll.user32.SetCursorPos(x, y)


def animateMove(curPos, targetPos, durTime=1, fps=60):
    x1 = curPos[0]
    y1 = curPos[1]
    x2 = targetPos[0]
    y2 = targetPos[1]
    dx = x2 - x1
    dy = y2 - y1
    times = int(fps * durTime)
    dx_ = dx * 1.0 / times
    dy_ = dy * 1.0 / times
    sleep_time = durTime * 1.0 / times
    for i in range(times):
        int_temp_x = int(round(x1 + (i + 1) * dx_))
        int_temp_y = int(round(y1 + (i + 1) * dy_))
        windll.user32.SetCursorPos(int_temp_x, int_temp_y)
        time.sleep(sleep_time)
    windll.user32.SetCursorPos(x2, y2)


def animateMoveAndClick(curPos, targetPos, durTime=1, fps=60, waitTime=1):
    x1 = curPos[0]
    y1 = curPos[1]
    x2 = targetPos[0]
    y2 = targetPos[1]
    dx = x2 - x1
    dy = y2 - y1
    times = int(fps * durTime)
    dx_ = dx * 1.0 / times
    dy_ = dy * 1.0 / times
    sleep_time = durTime * 1.0 / times

    for i in range(times):
        int_temp_x = int(round(x1 + (i + 1) * dx_))
        int_temp_y = int(round(y1 + (i + 1) * dy_))
        windll.user32.SetCursorPos(int_temp_x, int_temp_y)
        time.sleep(sleep_time)
    windll.user32.SetCursorPos(x2, y2)
    time.sleep(waitTime)
    clickLeft()
在Windows中提供了相关的API可供调用,因此写起来比较简单。自己主要写的是“动画函数”,这样在鼠标移动的时候看起来比较自然,不会“闪现”。
这里需要注意的问题是,鼠标坐标接受参数是整形,因此要类型转换。此外dx_、dy_不能一开始就变为int,否则每一次移动都会损失到一部分小数,到最后移动了指定次数后会发现和终点差很远。
这个差距就是由舍去的小数部分不断累积导致的,需要注意一下。
if __name__ == '__main__':
    animateMove(getCurPos(), (500, 500))
    animateMove(getCurPos(), (600, 400))
    animateMove(getCurPos(), (500, 300))
    animateMove(getCurPos(), (400, 400))
    animateMove(getCurPos(), (500, 400))
    animateMove(getCurPos(), (500, 500))
利用以上基础代码,就可以实现如下图的效果了。
 如果你仅仅只是想要学习利用Python操控鼠标,那么到这里就可以了。后面的内容主要就是上面代码在游戏中的具体应用。
2.识别并定位指定目标代码
本部分偏向于计算机视觉,主要介绍通过特征点提取和匹配,找到目标在屏幕中的位置。关于特征提取和匹配的原理,之前说过太多太多了,在博客里找找就行。下面就直接放代码和演示效果了。 特征提取和匹配的代码来自于之前写的functionModule。
# coding=utf-8
from PIL import ImageGrab as ig
import cv2
import numpy as np

def getSiftKps(img, numKps=2000):
    """
    获取SIFT特征点和描述子

    :param img: 读取的输入影像
    :param numKps:期望提取的特征点个数,默认2000
    :return:特征点和对应的描述子
    """
    sift = cv2.xfeatures2d_SIFT.create(nfeatures=numKps)
    kp, des = cv2.xfeatures2d_SIFT.detectAndCompute(sift, img, None)
    return kp, des


def flannMatch(kp1, des1, kp2, des2):
    """
    基于FLANN算法的匹配

    :param kp1: 特征点列表1
    :param des1: 特征点描述列表1
    :param kp2: 特征点列表2
    :param des2: 特征点描述列表2
    :return: 匹配的特征点对
    """

    good_matches = []
    good_kps1 = []
    good_kps2 = []

    print("kp1 num:" + len(kp1).__str__() + "," + "kp2 num:" + len(kp2).__str__())

    # FLANN parameters
    FLANN_INDEX_KDTREE = 0
    index_params = dict(algorithm=FLANN_INDEX_KDTREE, trees=5)
    search_params = dict(checks=50)  # or pass empty dictionary

    flann = cv2.FlannBasedMatcher(index_params, search_params)
    matches = flann.knnMatch(des1, des2, k=2)

    # 筛选
    for i, (m, n) in enumerate(matches):
        if m.distance < 0.5 * n.distance:
            good_matches.append(matches[i])
            good_kps1.append([kp1[matches[i][0].queryIdx].pt[0], kp1[matches[i][0].queryIdx].pt[1]])
            good_kps2.append([kp2[matches[i][0].trainIdx].pt[0], kp2[matches[i][0].trainIdx].pt[1]])

    if good_matches.__len__() == 0:
        print("No enough good matches.")
        return good_kps1, good_kps2
    else:
        print("good matches:" + good_matches.__len__().__str__())
        return good_kps1, good_kps2


def siftFlannMatch(img1, img2, numKps=2000):
    """
    包装的函数,直接用于sift匹配,方便使用

    :param img1: 输入影像1
    :param img2: 输入影像2
    :param numKps: 每张影像上期望提取的特征点数量,默认为2000
    :return: 匹配好的特征点列表
    """
    kp1, des1 = getSiftKps(img1, numKps=numKps)
    kp2, des2 = getSiftKps(img2, numKps=numKps)
    good_kp1, good_kp2 = flannMatch(kp1, des1, kp2, des2)
    return good_kp1, good_kp2

def findLocWithTemplate(img):
    h = img.shape[0]
    w = img.shape[1]
    screen = ig.grab()
    print "finding location..."
    screen_cv = cv2.cvtColor(np.asarray(screen), cv2.COLOR_RGB2GRAY)
    res = cv2.matchTemplate(screen_cv, img, cv2.TM_CCOEFF)
    min_val, max_val, min_loc, max_loc = cv2.minMaxLoc(res)
    target = (int((max_loc[0] + w / 2) / SCREEN_SCALE_FACTOR), int((max_loc[1] + h / 2) / SCREEN_SCALE_FACTOR))
    return target


def findLocWithKp(img, numKps=4000):
    screen = ig.grab()
    screen_cv = cv2.cvtColor(np.asarray(screen), cv2.COLOR_RGB2GRAY)
    kp1, kp2 = siftFlannMatch(img, screen_cv, numKps=numKps)
    if kp1.__len__() == 0 or kp2.__len__() == 0:
        return (0, 0)
    mean_x = 0
    mean_y = 0
    for i in range(kp2.__len__()):
        mean_x += kp2[i][0]
        mean_y += kp2[i][1]
    mean_x = int(mean_x / kp2.__len__())
    mean_y = int(mean_y / kp2.__len__())
    return (mean_x, mean_y)
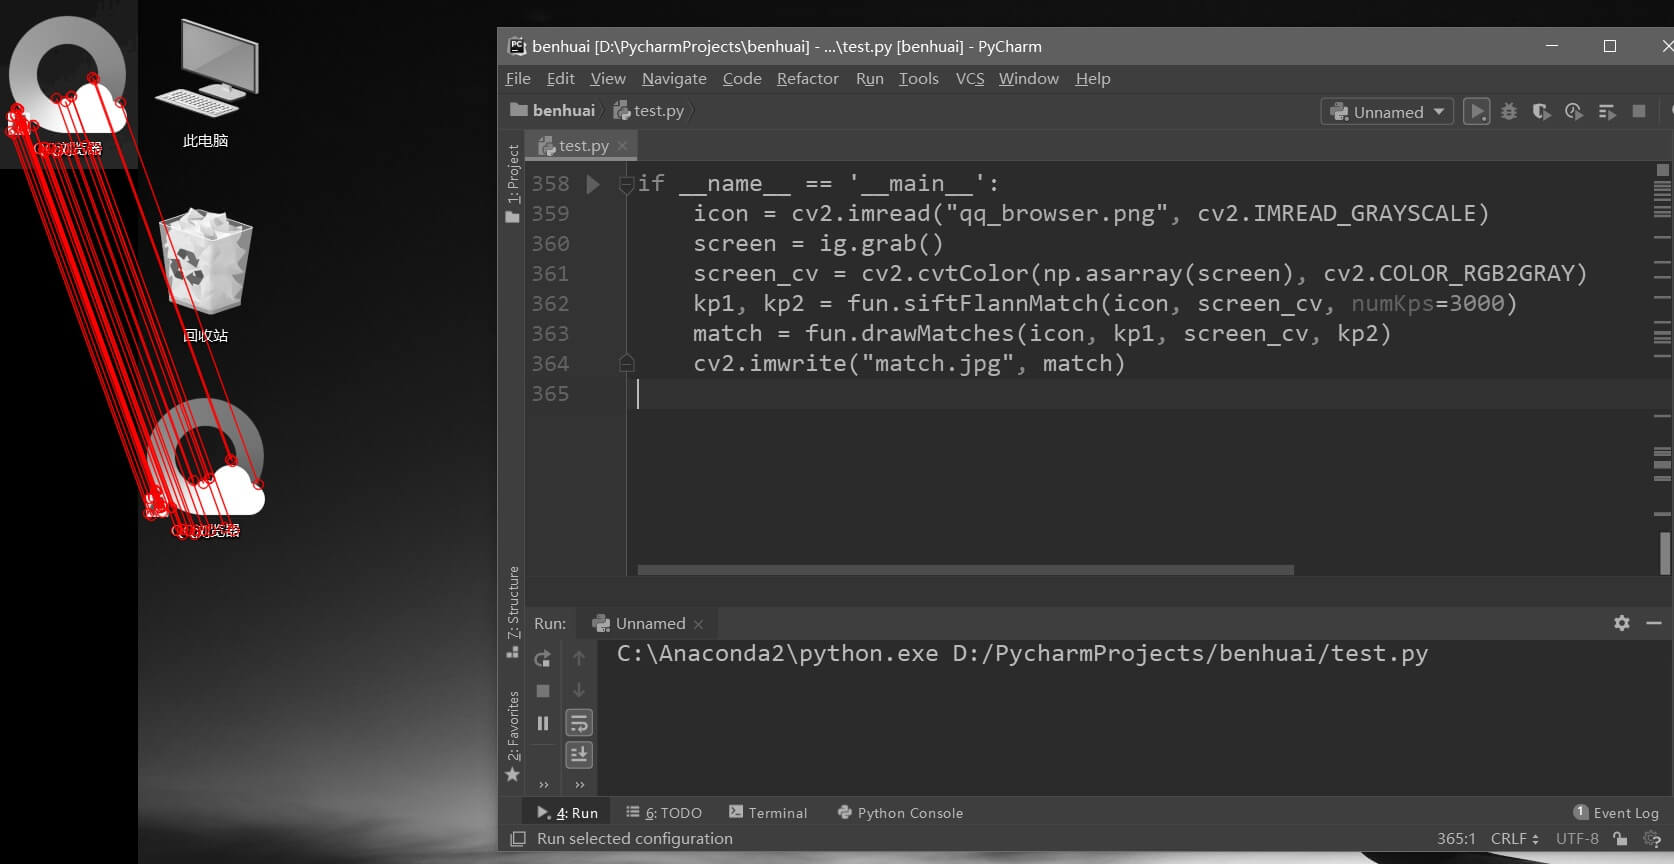
代码中提供了模板匹配和特征匹配两种方法。对于特征点匹配方法,通过求取特征点的坐标平均值来作为目标点击点。
通过PIL库的ImageGrab模块获得全屏截图。演示效果如下。
3.游戏自动操作代码
在上面做了这么多铺垫以后,便要开始进入正题了。这里以崩坏3和阴阳师两个游戏为例。由于手动指定点击坐标太简单了,这里演示的全部都是基于识别的操作。
(1)崩坏3
对于崩坏3,主要写了3个函数,分别是打开游戏、收集金币、探险委派。
# coding=utf-8
import baseFunctions as bf
import cv2
import time
import numpy as np
from PIL import ImageGrab as ig


def openBh3Auto():
    img_start = cv2.imread("bh3/01.png", cv2.IMREAD_GRAYSCALE)
    img_mumu = cv2.imread("bh3/02.png", cv2.IMREAD_GRAYSCALE)
    img_beng = cv2.imread("bh3/03.png", cv2.IMREAD_GRAYSCALE)
    img_login = cv2.imread("bh3/04.png", cv2.IMREAD_GRAYSCALE)
    img_message = cv2.imread("bh3/09.png", cv2.IMREAD_GRAYSCALE)
    img_daily = cv2.imread("bh3/17.png", cv2.IMREAD_GRAYSCALE)
    img_confirm = cv2.imread("bh3/18.png", cv2.IMREAD_GRAYSCALE)

    print "opening application..."
    start_menu = bf.findLocWithKp(img_start)
    bf.animateMoveAndClick(bf.getCurPos(), start_menu)
    time.sleep(2)
    mumu = bf.findLocWithKp(img_mumu)
    bf.animateMoveAndClick(bf.getCurPos(), mumu)
    counter = 0
    while True:
        print "waiting..."
        counter += 1
        bengbengbeng = bf.findLocWithKp(img_beng)
        if bengbengbeng[0] != 0 and bengbengbeng[1] != 0:
            break
        if counter > 15:
            exit()
        time.sleep(5)
    print "opening game..."

    bf.animateMoveAndClick(bf.getCurPos(), bengbengbeng)
    counter = 0
    while True:
        print "waiting..."
        login = bf.findLocWithKp(img_login)
        if login[0] != 0 and login[1] != 0:
            break
        if counter > 15:
            exit()
        time.sleep(5)
    bf.animateMoveAndClick(bf.getCurPos(), (login[0] + 300, login[1]))
    time.sleep(8)

    message_box = bf.findLocWithKp(img_message)
    if message_box[0] != 0 and message_box[1] != 0:
        bf.animateMoveAndClick(bf.getCurPos(), message_box)
    time.sleep(2)

    daily = bf.findLocWithKp(img_daily)
    if daily[0] != 0 and daily[1] != 0:
        bf.animateMoveAndClick(bf.getCurPos(), daily)
        time.sleep(1)
        confirm = bf.findLocWithKp(img_confirm)
        bf.animateMoveAndClick(bf.getCurPos(), confirm)
    time.sleep(8)


def collectCoinsAuto():
    img_base = cv2.imread("bh3/05.png", cv2.IMREAD_GRAYSCALE)
    img_coin = cv2.imread("bh3/06.png", cv2.IMREAD_GRAYSCALE)
    img_confirm = cv2.imread("bh3/07.png", cv2.IMREAD_GRAYSCALE)
    img_back = cv2.imread("bh3/08.png", cv2.IMREAD_GRAYSCALE)

    counter = 0
    while True:
        print "waiting..."
        counter += 1
        base = bf.findLocWithKp(img_base)
        if base[0] != 0 and base[1] != 0:
            break
        if counter > 15:
            exit()
        time.sleep(5)
    bf.animateMoveAndClick(bf.getCurPos(), base)
    time.sleep(2)
    coins = bf.findLocWithKp(img_coin)
    bf.animateMoveAndClick(bf.getCurPos(), coins)
    time.sleep(2)
    confirm = bf.findLocWithKp(img_confirm)
    bf.animateMoveAndClick(bf.getCurPos(), confirm)
    time.sleep(2)
    back = bf.findLocWithKp(img_back)
    bf.animateMoveAndClick(bf.getCurPos(), back)
    time.sleep(2)


def adventureAuto():
    img_base = cv2.imread("bh3/05.png", cv2.IMREAD_GRAYSCALE)
    img_adventure = cv2.imread("bh3/14.png", cv2.IMREAD_GRAYSCALE)
    img_refresh = cv2.imread("bh3/11.png", cv2.IMREAD_GRAYSCALE)
    img_back = cv2.imread("bh3/08.png", cv2.IMREAD_GRAYSCALE)
    img_goto = cv2.imread("bh3/10.png", cv2.IMREAD_GRAYSCALE)
    img_onekey = cv2.imread("bh3/12.png", cv2.IMREAD_GRAYSCALE)
    img_confirm = cv2.imread("bh3/13.png", cv2.IMREAD_GRAYSCALE)
    img_home = cv2.imread("bh3/16.png", cv2.IMREAD_GRAYSCALE)

    base = bf.findLocWithKp(img_base)
    bf.animateMoveAndClick(bf.getCurPos(), base)
    time.sleep(2)

    venture = bf.findLocWithKp(img_adventure, numKps=5000)
    bf.animateMoveAndClick(bf.getCurPos(), venture)
    time.sleep(2)

    loc1 = bf.findLocWithKp(img_back)
    loc2 = bf.findLocWithKp(img_refresh)
    y_start = loc1[1]
    y_end = loc2[1]
    print y_start, y_end
    y_range = y_end - y_start

    task1_y_start = int(y_start + 0.194 * y_range)
    task1_y_end = int(y_start + (0.194 + 0.225) * y_range)
    task2_y_start = int(y_start + 0.434 * y_range)
    task3_y_start = int(y_start + 0.673 * y_range)

    screen = ig.grab()
    screen_cv = cv2.cvtColor(np.asarray(screen), cv2.COLOR_RGB2GRAY)
    task1_img = screen_cv[task1_y_start:task1_y_end, :]
    _, kp_task1 = bf.siftFlannMatch(img_goto, task1_img)
    mean_x_task = 0
    mean_y_task = 0
    for i in range(kp_task1.__len__()):
        mean_x_task += kp_task1[i][0]
        mean_y_task += kp_task1[i][1]
    mean_x_task = mean_x_task / kp_task1.__len__()
    mean_y_task = mean_y_task / kp_task1.__len__()

    target1 = (int(mean_x_task), int(task1_y_start + mean_y_task))
    target2 = (int(mean_x_task), int(task2_y_start + mean_y_task))
    target3 = (int(mean_x_task), int(task3_y_start + mean_y_task))

    bf.animateMoveAndClick(bf.getCurPos(), target1)
    time.sleep(2)
    onekey = bf.findLocWithKp(img_onekey)
    bf.animateMoveAndClick(bf.getCurPos(), onekey)
    time.sleep(2)
    confirm = bf.findLocWithKp(img_confirm)
    bf.animateMoveAndClick(bf.getCurPos(), confirm)
    time.sleep(2)

    bf.animateMoveAndClick(bf.getCurPos(), target2)
    time.sleep(2)
    bf.animateMoveAndClick(bf.getCurPos(), onekey)
    time.sleep(2)
    bf.animateMoveAndClick(bf.getCurPos(), confirm)
    time.sleep(2)

    bf.animateMoveAndClick(bf.getCurPos(), target3)
    time.sleep(2)
    bf.animateMoveAndClick(bf.getCurPos(), onekey)
    time.sleep(2)
    bf.animateMoveAndClick(bf.getCurPos(), confirm)
    time.sleep(2)
    home = bf.findLocWithKp(img_home)
    bf.animateMoveAndClick(bf.getCurPos(), home)
    time.sleep(2)


if __name__ == '__main__':
    openBh3Auto()
    collectCoinsAuto()
    adventureAuto()
对于流程中有一些等待时间不确定的步骤,采用了while循环,每隔5秒检查一次,最多检查15次。运行效果如下。
(2)阴阳师
其实相比于崩坏3,阴阳师更适合于自动操作脚本,尤其是上面说到的觉醒材料副本。写了个自动打开游戏,然后刷觉醒副本的脚本。
# coding=utf-8
import baseFunctions as bf
import cv2
import time


def openYysAuto():
    img_start = cv2.imread("yys/01.png", cv2.IMREAD_GRAYSCALE)
    img_mumu = cv2.imread("yys/02.png", cv2.IMREAD_GRAYSCALE)
    img_yys = cv2.imread("yys/03.png", cv2.IMREAD_GRAYSCALE)
    img_announce = cv2.imread("yys/04.png", cv2.IMREAD_GRAYSCALE)
    img_enter = cv2.imread("yys/05.png", cv2.IMREAD_GRAYSCALE)

    print "opening application..."
    start_menu = bf.findLocWithKp(img_start)
    bf.animateMoveAndClick(bf.getCurPos(), start_menu)
    time.sleep(2)
    mumu = bf.findLocWithKp(img_mumu)
    bf.animateMoveAndClick(bf.getCurPos(), mumu)
    counter = 0
    while True:
        print "waiting..."
        counter += 1
        yys = bf.findLocWithKp(img_yys)
        if yys[0] != 0 and yys[1] != 0:
            break
        if counter > 15:
            exit()
        time.sleep(5)
    print "opening game..."

    bf.animateMoveAndClick(bf.getCurPos(), yys)
    time.sleep(15)
    bf.animateMoveAndClick(bf.getCurPos(), yys)
    time.sleep(10)
    announce = bf.findLocWithKp(img_announce)
    bf.animateMoveAndClick(bf.getCurPos(), (announce[0], announce[1] - 80))
    time.sleep(1)
    enter = bf.findLocWithKp(img_enter)
    bf.animateMoveAndClick(bf.getCurPos(), enter)
    time.sleep(5)
    bf.animateMoveAndClick(bf.getCurPos(), enter)
    time.sleep(8)


def juexingAuto(type, times=5):
    img_explore = cv2.imread("yys/06.png", cv2.IMREAD_GRAYSCALE)
    img_juexing = cv2.imread("yys/07.png", cv2.IMREAD_GRAYSCALE)
    img_huo = cv2.imread("yys/08.png", cv2.IMREAD_GRAYSCALE)
    img_feng = cv2.imread("yys/09.png", cv2.IMREAD_GRAYSCALE)
    img_shui = cv2.imread("yys/10.png", cv2.IMREAD_GRAYSCALE)
    img_lei = cv2.imread("yys/11.png", cv2.IMREAD_GRAYSCALE)
    img_challenge = cv2.imread("yys/12.png", cv2.IMREAD_GRAYSCALE)
    img_prepare = cv2.imread("yys/13.png", cv2.IMREAD_GRAYSCALE)
    img_confirm = cv2.imread("yys/14.png", cv2.IMREAD_GRAYSCALE)
    img_close = cv2.imread("yys/15.png", cv2.IMREAD_GRAYSCALE)
    img_back = cv2.imread("yys/16.png", cv2.IMREAD_GRAYSCALE)

    time.sleep(4)
    explore = bf.findLocWithKp(img_explore)
    bf.animateMoveAndClick(bf.getCurPos(), explore)
    time.sleep(5)
    juexing = bf.findLocWithKp(img_juexing)
    bf.animateMoveAndClick(bf.getCurPos(), juexing)
    time.sleep(3)

    if type == 1:
        exe_type = bf.findLocWithKp(img_huo)
    elif type == 2:
        exe_type = bf.findLocWithKp(img_feng)
    elif type == 3:
        exe_type = bf.findLocWithKp(img_shui)
    elif type == 4:
        exe_type = bf.findLocWithKp(img_lei)

    bf.animateMoveAndClick(bf.getCurPos(), exe_type)
    time.sleep(2)

    for i in range(times):
        print i + 1, '/', times
        challenge = bf.findLocWithKp(img_challenge)
        bf.animateMoveAndClick(bf.getCurPos(), challenge)
        time.sleep(10)
        prepare = bf.findLocWithKp(img_prepare)
        bf.animateMoveAndClick(bf.getCurPos(), prepare)
        time.sleep(50)

        counter = 0
        while True:
            print "waiting..."
            counter += 1
            confirm = bf.findLocWithKp(img_confirm)
            if confirm[0] != 0 and confirm[1] != 0:
                break
            if counter > 15:
                exit()
            time.sleep(5)
        bf.animateMoveAndClick(bf.getCurPos(), confirm)
        time.sleep(3)
    close = bf.findLocWithKp(img_close)
    bf.animateMoveAndClick(bf.getCurPos(), close)
    time.sleep(2)
    back = bf.findLocWithKp(img_back)
    bf.animateMoveAndClick(bf.getCurPos(), back)


if __name__ == '__main__':
    openYysAuto()
    juexingAuto(1, 2)
    juexingAuto(2, 1)
    juexingAuto(3, 1)
    juexingAuto(4, 1)
演示效果如下。视频里让电脑自动刷了两遍火,其它各一遍。
终于可以把手机扔在那里,让电脑自动刷一下午了。最后完整项目代码放在了Github上,点击查看。
本文作者原创,未经许可不得转载,谢谢配合